The Picture Tube tool allows you to stamp a graphic onto your image with a single click, or even spray a number of graphics to create a streamer effect. This is perfect for embellishing scrapbook photos, or creating your own picture frames. In this tutorial, we’ll show you how to use the existing picture tubes that come with PaintShop Pro, and how to create your own picture tubes.
Want to learn more? Watch our webinar on Working with Picture Tubes in PaintShop Pro for an in-depth look at how to use picture tubes and how to create your own.
Thanks for watching! We hope you found this tutorial helpful and we would love to hear your feedback in the Comments section at the bottom of the page. You will find a written version of this tutorial below, and a printable PDF copy to download on the Download Resources tab above.
Download your FREE 30-day trial and make every shot your best shot with PaintShop Pro 2023, your all-in-one photo editing and design software.
Download these free resources:
Written tutorial (PDF, 215 KB)
PaintShop Pro resources
Keyboard shortcuts (PDF, 173 KB)
PaintShop Pro User Guide (PDF, 25.4 MB)
What’s New in PaintShop Pro
PaintShop Pro Tools
Artistic Tools and Projects
Featured products
 PaintShop Pro 2023 Ultimate
 AI HDR Studio 3.0
 PaintShop Pro 2023
 Vision FX
How to Use the Picture Tube Tool
In this tutorial, you’ll learn how to use the Picture Tube tool to paint with a collection of objects. For example, you can add a stream of hearts and kisses to a picture of a couple, or frame a picture with flowers. You can use one of the picture tubes included with PaintShop Pro or create your own.
This tool is great for any of your graphic design projects or if you want to create your own scrapbook style photos or picture frames.
Click on any of the images below to view full-size.
What Are Picture Tubes?
Picture tubes are PspTube files. Each picture tube file is made up of a series of images arranged in rows and columns, called cells. Picture tubes may have any number of cells. As you paint with the Picture Tube tool, PaintShop Pro paints one image from the picture tube after another. Many picture tubes create discrete images (such as Autumn leaves), and others create the effect of a continuous image (such as grass). Here is an example of what a picture tube source file looks like:
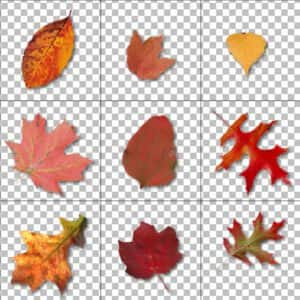
Picture Tube Basics
Open the image you want to use the Picture Tube tool on. To activate the tool, click on the Picture Tube tool icon on the Tools toolbar or press I on your keyboard.
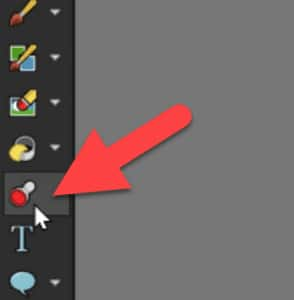
When you activate the Picture Tube tool, the Tool Options palette will provide a number of settings that you can adjust.

To view the collection of picture tubes that are included with PaintShop Pro, click on the Picture Tube drop-list.
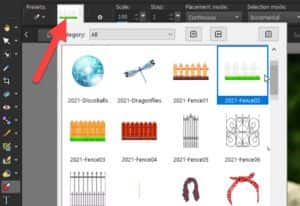
- Use the Scale slider to adjust the size of the picture tube.
- Adjust the Step level, which determines the distance in pixels between the center of each picture tube image.
- The Placement mode determines how the images are placed. Choose Continuous to space the images evenly by step size, or choose Random to randomly space the images, with intervals ranging from 1 pixel to the step size.
Before starting to paint with a picture tube, we highly recommend that you enable the Create as new raster layer option.

This allows you to add your picture tubes on a new layer, which gives you much more flexibility and creative options, plus it preserves your original image on its own layer.
When picture tube images are on a separate raster layer, you can move and resize them, adjust the layer transparency, use layer blend modes, add effects like a drop shadow, and more.
How to Use Picture Tubes
- Select a picture tube from the Picture Tube drop-list.
- Make any adjustments you want to the settings on the Tool Options You may need to try out the picture tube with the default settings first, then make any setting changes to suit your project.
Once you have the settings adjusted to your liking, you can click once on your image to place one picture tube image or click and drag to place a stream of picture tube elements to create a continuous image, such as a fence, rope, chain, or grass blades.
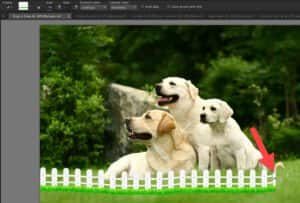
You can also combine single picture tube images with continuous images, as in this example with the disco balls.

How to Create Your Own Custom Picture Tubes
Although there are many different picture tubes included with PaintShop Pro, you may want to create your own custom picture tubes. For this example, we’ll make a summer fruits picture tube.
Step 1 – Choose your Images
Gather all the photos you to include in your picture tube. Use photos of objects that already have a transparent background, or photos in which the object stands out from the background so it will be easy to separate and remove the background.
Step 2 – Removing the Background
If the object is not already on a transparent background, you will need to remove the background before adding it to your picture tube. Our first image is this watermelon:

In this case, because the background is a solid white color, the easiest way to remove the background is with the Background Eraser tool.
- Select the Background Eraser tool on the Tools
- Choose the brush shape and size on the Tool Options
- With slow, careful strokes, drag around the edges of the object you want to isolate. Keep the brush tip at the center of the tool icon on the areas that you want to erase.
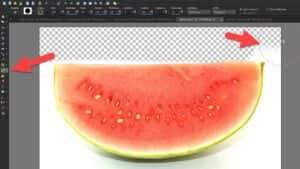
To learn more, watch our full tutorial Creating Transparent Backgrounds with the Background Eraser.
Repeat this process for all your images. If you want to save each image with a transparent background, make sure to save as PNG format.
Step 3 – Creating the Picture Tube
Once you have a collection of images with transparent backgrounds, you are ready to combine them to make the picture tube.
Start by creating a new PaintShop Pro image by going to File > New. The size of the new document will depend on the number of images you want to include in your picture tube. Remember, each image in the picture tube is placed in its own cell, and each cell should be the same height and width.
- In this example, we have 6 images so we will set the Width to 600 and the Height to 400 pixels. This will allow us to place the images 3 across and 2 down.
- Make sure that Raster Background is selected and enable the Transparent checkbox.
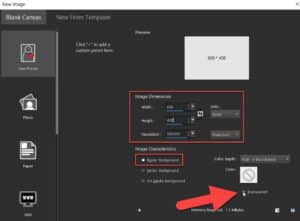
Now we should create a visible grid to help us place our pictures on this blank canvas.
- Go to View > Grid, Guide & Snap Properties.
- Click the Grid tab.
- In the Current image settings section, change the Horizontal grids to 200 Pixels because the canvas is 600 pixels wide, and we want three cells horizontally.
- Change the Vertical grids to 200 pixels, because we want 2 cells vertically and our canvas height is 400 pixels.

- TIP: You may also want to click on the Color icon under Current image settings to change the color of the grid lines so that they are more visible against the transparent background.
- Press OK.
Make sure View > Grid is enabled, and you can see we have 6 even cells for our pictures. Now we will copy and paste all our picture tube images onto this blank canvas.
- Select your first image with the Pick tool.
- Go to Edit > Copy (or use Ctrl + C) then switch to the blank canvas image and go to Edit > Paste as New Layer (or use Ctrl + V).
- Repeat the copy/paste process for each image until they are all on the blank canvas.
- Use the Pick tool to resize and reposition all images evenly within the six cells.
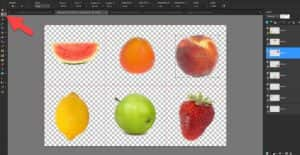
- In the Layers palette, right-click a layer and select Merge > Visible to create one raster layer.
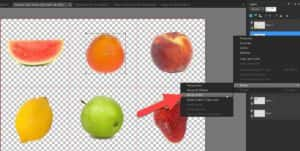
Step 4 – Save and Export the Picture Tube File
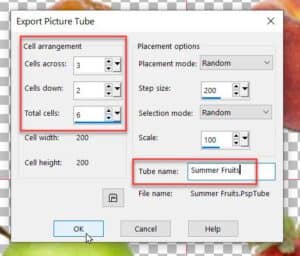
Click on File > Export > Picture Tube. The Export Picture Tube dialog box will pop up. In the Cell arrangement section, make sure to enter the values that match your grid. In this case, we will put 3 cells across and 2 cells down.
You can make any adjustments to the default Placement options, but these can always be changed in the Tool Options palette when you go to use the picture tube.
Name your picture tube and press OK.
Test out your new picture tube by opening a new image and selecting the Picture Tube tool. Open the Picture Tube drop-list and you’ll see that your new picture tube is available here.
Now we can paint with our custom picture tube as we did in the first example and make any adjustments on the Tool Options palette.

The Picture Tube tool is a fun way to create picture frames and add a splash of graphic images to your design projects. What kind of picture tubes will you create?
Download your FREE 30-day trial and make every shot your best shot with PaintShop Pro 2023, your all-in-one photo editing and design software.


Reader Interactions