
In this tutorial, you’ll learn how to create a double exposure photo effect in PaintShop Pro using the selection tools, layer blend modes, and various adjustments to touch up and fine tune your final image.
Thanks for watching! We hope you found this tutorial helpful. You will find a written version of this tutorial below, and a printable PDF copy to download on the Download Resources tab above.
Download these free resources:
Written tutorial (PDF, 1 MB)
PaintShop Pro resources
Keyboard shortcuts (PDF, 173 KB)
PaintShop Pro User Guides
Partner and User websites
PaintShop Pro User Forum
Scrapbook Campus (Tips and tricks, workshops, master classes, and more)
Creation Cassel (Scripts, picture tubes, and other PaintShop Pro tools, plus weekly freebies)
PaintShop Pro Maniacs (Facebook group)
PaintShop Pro (Facebook group)
Download your FREE 30-day trial and make every shot your best shot with PaintShop Pro, your all-in-one photo editing and design software.
What’s new in PaintShop Pro
Artistic tools and projects
Working with selections
Featured products
 PaintShop Pro 2023 Ultimate
 AI HDR Studio 3.0
 PaintShop Pro 2023
 Vision FX 2.0
How to create a double exposure effect
The double exposure photo effect is a photo editing technique that combines 2 different photos into one surreal image, often with symbolism or deeper meaning.
Click on any of the images below to view full-size.
If you’re not familiar with some of the tools we’re using, here are some additional tutorials you may find helpful:
Smart Selection Brush
Refine Brush
Layer Blend Modes
Eraser Tool
For this tutorial, we are using the Complete workspace. Go to File > Workspace and make sure Complete is checked.
STEP 1: Open your primary image
The primary image is your subject, and you’ll be superimposing and blending the secondary image into the primary image. You can use any image you want, but images that have a solid background or minimal background noise will make it easier to select and isolate the main subject.
Open your file in the Edit workspace, either by dragging and dropping into the interface from your computer or using File > Open to browse and locate your image.
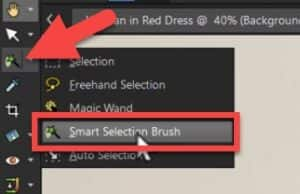
STEP 2: Isolate your subject
Use one of the Selection tools to select the subject of your image, such as the Smart Selection Brush.
Change the Mode type on the Tool Options palette to Add (Shift).
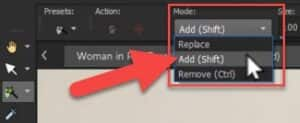
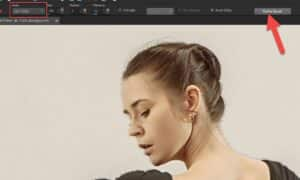
Click on the subject of your image to select it. Most likely, you will need to click and drag around the interior of your subject to select it completely.
You can set your Mode to Remove (Ctrl), if you need to remove from the selection.
To learn more about using the Smart Selection Brush and perfecting your selections, watch our full tutorial Making a fine-detail selection.
If the image you are using contains fine details that are difficult to select, you can use the Refine brush to brush over any areas that are difficult to select. NOTE: The Refine Brush button on the Tool Options palette is only visible when the Smart Selection Brush is active.
To learn more, watch our full tutorial Using the Refine Brush.
At this stage, don’t worry if you are finding it difficult to make your initial selection perfect, as you can fix this later using tools to erase bits or smooth any rough edges. With this in mind, it is better to “over-select” in the beginning, as it is much easier to remove parts of your selection later, rather than having to redo it completely to bring back any areas that were excluded from your initial selection.
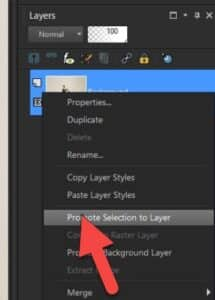
Once the selection is complete, right-click on the Background layer in the Layers palette and choose Promote Selection to Layer.
Deselect your subject by going to Selections > Select None or press Ctrl + D.
To further isolate the subject, add a solid white layer between the Promoted Selection layer and Background layer. To do this, click on the New Layer icon at the bottom of the Layers palette. Choose New Raster Layer and press OK.
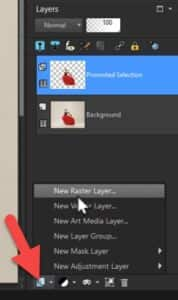
NOTE: If the Promoted Selection layer is active when you add a new layer, you’ll have to drag the white layer down below it in the Layers palette. Alternatively, you can make the Background layer active before adding the new raster layer.
Select the Flood Fill tool and set the Foreground and Stroke Properties swatch to white in the Materials palette. Then click on the new layer to fill with white.

STEP 3: Adjust the primary image (optional)
For our double exposure image, we’re using a popular style that has the primary image in black and white. But you can also choose to keep your primary image in full color, or slightly desaturated for muted colors.
Instead of applying the adjustments directly to the promoted selection layer, it is better to use Adjustment layers in this step. With Adjustment layers, you can easily edit them later on in the project, toggle the layer visibility on and off to compare results with and without the adjustment, or even delete the Adjustment layer completely if you decide you don’t want it.
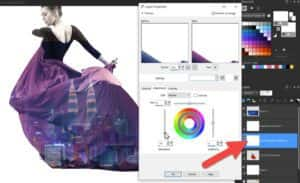
To convert the subject to black and white, select the Promoted Selection layer and go to Layers > New Adjustment Layer > Hue/Saturation/Lightness. Drag the Saturation slider to -100.
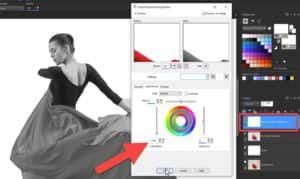
Depending on the image you’re working with, you may want to adjust the brightness and/or contrast also, since the double exposure photo effect will show up mostly in dark areas of your photo.
To do this, go to Layers > New Adjustment Layer > Brightness/Contrast and adjust the settings to your liking.
STEP 4: Add your secondary image
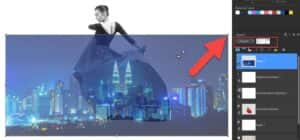
Open the second image that you want to blend with your subject. Go to Edit > Copy (or Ctrl + C) to copy the image, then return to your primary image and go to Edit > Paste as new layer (or Ctrl + V) to paste the image on top of the Promoted Selection layer.
Use the Pick tool to adjust the nodes as needed so the secondary image covers the main image. You can resize, reposition and even rotate the secondary image to get it positioned perfectly over your subject.
TIP: You can temporarily lower the layer opacity to help position the secondary image.
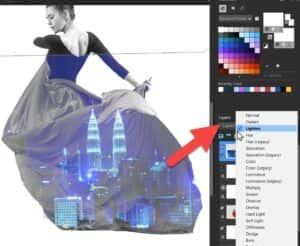
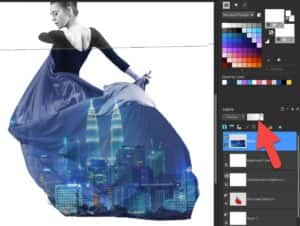
STEP 5: Change the Blend mode
At the top of the Layers palette, choose Lighten from the drop list of blend modes.
Lighten usually works best, but you can explore some other blend modes like Screen, Dodge, or Overlay to see what results you prefer.
Adjust the size and position of the top layer if needed for a more pleasing composition. You may also wish to adjust the layer opacity of the secondary image depending on the intensity of the effect you are going for.
Now that you have your double exposure completed, you can modify the Brightness/Contrast adjustment layer to bring out more of either image, if necessary. Or adjust the Hue/Saturation/Lightness layer if you wish to bring some color into the primary image or change the hue.
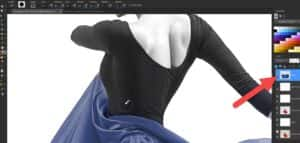
STEP 6: Final touch-ups with the Eraser tool
At this point, your double exposure image is complete, but you may want to use the Eraser tool for some final touch-ups. You can use the Eraser tool to:
- Clean up the edges of an imperfect selection on your primary image.
- Smooth and blend in any places where you’d like a softer transition instead of sharp edges, on either the primary or secondary image. To do this, lower the Hardness and Opacity levels on the Tool Options palette.
- Remove portions on the secondary image to isolate the double exposure area. In our example, we decided to keep the double exposure effect in the skirt only, so we erased the portions of the secondary image that were on the woman’s body.
And here’s our final image.

Now that you know the steps to create a double exposure photo effect, it’s time to make your own and share it in our Photo Gallery.
Download your FREE 30-day trial and make every shot your best shot with PaintShop Pro, your all-in-one photo editing and design software.
