
Before you get started creating slideshows and video projects, it’s helpful to understand the basics of setting up your project. In this tutorial we’ll review some key information such as how to adjust your project’s default settings, create project bins, import, and choose storage locations.
Thanks for watching! We hope you found this tutorial helpful and we would love to hear your feedback in the Comments section at the bottom of the page. You will find a written version of this tutorial below, and a printable PDF copy to download on the Download Resources tab above.
Download these free resources:
Written Tutorial (PDF, 508 KB)
Pinnacle Studio User Guide and Help Files
Studio Backlot
Pinnacle learning center
YouTube
Download a FREE 15-day trial and discover all the essential and advanced video editing features that Pinnacle Studio delivers to make your videos look their best.
What’s New in Pinnacle Studio
Beginner Video Editing Techniques
Featured products
 Pinnacle Studio 26 Ultimate
 Studio Backlot Membership
 Pinnacle Studio 26
 Vision FX 2.0
Setting up your Project
Before you get started creating slideshows and video projects, it’s helpful to understand the basics of setting up your project. In this tutorial we’ll review some key information such as how to adjust your project’s default settings, create project bins, import, and choose storage locations.
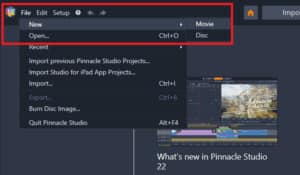
Open Pinnacle Studio then click on File > New > Movie. This will open up a new timeline where you can start building your slideshow or video.
Creating a Project Bin and Importing Media
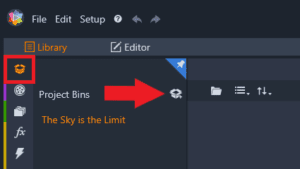
We want to build a Project Bin with all the media we’re going to use for this project. Click on the Project Bin icon in the left toolbar, then select the Create a New Project Bin icon. Name your new Project Bin whatever you would like to call your project, for example Family Fun Slideshow.
Now we can add our media to the new Project Bin.
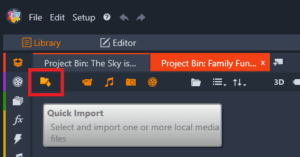
Click on the Quick Import icon and browse to the file folder that contains your assets, such as video clips, photos, audio tracks or music. Hold down the Shift key and click to select all the media you want to use, then click Open.
Tip: if you click and hold down your left mouse key, you can drag your mouse around the files to select them all at once.
You can also add media from a file folder open on your computer by dragging and dropping it directly into your Project Bin.

Adjusting Default Project Settings
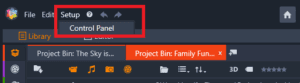
Go to Setup, then select Control Panel.
In the Control Panel window there are a number of options. Let’s start by clicking on Project Settings.
- Under New Movie Project Format, you can select the default resolution for every newly created project.
- You can also select the option to Detect format from first clip, so that the first clip added to the project will be used as the default format.
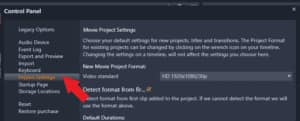
Note: The movie project format can be changed at any time by clicking on the Timeline Settings icon at the left of the Timeline toolbar
Under Project Settings, you can also set the Default Duration for new titles, stills and transitions.
Enabling Ruler Zooming will allow you to zoom in on your timeline when you drag to the right along the ruler (and zoom out by dragging to the left).
Adjusting Import Settings
Let’s look Import next. This is where you can view and change the default storage locations for media and projects that are physically copied when you use the Importer to import into your library.
Note: if you use the Quick Import feature, this will simply link to existing files without relocating them.
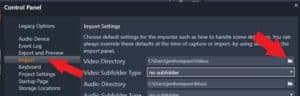
To change the default video, audio, image, and project directory, click on the browse button and select a new folder.
Once you have selected a base folder, you can also optionally set up a subfolder. Choose Custom to name the folder, or select to have imports filed by:
- Today (subfolder named with the current date YYYY-MM-DD)
- Creation Date (subfolder named with the creation date of the asset)
- Current Month (subfolder named with the current month YYYY-MM)
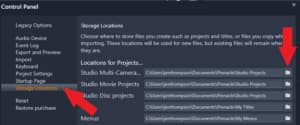
Adjusting Storage Locations
This section allows you to choose where to save media and projects that you create, including your movie projects, disc projects, titles and more. To change where you’d like these projects to be stored, simply click on the browse folder to select a new folder.
Changing Default Startup Page
Here you can select which workspace tab will display when you launch Pinnacle Studio such as the Edit or Author tab.
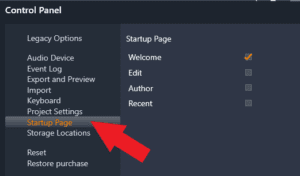
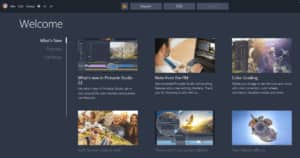
By default, the Welcome page is selected. We suggest keeping the Welcome page as your default startup page since it is regularly updated with new tutorials, special offers, product updates, contests, freebies and more.
Once you have finished making any adjustments to the settings, click Apply to save your new settings. Then click OK.
Now you are ready to start creating your first Pinnacle Studio project!
Download a FREE 15-day trial and discover all the essential and advanced video editing features that Pinnacle Studio delivers to make your videos look their best.

Comments (5)
Reader Interactions
Comments
C’è la possibilità dim ottenere l’esercitazione in italiano? Se si, come procedere? Grazie
Ciao Antonino
Questo tutorial non è disponibile in italiano ma puoi visualizzare il video con i sottotitoli in italiano.
Attiva i sottotitoli nell’angolo in basso a destra del video player.
Fare clic sull’icona Impostazioni e selezionare Sottotitoli > Traduzione automatica, quindi selezionare la lingua.
Inoltre, ecco le informazioni nella Guida per l’utente https://help.pinnaclesys.com/pinnacle/how-to/it/help/index.html#page/pinnacle-studio/h1-setup-and-preferences.html#
Spero questo sia di aiuto!
Discovery Center team
C’est dommage que les tutos ne soient pas en Français. Je ne parle pas Anglais.
Bonjour LIABAUD,
Pour voir les sous-titres dans votre langue :
– Cliquez sur l’icône “Settings/Paramètres” dans le coin inférieur droit du lecteur video
– Cliquez sur “Subtitles/Sous-titres” et sélectionnez votre langue
– Si votre langue n’est pas répertoriée, cliquez sur “English (auto-generated)”, puis sur “Auto-translate” et sélectionnez votre langue.
Cordialement,
Discovery Center team
ou se trouve le lecteur video SVP,?