
Find a collection of creative tools and features within CorelDRAW that will help you seamlessly design a magazine in record time with this this step-by-step tutorial. Learn the full process from document setup through to finished, print-ready PDF.
In this tutorial, you will learn how to:
- Set up a document
- Adjust the margins
- Define text styles
- Identify master objects
- Insert page numbers
- Add finishing touches
Start your FREE 15-day trial and embark on a design journey with powerful tools for vector illustration, layout, photo editing, typography, and collaboration.
Download these free resources:
Written Tutorial (PDF, 662 KB)
CorelDRAW Graphics Suite Resources
Quick Start Guide (PDF, 2 MB)
Keyboard Shortcuts (PDF, 3.5 MB)
CorelDRAW and Corel PHOTO-PAINT user guides
For CorelDRAW Graphics Suite subscription and perpetual licenses (2018 to 2024), languages include English, Português do brasil, 简体中文, 繁體中文, Čeština, Deutsch, Español, Français, Italiano, 日本語, Polski, Русский
What’s New in CorelDRAW Graphics Suite
How to Design a Magazine
Step 1: Setting up a Document
To help with the design process, we need to have a visual on screen of what we want printed. It’s important to use the actual magazine size, so that we have an accurate representation of the final work.
For example, if we want the final magazine size to be 190 x 270 mm when closed, then the open magazine size would be 380 x 270 mm.
First, we need to create a New Document (Ctrl+N), and the initial page size doesn’t matter. Double-clicking on the page border will quickly take you to Layout > Document Options. Next, we choose the correct size, 380 x 270 mm, and the orientation as “Landscape“.
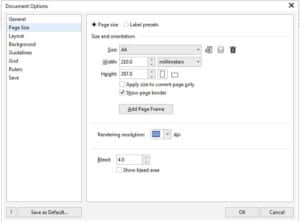
In the setup , the “bleed” must be active, and the default size set to 4 mm. The bleed refers to the surplus area around the page for cutting. The bleed is very important if the page has a background or an object that reaches the edge, so that when it’s cut there is no white border. Remember to make objects or the background larger than the page in order to exceed the page limits.
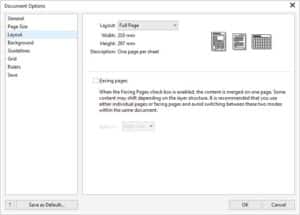
Next, we choose Design > Layout and choose “Booklet” and activate the option to see “Opposite pages“. We click Accept and add the number of pages we need. In this case, we will make a magazine totaling 48 pages, so we will need to add 47 more pages.
Design Tip: The number of pages must always be divisible by 4.
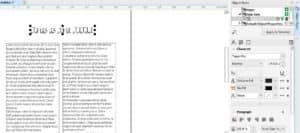
The first visual shown above represents a finished magazine. It depicts the first page or cover of a closed magazine. The next diagram shows what the pages would look like when reading the magazine. This is a helpful reference when placing objects or images that occupy more than one page.
However, if we export the magazine as a PDF there will be individual pages for imposition (part of the prepress printing process), and if an object occupies more than one page it will be automatically divided.
Step 2 – Adjusting the Margins
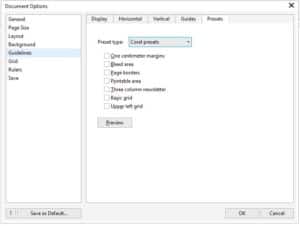
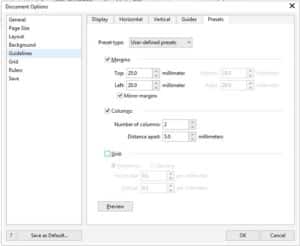
An important consideration when you design a magazine is having harmony and visual balance, which can be achieved using guides and margins in CorelDRAW. Go to Layout > Document Options and choose the “Guidelines” section. Here we can set the desired margins, such as 25 mm for the upper margin and 20 mm for the lower one.
Design Tip: The outer and inner margins can be mirrored to preserve the visual symmetry of the magazine.
Additionally, we can divide the content into columns, which will allow us to adjust the content to a specific space, giving our magazine a unique look or layout. We can also adjust the distance between columns.
Step 3 – Define Styles
The correct use of typography will help us to define the “personality” of the magazine. If we use a different font on each page, or if we mix serif fonts with non-serif fonts, the magazine would lack cohesiveness. In order to handle all of the text for 48 pages or more, we can use the Text Styles option instead of doing it page by page.
Design Tip: When you change a style, it is instantly changed on all pages.
In order to accomplish this, we need to open the Text and Graphic Styles docker (Ctrl + F5). We can easily add a style by dragging an object, in this case text, to the docker on “Style Sets“. There, we can define everything we want, such as typeface, size, color, alignment and more. We can create as many styles as we need, but it is good to have only a few basic ones in order to maintain control.
Additionally, if we select a style with the right mouse button, we can change the name to identify it easily. We can use simple names such as Titles, Sub-titles, body of text, foot of images, etc. We can also add a keyboard command to save time.
For example, I usually use the numeric keypad to create these naming conventions:
- Ctrl + NumPad 0 for Title
- Ctrl + NumPad 1 for Subtitles
- Ctrl + NumPad 3 for Body text
In the future, I can simply use a keyboard command to change all the attributes, without having to change them manually.
However, if we want to modify the font or color of all the titles, then we would edit the corresponding Style, so all of the pages will be modified simultaneously to optimize design time.
Design Tip: Text can be modified individually, despite having a style applied, without affecting the rest.
Step 4 – Color Styles
Similarly, we can create and define Color Styles for the magazine, regardless of the color used in the Text and Graphic Styles.
For example, suppose that in the current edition we are using the basic colors of blue and yellow. Note that is does not matter what color it is, nor whether they are spot colors or CMYK colors.
Simply open the Color Style docker (Ctrl + F6) and drag an object with the desired color to the docker, on “Create a Style” or on “Create a Harmony“.
This second option will allow us to create lighter or darker shades of the chosen color by clicking on the “Create New Harmony” icon and choosing “Create Gradient“. Each of these percentages can be applied to individual objects or groups in the file.
If we decide that the colors will be orange and violet for the next edition of our magazine, we won’t need to modify the colors page by page. Instead, we can simply modify the Color Style in order to apply the new color changes to the entire magazine. In addition, the percentages of the applied colors will also automatically change as well.
Step 5 –Master Objects
Sometimes, the magazine must include an image or logo that is repeated on every page, in the same place. For those instances, we will place the image or item into a Master Layer.
Go to the Objects menu and select Objects. Once the Objects docker is open, click on the New Master Layer icon, which is located in the bottom left of the Objects docker.
We can assign the name we want, and we can place it “above” the other layers (dragging it “up” to the Master Page) or “below” (dragging it below on the Master Page).
Step 6 – Page Numbering
To keep our magazine content in order, we can number our pages. Go to Layout > Insert Page Number. Although we have several options, we should choose “in all pages”.
Design Tip: Numbering is a Master Layer within the Master Page
We can change the position, font, color, size, etc. of the numbering at any time, and it will be applied to all pages automatically.
Step 7 – Final Considerations
As you design a magazine, here are some additional tips and tricks to help you in the process:
- Although the choice of the Color Profile should be one of the first actions (it is part of the dialog box when creating a “New Document”), we have intentionally omitted it in this tutorial to avoid confusion.
- Note that the Color Profile can be defined or modified at any time, in the Tools > Color Management menu, under the document settings section.
- If you are going to print your magazine, it is important that you choose the main color mode as CMYK, and that you choose the profile according to the correct region (Europe, North America, Japan, etc.). Similarly, all objects and images must be in CMYK at 300 dpi at the actual size because you will lose resolution when enlarging an image.
- If you are going to publish your magazine online, then RGB should be used. Make sure that the objects and images have equal RGB, which are lighter files and do not need as much resolution—between 96 and 150 dpi will be enough.
- If you are going to output to your printer, and have followed the previous steps outlined above, go to File > Print > Print Preview and it will automatically place the last page with the first one, and so on, until you finish at the center of the magazine.
- If we export the magazine as a PDF, the pages will be individual and suitable for use in any Imposition software which will help arrange the pages on a printer’s sheet in prepress. It’s important to remember to enable the “bleed” box (even if the document already has it) to activate the cutting marks.
 CorelDRAW Graphics Suite
 Ultimate Vector Bundle Vol. 1
 CorelDRAW Standard 2021
 Ultimate Vector Bundle Vol. 2
 Corel Vector
Start your FREE 15-day trial and embark on a design journey with powerful tools for vector illustration, layout, photo editing, typography, and collaboration.

Comments (2)
Reader Interactions
Comments
We couldn’t upload our e magazine online as the texts are not readable when I export as JPEGs from my CorelX7 file. I couldn’t find sharp text even I export it in 300 Resolution. Text are blurred
But I need my text sharp and visible in my JPEGs like how it looks on pdf file. Could you give us a suggestion…
Hi Jenifer,
Is it possible that you can upload your e-magazine in a different format other than JPEG, such as PDF or PNG? JPEGs are a lossy image format, meaning that they are compressed to achieve small file sizes.
Best regards,
The Discovery Center team