
Learn how you can edit high definition content quickly, even when using an older or slower computer! VideoStudio offers an easy solution to allow HD video editing on slower computers with the Smart Proxy feature. By enabling Smart Proxy, smaller files will be generated in the background allowing you to edit high definition content and requiring fewer system resources.
In this tutorial, you’ll learn all about Smart Proxy editing, how to enable Smart Proxy, and create and manage Smart Proxy files!
Thanks for watching! We hope you found this tutorial helpful and we would love to hear your feedback in the Comments section at the bottom of the page. You will find a written version of this tutorial below, and a printable PDF copy to download on the Download Resources tab above.
Download a FREE 30-day trial and turn your best moments and life experiences into unique movies with this easy and fun video editor packed with intuitive tools and creative effects.
Download these free resources:
Written Tutorial (PDF, 253 KB)
VideoStudio User Guides and Help files
For VideoStudio X9 to 2023, languages include English, Deutsch, Français, Italiano, Nederlands, 简体中文, 繁體中文, 日本語
Intermediate and Advanced Techniques
What’s New in VideoStudio
Overlays and Templates
Featured products
 VideoStudio Pro 2023
 Studio Backlot Membership
 VideoStudio Ultimate 2023
 Vision FX
Faster Video Editing using the Smart Proxy Feature in VideoStudio
Video Studio offers an easy solution to allow HD video editing on older or slower computers with the Smart Proxy feature. By enabling Smart Proxy, smaller files will be generated in the background allowing you to edit high definition content without slowing down your computer.
In this tutorial, you will learn how to:
- Understand Smart Proxy editing
- Enable Smart Proxy
- Create and manage Smart Proxy files
- Change Smart Proxy settings
What is Smart Proxy?
With Smart Proxy editing, you use lower resolution proxy files for editing and previewing an HD video project. This means VideoStudio will require fewer system resources, which results in faster, smoother editing of HD video.
The proxy video is used only for editing. When it is exported, the proxy clip links back to the original HD video, so the final product will be full HD quality!
How to Enable Smart Proxy:
1. Go to the Settings tab.
2. Select Smart Proxy Manager from the dropdown menu.
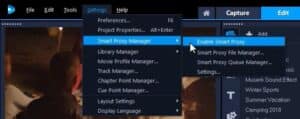
3. Select Enable Smart Proxy.
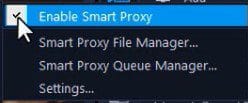
If you go back to the Smart Proxy Manager, you can see that Smart Proxy has now been enabled by the check mark.
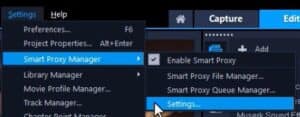
Changing the Location of your Proxy Folder
1. Go to the Settings tab.
2. Select Smart Proxy Manager from the dropdown menu.
3. Select Settings.
4. The Preferences dialog box will appear.
5. Under the Performance tab, you can view the default Proxy Folder that VideoStudio has created on your computer and choose to use this.
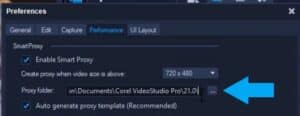
6. Or click the Browse button to select a different folder to store your proxy files.
7. Click OK.
Working with Smart Proxy Templates
Smart Proxy also allows you to customize your proxy files. By default, they are set to MPEG-4 files at 1080 resolution. You might want to change this if you prefer to work with a different file format such as AVI or want to change the default aspect ratio.
1. Go to the Settings tab.
2. Select Smart Proxy Manager from the dropdown menu.
3. Select Settings.
4. The Preferences dialog box will appear.
5. Under the Performance tab, deselect the Auto Generate Proxy Template icon.
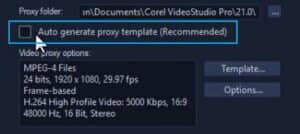
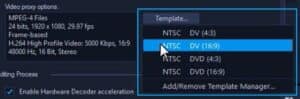
6. Select Template. From here you can choose a different format.
7. Now press OK to save your new settings.
Using Smart Proxy
Whenever Smart Proxy is enabled, proxy files are automatically created for any new projects when you move videos from the Library to the Timeline.
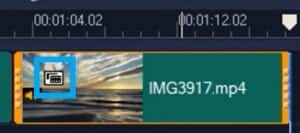
- Drag your video clip to the Timeline.
- Your video file will be automatically converted to a proxy file in the background.
- After conversion, an icon will appear on both the clip on the timeline and in the Library to show that a proxy file has been created.
Creating Smart Proxy Files Manually
If you created a project without Smart Proxy enabled, you can manually create proxy files within the project. To do this:
1. Right-click on your video clip.
2. Select Create Smart Proxy File.
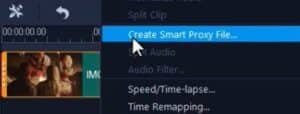
3. Then click OK.
After the conversion in the background has finished, you’ll see the Smart Proxy icon on your clip.
If you have multiple files on your Timeline that you need to convert manually:
1. Hold down Shift as you select each clip on the timeline.
2. Right-click and select Create Smart Proxy File.
Alternatively, you can right-click a video in the Library and choose Create Smart Proxy File.
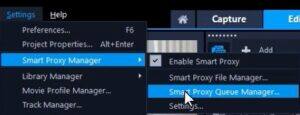
You can view the proxy file conversion progress by doing the following:
1. Go to the Settings tab.
2. Select Smart Proxy Manager from the dropdown menu.
3. Select Smart Proxy Queue Manager.
Download a FREE 30-day trial and turn your best moments and life experiences into unique movies with this easy and fun video editor packed with intuitive tools and creative effects.

Reader Interactions