
Adding a picture-in-picture effect is a great way to make you videos look more professional and polished. In this tutorial, we will show you two methods to create this effect: the first using overlays and the second using the Multi-Camera Editor. You will also learn how to apply some basic effects to the picture-in-picture window, such as adjusting transparency, adding a border, and adjusting the size and placement.
Thanks for watching! You will find a written version of this tutorial below, and a printable PDF copy to download on the Download Resources tab above.
Download a FREE 30-day trial and turn your best moments and life experiences into unique movies with this easy and fun video editor packed with intuitive tools and creative effects.
Download these free resources:
Written Tutorial (PDF, 752 KB)
Sample media for Project 1 (Zip file, 10.8 MB)
Sample media for Project 2 (Zip file, 42.7 MB)
VideoStudio User Guides and Help files
For VideoStudio X9 to 2023, languages include English, Deutsch, Français, Italiano, Nederlands, 简体中文, 繁體中文, 日本語
What’s new in VideoStudio
Effects, filters and transitions
Getting started with VideoStudio
Featured products
 VideoStudio Pro 2023
 Studio Backlot Membership
 VideoStudio Ultimate 2023
 Vision FX 2.0
How to create a picture-in-picture effect
In this tutorial, we’ll review 2 methods that you can use to easily create a picture-in-picture effect in your videos.
Click on any of the images below to view full-size.
Method 1: Picture-in-picture effect using overlays
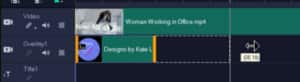
The first picture-in-picture method uses overlays placed on top of your main video clip. In this example, our main video clip is a video of a woman working in her office. To create a promotional video, we are going to add a second video in a picture-in-picture window and a logo.
- Open VideoStudio in the Edit tab and drag the main video clip onto the Video track on the timeline.
- Drag the business logo from your library onto the Overlay track.
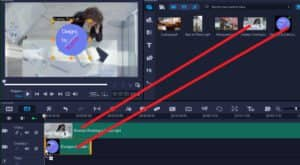
- Click on the nodes in the preview pane to adjust the size of the logo. You can also click and drag the logo to adjust its placement.
To adjust the duration length of the overlay:
- Hover your mouse over the edge of the clip until the arrow icon pops up and then click and drag to your desired length.
To add a second picture or video overlay:
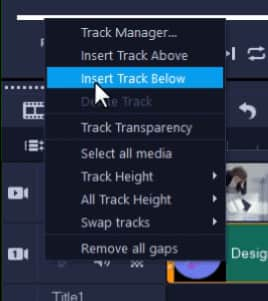
- Right-click on Overlay Track 1 and select Insert Track Below to add a second overlay track, where we will place the picture-in-picture video clip.
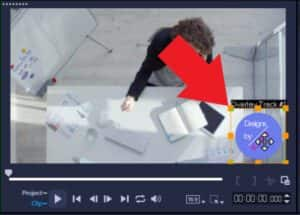
- Drag the second picture or video from your library onto Overlay Track 2 and adjust the size and position in the preview pane as needed.
How to adjust transparency level or add a border:
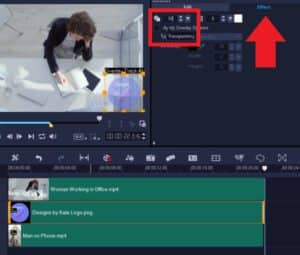
- Double-click on the logo overlay on the timeline to bring up the Editor panel, then click on the Effect
- Click on Mask & Chroma Key.
- Adjust the Transparency setting to about 50 to give a watermark effect.
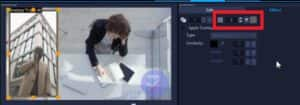
Now we will add a border around our picture-in-picture video clip. First, click on the video clip on Overlay track 2 to select it.
- On the Effect tab, click on Mask & Chroma Key.
- Enter a width in the Border field or use the “up” arrow to adjust the size of the border to your liking.
- You can also click on the Border Color icon to select a color that matches the color scheme of the video.
Now if you preview the video, you’ll see we’ve created a more professional-looking video by adding a picture-in-picture effect and logo overlay on top of the original video clip.

Method 2: Picture-in-picture effect using the Multi-Camera Editor
Another way to create a picture-in-picture effect is to use the Multi-Camera Editor. This method is especially useful if you want to play two or more video clips shot of the same scene from different angles.
For this example, we’ll use a video of a restaurant storefront as the main background and add a second video of a chef cooking a meal as our picture-in-picture effect.
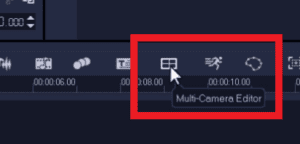
- Drag and drop your video clips into the media library then click on the Multi-Camera Editor icon on the Timeline toolbar.
- Drag the main clip you want to use as a background onto Track 1, and the cooking clip onto Track 2.

NOTE: You can have up to 6 tracks in VideoStudio Ultimate and 4 tracks in VideoStudio Pro.
- Once you’ve added your clips, click OK and the Multi-Camera Editor window will launch.
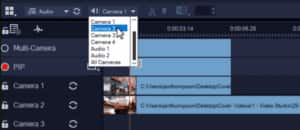
- Click on the Multi-Camera track in the timeline and then click on Video 1 and it will be automatically added to the multi-camera track.
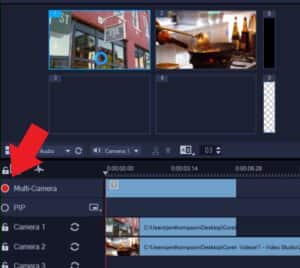
- Now click on the PIP track in the timeline (make sure the round button beside it is red, to indicate it is the selected track).
- You can have your picture-in-picture effect start at the beginning or drag your scrubber to the point on the timeline where you want to add your second video clip.
- Click on the Change PIP position icon beside the PIP track to adjust the location of where you want to place the picture-in-picture effect.

- Then click on Video 2, and it will be added to the PIP track at the point where you placed your scrubber.
NOTE: You can also choose which video you’d like the audio to come from by clicking on the Main Audio icon, if both videos have audio.
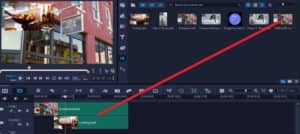
- Now click OK and the Multi-Camera Editor window will close. VideoStudio will create a .VSP file and add it to the media library.
- Drag the .VSP file onto the timeline and you’ll see that the picture-in-picture video clip has been automatically trimmed to match the length of your main video clip.
At this point, you can follow the same steps as in method 1 if you would like to adjust the transparency, add a border, or adjust the size/placement of the picture-in-picture window.

These are a few of the ways you can enhance your videos by adding a professional picture-in-picture effect!
Download a FREE 30-day trial and turn your best moments and life experiences into unique movies with this easy and fun video editor packed with intuitive tools and creative effects.
