A key step in many photo editing projects, such as creating composite images, is to remove the background so that you can replace it with a different background or extract a subject or object to use in another image. In this tutorial you’ll learn how to do photo background removal using the Smart Selection Mask tool, which was introduced in Corel PHOTO-PAINT 2020, and the Cutout Lab.
Thanks for watching! You will find a written version of this tutorial below, and a printable PDF copy to download on the Download resources tab above.
A key step in many photo editing projects, such as creating composite images, is to remove the background so that you can replace it with a different background or extract a subject or object to use in another image. In this tutorial you’ll learn how to do photo background removal using the Smart Selection Mask tool, which was introduced in Corel PHOTO-PAINT 2020, and the Cutout Lab.
Thanks for watching! We hope you found this tutorial helpful and we would love to hear your feedback in the Comments section at the bottom of the page. You will find a written version of this tutorial below, and a printable PDF copy to download on the Download Resources tab above.
Start your FREE 15-day trial and embark on a design journey with powerful tools for vector illustration, layout, photo editing, typography, and collaboration.
Download these free resources:
Written tutorial for Windows (PDF, 1.4 MB)
Written tutorial for Mac (PDF, 1.4 MB)
CorelDRAW Graphics Suite resources
Quick Start Guide (PDF, 2 MB)
Keyboard Shortcuts (PDF, 3.5 MB)
CorelDRAW and Corel PHOTO-PAINT user guides
For CorelDRAW Graphics Suite subscription and perpetual licenses (2018 to 2024), languages include English, Português do brasil, 简体中文, 繁體中文, Čeština, Deutsch, Español, Français, Italiano, 日本語, Polski, Русский
CorelDRAW Community
CorelDRAW learning center
Facebook
X (formerly Twitter)
YouTube
Introduction to PHOTO-PAINT
What’s new in CorelDRAW Graphics Suite
Working with bitmaps
 CorelDRAW Graphics Suite
 Ultimate Vector Bundle Vol. 1
 CorelDRAW Standard 2021
 Ultimate Vector Bundle Vol. 2
 Corel Vector
Photo background removal in PHOTO-PAINT
This tutorial will demonstrate two methods for removing the background of a photo: the Cutout Lab and the Smart Selection mask tool.
Click on any of the images to view full-size.
Background removal with the Cutout Lab
In our first example, we want to put the dog’s face on a different background image, so we need to remove everything else.

Go to Image > Cutout Lab. When using the Cutout Lab, the first step is to trace around the area you want to keep. The Highlighter tool is active by default, and you can adjust the settings for Nib Size, Highlight Color and Fill Color.
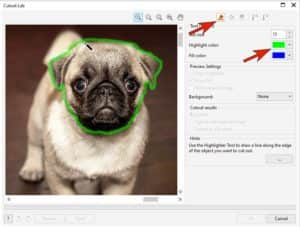
After tracing a closed loop, the next step is to choose which area to keep – inside or outside the highlighted area. Activate the Inside Fill tool and click inside the area you traced.
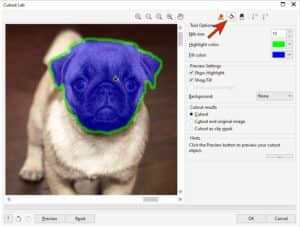
You can click the Preview button to check the results so far and zoom in to see more detail. From the Background dropdown list, you can choose to add a Grayscale, Black matte or White matte background, which can make it easier to see the cutout results.
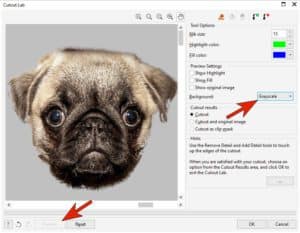
Once you have clicked on the Preview button, the Add Detail and Remove Detail tools become available at the top of the window. You can adjust the Nib Size of the tool and use it to refine your cutout to add or remove any bits.
TIP: If you have the Add Detail tool activated, using your right mouse button will switch to the Remove Detail tool, and vice versa. This is a quicker way to switch between adding and removing detail from your cutout.
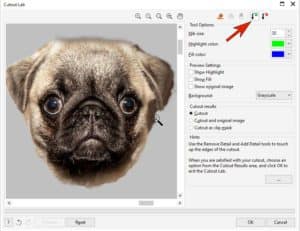
Once you have finalized your cutout, you can choose the Cutout results:
- Cutout creates an object from your cutout and discards the original image.
- Cutout and original image creates an object from your cutout and preserves the original image.
- Cutout as clip mask creates a clip mask from the cutout. The clip mask is attached to the original image and can viewed in the Objects docker.
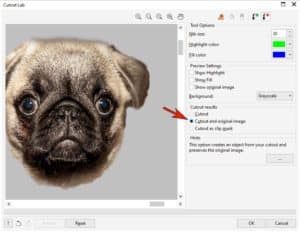
After you have selected the Cutout results option you want, click OK. In this example we chose Cutout and original image, so now in the Objects docker there are two objects: Object 1 which is the cutout, and Background which is the original photo. Click the Eye icon to hide the background.
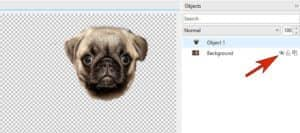
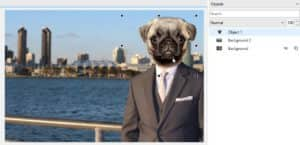
To add a new background, use File > Import to bring in the background image. In the Objects docker, drag the imported photo (called Background 2) below the Object 1 cutout layer. Use the Pick tool to resize and reposition the new background image and cutout as needed.
Background removal with masking
For the second example, we want to cut out the tiger in this photo and place it on a new background.

When you open an image in PHOTO-PAINT it will be a background layer and some editing tools can’t be applied to backgrounds. So in the Objects docker, click the Create Object from Background icon to make the background into an object.
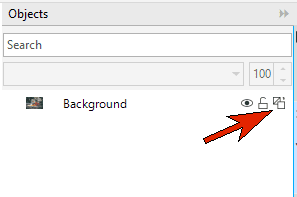
There are a number of different mask tools but for this example we are using the Smart Selection Mask, which was introduced in PHOTO-PAINT 2020.
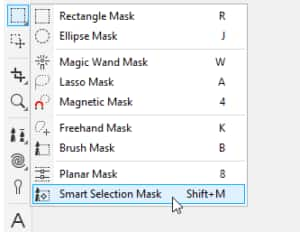
Once you activate the Smart Selection Mask tool, there will be some options available on the interactive property bar along the top.
Click on the Normal mode button and adjust the Nib size if desired. To define the initial area, click and drag your mouse within the tiger . . .
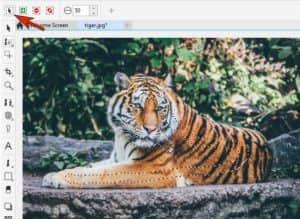
. . . and when you release your mouse button, the mask area will expand to select just about the entire tiger.

To add any bits that weren’t included, switch to Additive mode on the Property Bar, or hold down the Shift key while clicking or dragging with your mouse. If you accidentally select any parts of the background, switch to Subtractive mode or hold down the Ctrl key while clicking and dragging to remove them.
TIP: hold down the Alt key while dragging with your mouse key to resize the nib as you are working.

Once your mask selection is complete to your liking, you can adjust the mask border by going to Mask > Mask Outline > Feather. Adding a small amount of Inside feather will soften the edges to help it blend better. In the Feather dialog box, click the Preview icon to see what the results will look like.
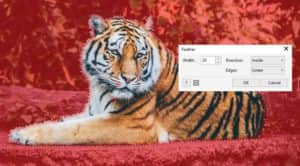
The area inside the mask is what would be removed when you use Ctrl + X to cut out the image. You can see this when you go to Mask > Mask Overlay – the red area is what will be kept. Since we want to remove the background, which is outside the mask area, we need to invert the mask by going to Mask > Invert Mask. Now the mask overlay shows that the tiger will be kept, and the background will be removed when we press Ctrl + X.
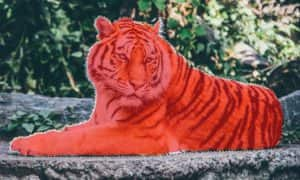
Press Ctrl + X and the background is removed.
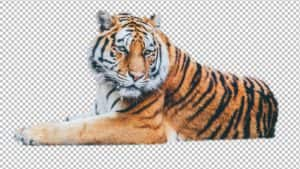
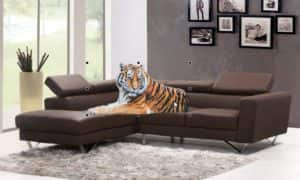
To place the tiger onto a new background, you can import the background image into the tiger image as we did with the previous example. Drag the background layer below the tiger layer in the Objects docker and use the Pick tool to resize and reposition as needed.
Another way is to open your new background as a new file and use Ctrl + C to copy the tiger, then Ctrl + V to paste the tiger onto the new background. Again, use the Pick tool to resize and reposition as needed.

Removing backgrounds from images in CorelDRAW and PHOTO-PAINT
Using masks in Corel PHOTO-PAINT
Start your FREE 15-day trial and embark on a design journey with powerful tools for vector illustration, layout, photo editing, typography, and collaboration.

