
Corel PHOTO-PAINT is an image-editing application included in CorelDRAW Graphics Suite. With PHOTO-PAINT you can adjust, enhance and retouch photos, as well as create original bitmap illustrations, composite images and paintings. This tutorial will provide a tour of the workspace and demonstrate some basic features.
Thanks for watching! We hope you found this tutorial helpful and we would love to hear your feedback in the Comments section at the bottom of the page. You will find a written version of this tutorial below, and a printable PDF copy to download on the Download Resources tab above.
Start your FREE 15-day trial and embark on a design journey with powerful tools for vector illustration, layout, photo editing, typography, and collaboration.
Download these free resources:
Written tutorial (PDF, 454 KB)
CorelDRAW Graphics Suite resources
Quick Start Guide (PDF, 2 MB)
Keyboard Shortcuts (PDF, 3.5 MB)
CorelDRAW and Corel PHOTO-PAINT user guides
For CorelDRAW Graphics Suite subscription and perpetual licenses (2018 to 2024), languages include English, Português do brasil, 简体中文, 繁體中文, Čeština, Deutsch, Español, Français, Italiano, 日本語, Polski, Русский
CorelDRAW Community
CorelDRAW learning center
Facebook
X (formerly Twitter)
YouTube
Introduction to PHOTO-PAINT
What’s New in CorelDRAW Graphics Suite
 CorelDRAW Graphics Suite
 Ultimate Vector Bundle Vol. 1
 CorelDRAW Standard 2021
 Ultimate Vector Bundle Vol. 2
 Corel Vector
Introduction to Corel PHOTO-PAINT
This tutorial will review the PHOTO-PAINT workspace and highlight the key tools and features.
Click on any of the image below to view full-size.
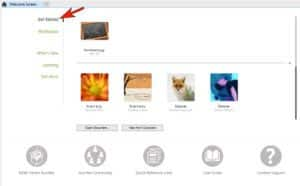
The Welcome Screen
When you first open PHOTO-PAINT, you’re brought to the Welcome Screen. The Get Started tab shows recent documents and enables you to create a new document or open an existing document. There are also some discovery files that you can use to try out new and popular features. At the bottom are links to special offers, user forums, documentation, and support.
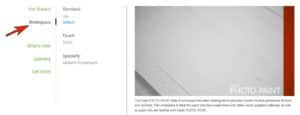
The second tab is Workspace, and there are several options to choose from:
- Standard – Default for users who are familiar with CorelDRAW or other vector graphics software.
- Standard – Lite offers a simplified workspace that is easy to explore for users who are just getting started.
- Touch is optimized for users working on touch-enabled devices.
- Specialty – Adobe Illustrator has a look and feel to help Illustrator users get started quickly.
The What’s New tab is updated regularly with new and exciting content like contests, blog posts, tutorials, webinars and more. The Learning tab provides a wide range of tutorials, and the Get More tab helps you find additional content such as plugins or fonts. You can use the filters on the right to display specific types of content, such as fonts, vectors or free content, or choose the My Library filter to see the content you’ve already installed.

Creating a New Document
There are many ways to create a new document. To open a photo, go to File > Open. This creates, in a new tab, a document with the photo’s original dimensions. You can choose View > Rulers to see the photo size.
Back in the Welcome Screen, there’s also an option called New from Clipboard, which creates a new document that contains whatever is in your copy buffer – in other words, whatever you’ve copied or cut from another application.
There are several ways to create a blank document:
- click New Document on the Get Started tab of the Welcome Screen
- click on the New Document icon on Standard toolbar
- go to File > New
- use keyboard shortcut Ctrl + N
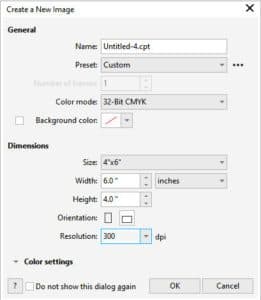
In the Create a New Image window there are a number of document type presets that you can choose, which will automatically adjust some of the document properties such as Color Mode, Units of Measure and Resolution. You can also enter a custom size and change any of the settings as you wish.
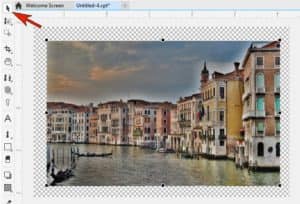
A new image takes up the entire workspace, but you can use the mouse scroll wheel to zoom out.
Exploring the Standard – Default Workspace
At the top, the Standard toolbar includes familiar commands such as New, Open, Save and Print; Cut, Copy and Paste; Undo and Redo; and Zoom. There are also icons for displaying rulers, accessing the application options, and launching plugins or other Corel programs.

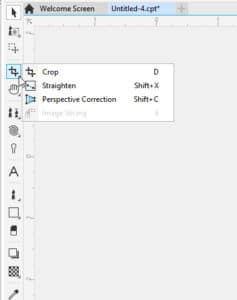
The toolbar down the left side is the Toolbox, which contains all of the drawing and editing tools. A small arrow on a tool icon means that the tool is part of a tool group, and clicking on the arrow opens the group.
Just below the Standard toolbar along the top is the Property bar, which displays different commands depending on which tool you are using. For example, if the Rectangle tool is active, the Property bar includes options for fill, outline, corners, etc. You can click the plus sign at the right end of the Property bar to add or remove any icons.

Along the right side of the interface is the Color Palette. Click on a swatch to select a fill color and right-click on a swatch to select the outline color.
Along the bottom of the interface is the Status bar, which offers hints about using the tool. Once you use a color, it’s added to the Image Palette just above the Status bar.
When you activate the Text tool, the property bar has icons for font, size, alignment, spacing etc.

Left-click a color to set the font color, click where you want to place the text, and type what you want to appear. Click outside the text when finished.

The tip in the Status bar for this tool lets you know that you can click inside text to change it.
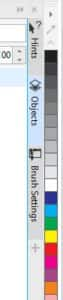
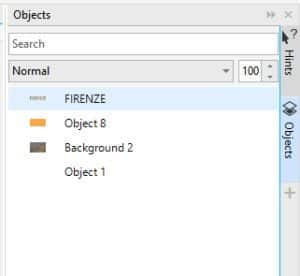
Also on the right side are the dockers – separate windows that contain categories of tools and features. For example, the Objects docker lists all objects in the document.
And the Text docker displays properties for the selected text, which you can change.

You can open dockers by going to the Window > Dockers menu, or click the plus sign below the current docker tabs.
Finally, when working on a large photo, or at a large zoom, you can click and hold the Navigation icon, to pan to the spot in the document you want to work on.
Start your FREE 15-day trial and embark on a design journey with powerful tools for vector illustration, layout, photo editing, typography, and collaboration.
