In this tutorial, we bring together everything we’ve learned in the previous screen printing tutorials to create a sample project: a baseball t-shirt design and mockup. Starting with a new document, we’ll review all the steps in the process of creating the logo, adding text effects, sizing the design to print size, and creating a mockup image to show to a client.
Thanks for watching! We hope you found this tutorial helpful and we would love to hear your feedback in the Comments section at the bottom of the page. You will find a written version of this tutorial below, and a printable PDF copy to download on the Download Resources tab above.
Download these free resources:
Written tutorial (PDF file, 755 KB)
Demo files (Zip file, 1.27 MB)
CorelDRAW Graphics Suite resources
Quick Start Guide (PDF, 2 MB)
Keyboard Shortcuts (PDF, 3.5 MB)
CorelDRAW and Corel PHOTO-PAINT user guides
For CorelDRAW Graphics Suite subscription and perpetual licenses (2018 to 2024), languages include English, Português do brasil, 简体中文, 繁體中文, Čeština, Deutsch, Español, Français, Italiano, 日本語, Polski, Русский
CorelDRAW Community
CorelDRAW learning center
Facebook
X (formerly Twitter)
YouTube
Start your FREE 15-day trial and embark on a design journey with powerful tools for vector illustration, layout, photo editing, typography, and collaboration.
CorelDRAW for Screen Printing
What’s New in CorelDRAW Graphics Suite
 CorelDRAW Graphics Suite
 Ultimate Vector Bundle Vol. 1
 CorelDRAW Standard 2021
 Ultimate Vector Bundle Vol. 2
 Corel Vector
Screen Printing Project: T-shirt Design and Mockup
In this tutorial we are going to create a baseball logo design and then make a mockup on a t-shirt. To make this design, we will trace a clipart image, create customized text with outlines and add some tiger stripes to the text using PowerClip. We will also show you how to put the finishing touches on your design and export as a PDF.
Click on any of the images below to view full-size.
Document Setup
To create a new document, go to File > New. Set the page size to Letter, the orientation to Landscape then click OK.
A commonly used color palette for screen printers is the Pantone® spot color palette. Let’s also open that palette to have it handy as we are designing.
- Go to Window > Dockers > Palettes.
- In the docker, click on the arrow beside Palette Libraries to expand the selection.
- Then expand Spot > Pantone > Pantone+ and select Solid Coated-V3.
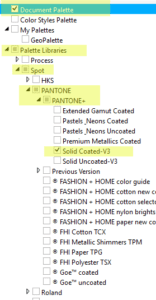
The palette will appear on the right of the interface but let’s place it along the bottom. Click the dotted area at the top of the palette and drag it to the bottom of the CorelDRAW window. When you see the bar turn grey, let go and it will attach to the interface.
We will also turn on the Document palette by going to Window > Color Palettes and selecting Document Palette or by checking it in the Palettes docker.
Importing Images
Let’s start by importing the colored shirt our design will go on. Go to File > Import and browse to the location on your computer where you have saved the file, then click Import. To place the image in your document, drag to draw a rectangle on the page then release and the t-shirt image is now in your document. You can enlarge it if you like by dragging out one of the corner handles.
TIP: Before we go any further, it’s a good idea to save your file now, and periodically throughout the design process.
Setting a Background Page Color
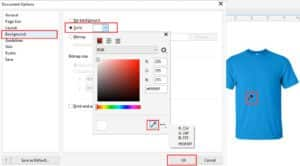
Now let’s create a background color on our page that is the same color as the t-shirt image. This will help us see how the ink colors we choose will look against that color.
- Select the shirt with the Pick tool and move shirt off to one side of the page.
- Double-click on the grey shadow at the edge of the document to open the Document Options window (or go to Layout > Document Options).
- Click on Background in the left column.
- Choose Solid and click the dropdown arrow to select a color.
- Click on the Eyedropper icon in the bottom right corner of the color window and click on the t-shirt to sample the color.
- Uncheck Print and export background then click OK and our page color is set.
Next, import the baseball image. This file is a bitmap and most screen-printing shops prefer vector art so we will need convert it to vector using the PowerTRACE feature.
Use the Pick tool to select the baseball and then click the dropdown arrow beside Trace Bitmap in the property bar. Then choose Outline Trace > Clipart. Because the baseball image is large, a dialog box will pop up suggesting you reduce the size, so click on the Reduce Bitmap button.
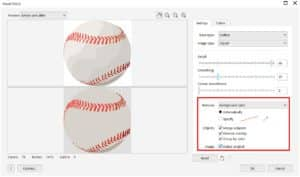
The PowerTRACE window will open and you will see the top image is the original bitmap and the bottom is the trace result.
On the Settings tab choose these options:
- Remove: background color
- Objects: Merge adjacent, Remove overlap and Group by color (this allows you to easily change a group of objects from an RGB or CMYK color to a Spot color and get them all at the same time)
- Image: Delete original – we don’t need it anymore
To learn more about PowerTRACE, watch our full tutorial How to Convert JPG to Vector.
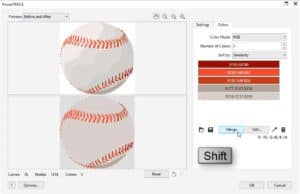
Now click on the Colors tab so we can make some changes in here. First, you have the option to change the Color Mode to Pantone Solid Coated. This will save time and allow you to convert the entire image to spot colors.
Next, we need to simplify our colors by merging them. To merge the red colors:
- Select the first red color on the list, hold down the SHIFT key and select the other reds.
- Click the Merge
- Repeat this process for the grey colors then click OK.
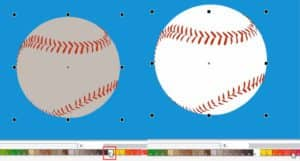
We’d like to change the colors of the baseball so that it is white instead of grey, with a different shade of red for the stitches.
- Select the baseball and click the Ungroup icon on the Property bar. This will separate the grey ball and the red stitches.
- Select the grey ball then click the White swatch on the Pantone color palette we placed at the bottom of the interface. This will change the ball to white.
- Press the Tab key on your keyboard and now the red stitches will be selected.
- Click the Bright Red swatch on the Pantone color palette. This will change the color of the stitches.
- Use the Pick tool to lasso the baseball, which will select both the ball and stitches objects.
- Click the Group Objects icon in the Property bar to regroup the baseball into one object.
Adding and Manipulating Text
To add text, select the Text tool on the left toolbar then click on the page and start typing. For this design we typed TIGERS in uppercase.
Now select the Pick tool and use it to resize and reposition your text as you like. You can make it larger or smaller by dragging one of the corner handles in or out. Or stretch it taller by using the top center handle.
Use the font dropdown list to change the font if you wish. For this design we wanted something heavier (American Captain Eternal font).
At this point, use the Pick tool to reduce the size of the baseball and move it under the text, so the design now looks like this.

Now we are going to give our text a custom shape using the Envelope tool. To add an envelope:
- Open the Envelope docker by going to Effects > Envelope or Window > Dockers > Effects > Envelope.
- Select the text with the Pick
- Choose the Single-arc mode from the options at the bottom of the Envelope docker and then click the Add New button.
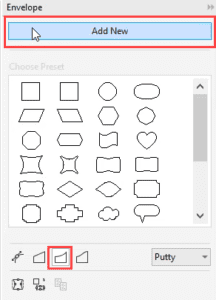
- You will now see a white dashed border around your text to represent the envelope.
- Use the handle in the middle bottom of the text and pull up to make the text arc.
- You can alternate between using the Pick tool to adjust the width and height of the text and Envelope tool to adjust the arc until you are happy with the results.

To make the text orange select the text with the Pick tool and click the Orange 021 swatch on the Pantone color palette.

We also added a contour effect to our TIGERS text. To add a contour:
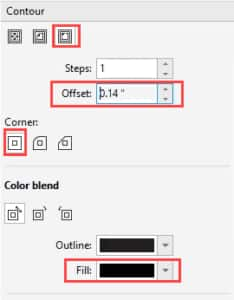
- Open the Contour docker by going to Effects > Contour or Window > Dockers > Effects > Contour.
- Under Contour alignment, choose the Outside contour
- Under Corner, choose the Mitered corners
- Adjust the Offset value if you wish (we used 0.14”).
- Under Color blend, set the Fill to black then click Apply.
Once you are happy with your contour effect, go to Object > Break Contour Apart.
Click outside the page to deselect, then select the black contour only. In the Pantone color palette, click on the Black swatch to change the color of the contour.
Next we add the text BASEBALL to our design, using the same steps as when adding the TIGERS text. Once you have the text sized and positioned as you like, click on the Black swatch in the Pantone color palette to make the BASEBALL text the exact same color as the contour of the TIGERS text.
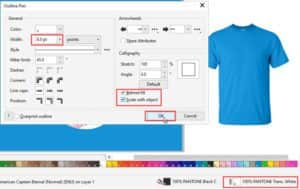
We also added a white outline to the BASEBALL text by right-clicking on the White swatch in the Pantone color palette. Then double-click on the outline color swatch in the Status bar that is under the bottom color palette. This will open the Outline Pen window, where you can set the Width to 8 and add a check beside the options Behind Fill and Scale with object.
To enhance our design, we will add some stripes to the TIGERS text.
- Select the Freehand tool and use it to draw a basic stripe shape.
- Click on the Pantone Black swatch to fill it with black.
- To modify the stripe shape, click on the Shape tool and use it to move the nodes to change the shape.
- To add more stripes, select the first stripe with the Pick tool and duplicate it using the + key on your keyboard. You can also duplicate objects using Ctrl + D or go to Edit > Duplicate.
- Use the Pick tool to resize, reposition or rotate the duplicate stripes all over the TIGERS text.
- You can use the Shape tool to alter the shape of some stripes, so they don’t all look the same.

Once we have all the stripes created, we can use the PowerClip feature to place the stripes inside the TIGERS text, so there are no stripes sticking outside the letters.
- Use the Pick tool to lasso all the stripes, then click on the Group button in the Property bar.
- Right-click on a stripe and choose PowerClip Inside.
- Your cursor will change to an arrow shape – use this to click on the orange text.
- Now the stripes will be “clipped” inside the orange text.
To learn more, watch our full tutorial on Clipping Objects into Other Objects with PowerClip.
Finalizing the Design
Our design is nearly complete, but we need to make sure that all objects are properly aligned and that the design is the proper size for printing.
First, use the Pick tool to lasso the TIGERS text and then click the Group Objects button on the Property bar. Now the text, contour effect and stripes will be aligned as a group.
- Use the Pick tool to move the TIGERS text, baseball image and BASEBALL text until you are happy with the design arrangement.
- Lasso the entire design then go to Object > Align and Distribute > Align Centers Horizontally, or simply press C on your keyboard.
- Group your design using the Group Objects button on the Property bar or press Ctrl + G.
- On the Property bar, make sure the Lock Ratio setting is on then enter 10” in the Object size width field (10” is a common youth size screen print).

Creating a T-shirt Mockup
We are going to create the mockup on a new page in this document. To add a new page, right-click on the Page 1 tab at the bottom of the document and select Insert Page, or click on the Add Page icon just to the left of the Page 1 tab.
- Select the t-shirt image that we imported at the beginning of this project and copy (Edit > Copy or Ctrl + C) then paste (Edit > Paste or Ctrl + V) onto the new page.
- Go back to page 1, select the design and copy it.
- Go to page 2 and paste the design.
- Use the Pick tool to resize and reposition the design on the t-shirt.

You now have a t-shirt design you can scale to any size, vector art for a screen printer and a mockup to show how you want it.
Preparing for Print
To share this file with a screen printer or another vendor, you should export document as a PDF.
- Go to File > Publish to PDF and choose the location where you want to save the file.
- Click on the PDF preset dropdown and select Prepress.
- Click the Settings button to open the PDF Settings
- On the General tab you can set the Export range to the current document, current page, or select pages.
- On the Objects tab, make sure to enable Export all text as curves. This will ensure that the text will be properly displayed, even if the person you send it to doesn’t have the fonts you used.
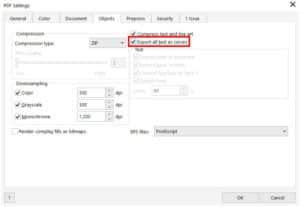
Click OK then click Save. Now your file is ready to email to the screen printer or other vendor.
Start your FREE 15-day trial and embark on a design journey with powerful tools for vector illustration, layout, photo editing, typography, and collaboration.

