
Learning how to properly set up your CorelDRAW document is an important step to help your design process flow smoothly. In this tutorial we will show you how to create a new document specific to your project and introduce you to a number of tools and settings that are important to master before you begin creating, such as guidelines, backgrounds, rulers and more.
Thanks for watching! We hope you found this tutorial helpful and we would love to hear your feedback in the Comments section at the bottom of the page. You will find a written version of this tutorial below, and a printable PDF copy to download on the Download Resources tab above.
Start your FREE 15-day trial and embark on a design journey with powerful tools for vector illustration, layout, photo editing, typography, and collaboration.
Download these free resources:
Written tutorial (PDF, 457 KB)
Exercise file (CDR, 468 KB)
CorelDRAW Graphics Suite resources
Quick Start Guide (PDF, 2 MB)
Keyboard Shortcuts (PDF, 3.5 MB)
CorelDRAW and Corel PHOTO-PAINT user guides
For CorelDRAW Graphics Suite subscription and perpetual licenses (2018 to 2024), languages include English, Português do brasil, 简体中文, 繁體中文, Čeština, Deutsch, Español, Français, Italiano, 日本語, Polski, Русский
CorelDRAW Community
CorelDRAW learning center
Facebook
X (formerly Twitter)
YouTube
CorelDRAW for Screen Printing
What’s New in CorelDRAW Graphics Suite
 CorelDRAW Graphics Suite
 Ultimate Vector Bundle Vol. 1
 CorelDRAW Standard 2021
 Ultimate Vector Bundle Vol. 2
 Corel Vector
CorelDRAW Document Setup
In this tutorial you learn will some of the key features of CorelDRAW document setup and how they affect printing and building art. It’s important to learn how to get your document set up properly from the beginning, to help your design process flow smoothly.
Click on any of the images below to view full-size.
Creating a New Document
There are a few different ways to create a new document in CorelDRAW:
- Click on File > New
- Click on the New Document icon on the standard toolbar
- Press Ctrl + N on your keyboard
- Click on the New Document plus sign on the Get Started tab of the Welcome Screen
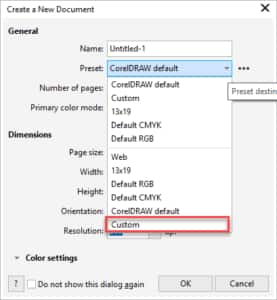
In the New Document dialog box, you can enter your own custom settings or choose from a preset.
- If you are creating for the web, chose the Web Automatically the document units of measure will be changed to pixels and the resolution changed to 150 dpi.
- If you are creating for sublimation or laser engraving, you could choose the Default RGB
- If you are working on offset printing artwork you could choose the Default CMYK
You can also create a custom document setup and then save it as a preset for future use. For example, a common page size for a large printer is 13” x 19” so let’s set that up and save the preset.
- Choose the Custom preset
- Change the units of measure to inches
- Enter 13 and 19 in the Width and Height
You can also enter the document name and choose the number of pages, primary color mode and resolution if necessary.

Next, click on the 3 dots next to the Preset dropdown list and click Save Preset. Enter a name and click OK. The next time you start a new document, this new preset will be available.
Once you have entered the settings, click OK to create the new document.
NOTE: all the document settings can also be altered once inside the document, on the Property bar and under the Layout menu.

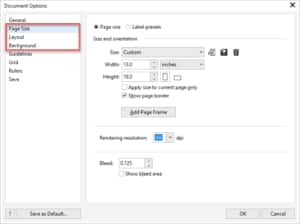
You can also access and change the document settings by double-clicking on the grey shadow along the right and bottom of your CorelDRAW document. This will open the Document Options window.
Multiple Page Sizes
Did you know that a CorelDRAW document can contain multiple pages that are different sizes and orientations? The sample exercise file has 3 pages: the first page is 8.5 x 11” for a sign, the second page is a business card and the third page is 13 x 19” for t-shirt artwork.
If you need your document to contain different page sizes, you will find a setting on the Property bar to apply the page size to ALL pages in the document or apply the page size to the CURRENT page only.

Setting the Duplicate Distance
The duplicate distance is the distance between the original object and the duplicated object. The default values are set at .25 and .25 but some users prefer to set the values to 0:0. This can be useful when creating multiple outlines on text or shapes because the objects land right on top of each other when duplicated.

NOTE: the duplicate distance setting is only visible on the Property bar when you have nothing selected in the document.
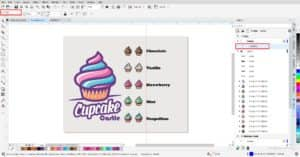
Give it a try on page one of the exercise file:
- Set the duplicate distance to 0:0
- Hold down the Shift key and select each of the 5 small cupcakes.
- To duplicate, press Ctrl + D or go to Edit > Duplicate.
- The duplicate group of objects will be right on top of the original objects. Start dragging to the left or right then press and hold the Ctrl key (using the Ctrl key keeps the duplicate objects in exact alignment with the originals).
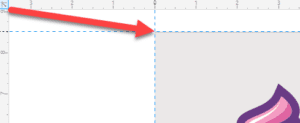
Objects On and Off the Page
Another key thing to know about the document setup and printing is that anything OFF the page (or on the desktop) will NOT print. For example, if you manually add registration marks or tags to identify your colors or separations make sure that the object or text is ON the page not in the desktop or the work area of the document.
Units of Measure
You can select the units of measure for your document in the New Document window when creating a new document, but you can also change the units of measure on the property bar. As with the duplicate distance setting, the units of measure setting is only visible on the property bar when nothing is selected.

Background Page Color
A helpful tip while creating art is to add a background color to your page. The default CorelDRAW document background is white, so if your art includes white shapes or objects, they can be difficult to see. There are two ways to add a background page color to your document:
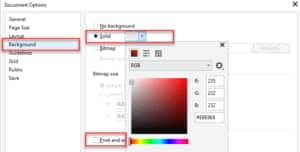
- Add the background page color via the document options:
- Double-click on the shadow of the page to open the Document Options window (or go to Layout > Document Options).
- Select Background in the left column.
- Choose Solid and then use the dropdown color palette to select a color.
- Uncheck Print and export background.
Keep in mind this setting is applied to all the pages in your document.
- Add a background page color with the Rectangle tool:
- Make sure nothing is selected in your document.
- Double-click on the Rectangle tool in the Tools This will create a rectangle the size of your document.
- Click on a color in the Color palette to fill the rectangle.
- Right-click on the rectangle and choose Lock. This will keep the rectangle from moving when you are working on other objects in the document.
- At any time, you can right-click and choose Unlock, and delete the rectangle if you no longer need it.
Turn off Treat as Filled
Do you have trouble clicking on objects? Turning off Treat as Filled can help.
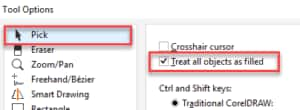
The Treat all objects as filled icon is visible at the far right on the property bar when nothing is selected. By default it is enabled, indicated by a white box around it. Click on the icon to turn it off.

You can also turn it off by going to Tools > Options > Tools, select the Pick tool in the left column and then uncheck Treat all objects as filled.
Setting the Zero Point for Rulers
Did you know you can move the rulers 0:0 point around inside the document? The default is at the bottom left of the page but what if you want it at the top left of the page? Click the ruler intersection (where the rulers join at the top left) and drag to the top left corner of the page.
If you want the rulers back to the default location just double-click on the ruler intersection and they return to that location.
Adding Guidelines
Guidelines are a very helpful tool for layout and design. There are two methods to add guidelines but first, go to View and ensure Guidelines is checked. Next, go to Window > Dockers and select the Object docker and Guidelines docker.
Method 1: In the Objects docker, select the Guides layer on page one. Drag a guide from the vertical ruler on the left and place where you want on the document. You can adjust the position exactly in the Object Position box on the property bar.
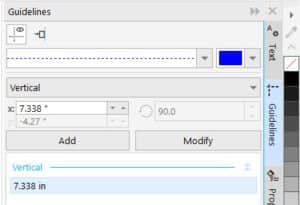
Method 2: You can also set the guideline using the Guidelines docker:
- Set the Guideline Type to vertical or horizontal, depending on what kind of guideline you want.
- Enter the position in the Guideline Position
- Click Add.
To learn more about guidelines, watch our full tutorial How to Align and Position Objects.
Start your FREE 15-day trial and embark on a design journey with powerful tools for vector illustration, layout, photo editing, typography, and collaboration.

Comments (3)
Reader Interactions
Comments
Vou comprar tudo, TUDO.
need to learn how to take background from one photo and put in another
Hi Liz,
Here are some tutorials on background removal in CorelDRAW and PHOTO-PAINT.
https://learn.corel.com/tutorials/removing-backgrounds-from-images-in-coreldraw-and-photo-paint/
https://learn.corel.com/tutorials/photo-background-removal-in-photo-paint/
Hope this helps!
The Discovery Center Team