
Artwork files supplied by your clients can come in all different shapes, sizes, formats and file types. This tutorial will provide a checklist for you to follow to analyze and fix artwork from clients, so that you have an idea of how it will impact your workflow before you provide a quote. Some common issues with artwork from clients include missing fonts, low resolution images, and color gradients or fills not suitable for printing.
Thanks for watching! We hope you found this tutorial helpful. You will find a written version of this tutorial below, and a printable PDF copy to download on the Download Resources tab above.
Download these free resources:
Written tutorial (PDF, 765 KB)
Exercise file (Zip, 725 KB)
Checklist for analyzing art (PDF, 394 KB)
Sample image “Roxanne” (PDF, 112 KB)
CorelDRAW Graphics Suite resources
Quick Start Guide (PDF, 2 MB)
Keyboard Shortcuts (PDF, 3.5 MB)
CorelDRAW and Corel PHOTO-PAINT user guides
For CorelDRAW Graphics Suite subscription and perpetual licenses (2018 to 2024), languages include English, Português do brasil, 简体中文, 繁體中文, Čeština, Deutsch, Español, Français, Italiano, 日本語, Polski, Русский
CorelDRAW Community
CorelDRAW learning center
Facebook
X (formerly Twitter)
YouTube
Start your FREE 15-day trial and embark on a design journey with powerful tools for vector illustration, layout, photo editing, typography, and collaboration.
 CorelDRAW Graphics Suite
 Ultimate Vector Bundle Vol. 1
 CorelDRAW Standard 2021
 Ultimate Vector Bundle Vol. 2
 Corel Vector
How to Analyze and Fix Artwork from Clients
In this tutorial you will learn some steps to analyze clients’ art files and understand some critical checkpoints that could impact your workflow.
Click on any of the images below to view full-size.
Artwork types
The most common vector file types are CDR, SVG, PDF, EPS, and AI. Most of these file types can also contain raster/bitmap images or photos inside of them.
The most common raster file types are JPG, PNG, GIF, PSD, and TIF. Most web images are JPG, PNG or GIF. For example, a screen shot from someone’s phone will always be raster image, most likely a JPG.
To learn more about artwork types, watch our tutorial on Vector Art vs. Raster Art.
Importing client files
When opening an artwork file from a client, it is better to import it into a CorelDRAW document instead of just opening the file. That way you can have the document set up the way you want and bring the artwork into the file. If you just double-click on the artwork file to open it, you may not get a true representation, especially if you don’t have the software it was created in.
How to import an artwork file:
In CorelDRAW, go to File > New to create a new document. Or, you can add a page to a current document by clicking on the New Page icon at the bottom left of the document.
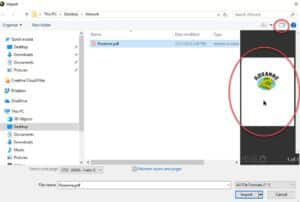
Then go to File > Import and browse to the location on your computer where you have saved the file. Select the file and click Import. In this example we are importing the sample file Roxanne.pdf.
TIP: In Windows, you can turn on the Preview pane under the View menu to see a thumbnail of the artwork file.
Missing fonts:
Next, the Import PDF dialog box will ask if you want to import text as Text or Curves. If you choose Text, it may have some font defaults – meaning you don’t have those specific fonts on your computer and CorelDRAW will substitute a different font when opening the file.
TIP: if you are missing fonts used in the client’s artwork file, stop here and write down the missing font names. You may be able to search for it on the internet to find and then install the font. You can set the font substitution to temporary just so you can import and see the art.
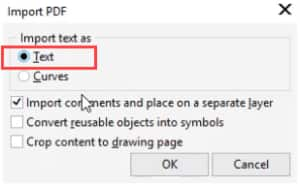
If you choose to Import text as Curves, the text will be converted to objects and will not be editable with the Text tool. However, the fonts will look correct and the art is more likely to be accurate. I usually leave the other options alone. Then click OK.
Placing the artwork on the page:
When importing files from a customer, press the spacebar instead of dragging with your mouse to place the artwork on the page. Using the spacebar will retain the size that was created by the customer. Sometimes art size is can be critical.
Analyzing the artwork
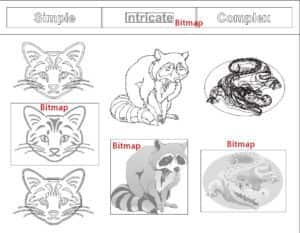
Certain artwork attributes can add minutes or hours to your job. In the sample file Analyzing Art.cdr, page 2 shows 3 examples of art files: simple, intricate and complex. Superficially they all look great but below the surface they are not all created equally.
The following tips will help you see the difference in the various types of artwork.
Adding a colored background
White shapes can sometimes help or hinder your job to produce the art. Adding a color background to the page can help discern where the white objects are. There are 2 ways to add a colored background.
- Page options: double-click the grey drop shadow at the bottom or right side of the page to open the Document Options window (or go to Layout > Document Options). Select Background in the left column and then click the Solid radio button and choose a color from the dropdown color palette. Make sure to UNCHECK the Print and export background setting, as we are using the background color for viewing purposes only.
- Rectangle tool: Double-click the Rectangle tool and it will create rectangle the size of your document. You then may need to set the color by clicking on a color in the color palette. You can also lock it so it doesn’t move when working on art by right-clicking on it and choosing Lock. You can unlock later and delete it if you don’t need it.
Now that you have added a colored background it is much easier to see any white objects.
Color fills
If we look closely at the 3 cat images in the Simple column, we can see that although they appear similar, they have different properties that will affect your workflow if you wanted to add a colored fill.
In the top design there is no fill to make it orange. Thus, the “missing” white shape is inside the cat and will take time to make the cat orange.
The middle design is a bitmap and would have to be traced. This is an extra step.
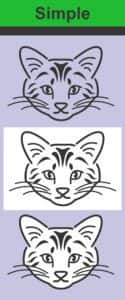
To learn more about tracing, watch our full tutorial on using the PowerTRACE tool.
The bottom design is the only one that is ready to go. It would only take seconds to change the color of the cat’s face to orange – just hold down the CTRL key and click on the white area inside the face to select, then click the orange swatch in the color palette.

Adding drop shadows
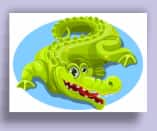
If your client would like to have a drop shadow added to a design, white backgrounds can interfere as we can see with the alligator images.
To add a drop shadow, select the top alligator image then activate the Drop Shadow tool. Click and drag on the alligator image to apply the shadow. Now do the same with the second alligator image.
In this image, the drop shadow applies perfectly around the oval because there is no white background.
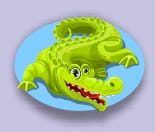
In this image, we can’t apply the drop shadow to the oval because the white rectangle background interferes.
Using Wireframe view
The complexity of artwork can add time your job. The Wireframe view is a quick way to gauge the complexity of an art file, as it gives you x-ray vision to see how the art is made. To enable Wireframe view, go to View > Wireframe.
If you see lots of complex shapes like the alligator it may take a lot more work to prepare the art for various processes like screen printing, vinyl cutting, or engraving.
Bitmaps
While in Wireframe view look for bitmaps. Bitmaps may or may not work for your process.
If you see just a box and a grayscale image – this means the image is a bitmap or a photo. Even text can be a bitmap which may add time to prepping the artwork for output. For example, the middle cat could be traced but the bottom racoon bitmap wouldn’t trace due to the low resolution and quality of the image. And the alligator wouldn’t trace well due to the number of colors.
To exit Wireframe view, go to View > Enhanced.
Fountain fills and gradients
Another thing that can impact your workflow is the use of fountain fills or gradients. Be cognizant of fountain fills and gradients because they may or may not work for your process. For simple spot color screen printing – gradients just complicate things. And gradients don’t work for simple vinyl cutting either. Also, if color model is critical to your process, checking the colors of the artwork is important.
To determine if the artwork has a fountain fill, click on the object and then look at the status bar or Objects docker.
NOTE: If the image has multiple objects grouped together, either hold down the CTRL key and click on one object or ungroup the image in order to see the color types.
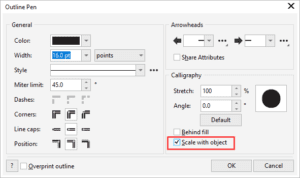
Scale with image setting
Another artwork attribute that sometimes catches designers off guard is the “scale with image” setting for outlines. If it is “ON” for all shapes, the art will scale properly when reduced or enlarged. If it is “OFF” the art changes when reduced or enlarged.
To see this in action, let’s look at a simple circle. Select the Ellipse tool and draw a circle, then right-click on a color in the Color palette to add an outline. In the property bar set the Outline width to 16pt.

Double-click on the outline settings on the status bar in the bottom right of the screen to open the outline settings window.

Check or uncheck the Scale with Object setting and press OK, then use the Pick tool to reduce or enlarge the ellipse. If you have Scale with Object turned on, the outline will scale in proportion with the size of the ellipse. If you have it turned off, the outline will not remain in proportion to the circle size when you reduce or enlarge.
Artwork resolution
Analyzing the resolution or DPI of bitmaps can determine how easy or hard it will be for you to produce the job. Sometimes a low-resolution image can add hours to job if you have to recreate it by hand using other tools in CorelDRAW. To see the DPI of a bitmap, select the bitmap and then look in the status bar to see the DPI or the resolution.
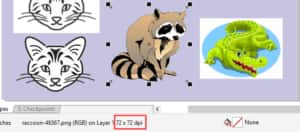
- High-resolution bitmaps will trace more accurately.
- Always zoom in to double-check image quality, because even high-resolution images are not always clear.
- Low-resolution bitmaps are usually from a web page on the internet.
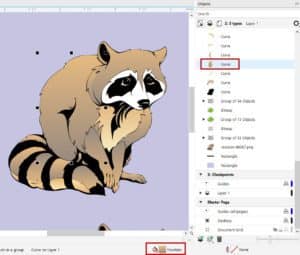
Using the Objects docker
You may also want to check how a client’s file is set up by using the Objects docker. Sometimes if there are excessive layers or grouping this may add time to your job workflow. Go to Window > Dockers > Objects to open the Objects docker.
NOTE: if you are using CorelDRAW 2018 or earlier, the Objects docker is called the Object Manager.
To learn more about the Objects docker, watch our full tutorial on Managing Objects, Layers and Pages.
Once you have analyzed your client’s artwork files by using these checkpoints you will have a better idea on how to quote your job and what you may need to do to fix the artwork for output.
Start your FREE 15-day trial and embark on a design journey with powerful tools for vector illustration, layout, photo editing, typography, and collaboration.
