
Did you know that you can edit PDFs in CorelDRAW? The Adobe PDF format, or Portable Document Format, is an industry standard file format that enables you to share files which can be viewed on almost any device. In this tutorial we’ll show you how to import a PDF file as a fully editable document, and how to work with the text and design elements. This ability to edit PDFs saves you the time and effort of recreating the file from scratch, with no need to purchase additional PDF editing software.
Thanks for watching! We hope you found this tutorial helpful. You will find a written version of this tutorial below, and a printable PDF copy to download on the Download resources tab above.
Start your FREE 15-day trial and embark on a design journey with powerful tools for vector illustration, layout, photo editing, typography, and collaboration.
Download these free resources:
Written tutorial (PDF, 1.2 MB)
CorelDRAW Graphics Suite resources
Quick Start Guide (PDF, 2 MB)
Keyboard Shortcuts (PDF, 3.5 MB)
CorelDRAW and Corel PHOTO-PAINT user guides
For CorelDRAW Graphics Suite subscription and perpetual licenses (2018 to 2024), languages include English, Português do brasil, 简体中文, 繁體中文, Čeština, Deutsch, Español, Français, Italiano, 日本語, Polski, Русский
CorelDRAW Community
CorelDRAW learning center
Facebook
X (formerly Twitter)
YouTube
What’s new in CorelDRAW Graphics Suite
CorelDRAW tools
Importing, exporting, and printing
 CorelDRAW Graphics Suite
 Ultimate Vector Bundle Vol. 1
 CorelDRAW Standard 2021
 Ultimate Vector Bundle Vol. 2
 Corel Vector
How to edit PDFs in CorelDRAW
Did you know that you can edit PDFs in CorelDRAW? In this tutorial we’ll show you how to import a PDF file as a fully editable document, and how to work with the text and design elements. This ability to edit PDFs saves you the time and effort of recreating the file from scratch, with no need to purchase additional PDF editing software.
In this example, let’s say a client wants some changes to this design piece, but the only source file is this PDF.
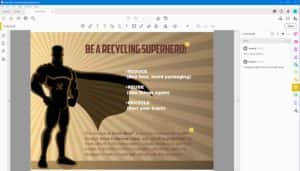
Rather than recreate the entire design from scratch in CorelDRAW, you can bring the PDF right into CorelDRAW in an editable format and go from there.
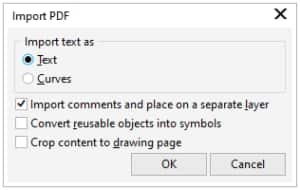
In a blank CorelDRAW file, go to File > Import, browse and select the PDF, then click Import. You have the option to Import text as Text or Curves.
- Import text as text: the text is fully editable, but some effects and formatting may be lost. Use this option if you have large blocks of text and you want to reformat or add more text.
- Import text as curves: the text effects and formatting are preserved, and each letter is converted to a curve but can no longer be edited with the Text Use this option if you don’t need to edit the text or don’t have the fonts used in the original PDF.
In this example, we will be editing the text, so we choose Import text as text. If there are comments in the PDF, enable the option Import comments and place on a separate layer.
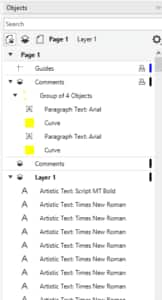
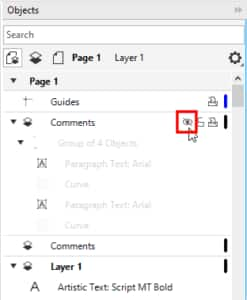
After the import is complete, all the design elements will be placed on Layer 1, which can be seen in the Objects docker (Window > Dockers > Objects). Any comments are grouped together in the Comments layer.
If the comments are blocking any areas that you need to edit, you can hide the layer by clicking on the Hide (eye) icon in the Objects docker.
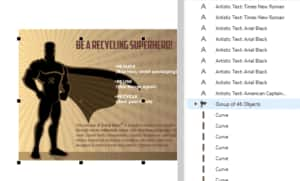
All text elements were imported as artistic text objects, and the fonts are identical to those in the PDF, as long as the original fonts from the PDF are on your system. You can use the Text tool to change fonts or colors or characters if needed.

Looking in the Objects docker, we can see that the background and superhero character are comprised of hundreds of individual curves. Here are a couple tips to organize the curves to make it easier to work with this document.
First, we are going to group all the curve objects that make up the superhero character. In the Objects docker, find the first curve for the character and select it. Hold down the Shift key and select the last curve, which selects the whole character. Press Ctrl + G to group.
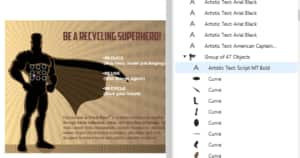
Click on the eye icon to toggle off the visibility of this group to make sure you selected all the curves. In this case, we can see that the “R” on the character’s chest wasn’t included.

So find this artistic text object in the Objects docker and drag it into the superhero group. Now not only have you added a bit of organization to the Objects docker, you also have the superhero character grouped, which could be exported as an object if, say, you wanted to use him as a logo in other design files.
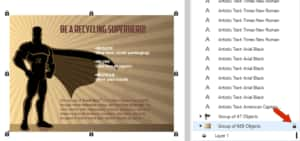
Follow the same process for the background, which is made up of over 600 curves. Once these are grouped, you could export the background as a separate file, add effects, or change the color scheme.
An issue that may occur after importing files created in other applications is these vertical breaks separating curves throughout the background image.

The fix for this is really simple. Right-click on the background group and choose Object Hinting. This feature helps improve object rendering by adjusting the display of an object so that it lines up with the pixel grid. The background still has hundreds of separate curves, but the breaks between curves are gone and they look much more smoothly blended.

And because these curves are completely editable, you could change colors, move things around, add effects, etc.
Lock this group of background curves in the Objects docker, which will make it easier to work with other elements such as the text.
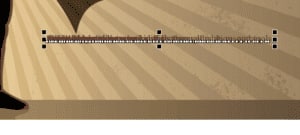
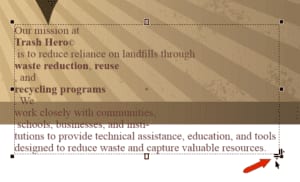
Now let’s look at the text. As mentioned above, everything looks identical to the original. All text is artistic text, including the long text string along the bottom of the document. You could leave this text as is, if you just wanted simple changes like font or color. But for more complex editing, or to change the copy itself, this should be converted to paragraph text.
Note that there are separate artistic text objects for each place where the font switches to bold and back. And symbols, such as the copyright symbol, are also separate artistic text objects.

When selecting artistic text for conversion to paragraph text, the selection order is important. In the Objects docker, the first line we see in the document is actually the last line in the list of text strings in the Objects docker – the order is reversed.

So with the Shift key pressed, select the first line of text and then the last line, so that you’re selecting from bottom to top in the Objects docker.
NOTE: it’s better to do this in the Objects docker, so that you don’t miss any text elements. And if you were to use the Pick tool to marquee-select all the text on the document, the selection order would turn out upside-down.

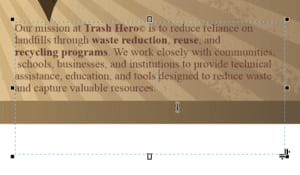
Once you have all the text selected, press Ctrl + L to combine all these objects, which brings everything into one line.
The next step is to right-click and choose Convert to Paragraph Text, or press Ctrl + F8.
To separate the lines, increase the spacing by dragging down the leading icon.
Now go into the text itself by double-clicking (which will activate the Text tool) and remove the line breaks if necessary.
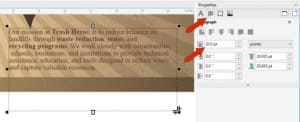
You could readjust the text frame and leading by eye, but for more precise control, open the Properties docker (Window > Dockers > Properties) and click on the Paragraph tab. Here you can set the line spacing to match the point size of the text.
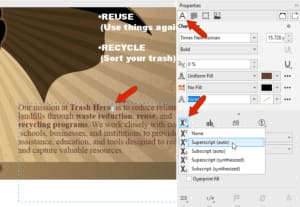
The copyright symbol is included as regular text, so with it selected, switch to the Character tab of the Properties docker, expand the options, and use the Position icon to switch this character to Superscript.
Once your text is properly converted and formatted, you can go on to make any other type of text edits, such as changing the color or size, switching to a different font, etc.
Now we’ll have a look at the Comments layer, which contains some notes from our client requesting changes to the document.
Back in the Objects docker, turn the Comments layer back on to see the requested changes. The first request is to add a shadow to the title text which we can do with the Shadow tool. Select the Shadow tool on the left toolbar, then click and drag on your text to add the effect. When the Shadow tool is activated, you can see that there are settings on the Property bar to adjust color, transparency, feathering and more.

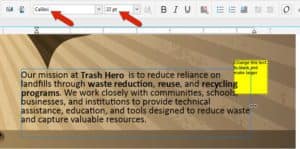
The next request is to change the color and size of the text in the bottom paragraph, which can easily be done with the Text tool. If necessary, you can readjust the line spacing again, using the leading handle or in the Properties docker as before.
Once you are finished with the comments, you can hide the layer again, or delete it by right-clicking on the layer in the Objects docker and selecting Delete.
Now that you know how to edit PDFs in CorelDRAW, it will save you a lot of time and effort instead of recreating the design file from scratch. And no need to purchase additional software specifically designed to edit PDFs.
Start your FREE 15-day trial and embark on a design journey with powerful tools for vector illustration, layout, photo editing, typography, and collaboration.

Comments (2)
Reader Interactions
Comments
Couldn’t find the hero7.pdf file to download so I could follow along with demo.
Hi wurth51,
Unfortunately, we are not able to provide the PDF used in this tutorial, as it was created with stock imagery that we don’t have rights to distribute widely. However, the steps and tools demonstrated in this tutorial can be applied to other PDF files that you may have.
Best regards,
The Discovery Center team