
Do you know all the ways to duplicate an object? Or how to easily select a single object within a large group? CorelDRAW Master Ariel Garaza Diaz shares his collection of 20 tips that will help boost your productivity, whether you are new to CorelDRAW or an experienced user.
Thanks for watching! We hope you found this tutorial helpful. You will find a written version of this tutorial below, and a printable PDF copy to download on the Download Resources tab above.
Start your FREE 15-day trial and embark on a design journey with powerful tools for vector illustration, layout, photo editing, typography, and collaboration.
Download these free resources:
Written tutorial (PDF, 1.1 MB)
CorelDRAW Graphics Suite resources
Quick Start Guide (PDF, 2 MB)
Keyboard Shortcuts (PDF, 3.5 MB)
CorelDRAW and Corel PHOTO-PAINT user guides
For CorelDRAW Graphics Suite subscription and perpetual licenses (2018 to 2024), languages include English, Português do brasil, 简体中文, 繁體中文, Čeština, Deutsch, Español, Français, Italiano, 日本語, Polski, Русский
CorelDRAW Community
CorelDRAW learning center
Facebook
X (formerly Twitter)
YouTube
What’s New in CorelDRAW Graphics Suite
 CorelDRAW Graphics Suite
 Ultimate Vector Bundle Vol. 1
 CorelDRAW Standard 2021
 Ultimate Vector Bundle Vol. 2
 Corel Vector
20 CorelDRAW tips to improve productivity
Here are 20 tips that will help you get the most out of CorelDRAW, courtesy of CorelDRAW Master, Ariel Garaza Diaz.
Click on any of the images below to view full-size.
Tip 1: Quick rectangular frames
Most users know that you can double-click the Rectangle tool icon on the Toolbox to create a page frame, or a rectangle along the page border.
But here’s a lesser-known trick of the Rectangle tool: if you select one or more objects and hold the Shift key while double-clicking the Rectangle tool, this adds a rectangle surrounding the selected objects.
In terms of object order, the page frame is always at the bottom, and the rectangle around the selected objects gets placed at the top, as the most recent object.
To learn more, watch the full tutorial How to Use the Rectangle Tools.
Tip 2: Duplicating an object
There are several ways to duplicate objects in CorelDRAW:
- When nothing is selected, the Property Bar has editable fields for duplicate distances in X and Y. When you select an object and press Ctrl + D (Cmd + D for Mac users) this creates a single copy using the duplicate distances, then you can repeat for more copies.
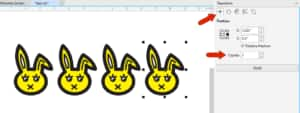
- Pressing Alt + F7 (Ctrl + T for Mac users) opens the Transform Select an object and choose one of the options along the top of the docker: Position, Rotate, Scale and Mirror, Size, or Skew. Enter values for the chosen transformation and set the number of Copies, then press Apply.
- With an object selected, start to move it to where you want a copy placed, keeping the left mouse button pressed. While still holding the left mouse button, press the right mouse button, which adds a plus sign to the cursor. When you release both buttons, the copy is placed.
- Simply drag an object while holding the right mouse button instead of the left. When you release the right mouse button, a menu will pop up with options to Move Here or Copy Here. For Mac users, the copy is made automatically.
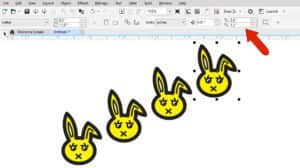
- Select an object and drag it with the left mouse button held down. While keeping the mouse button pressed, press the Spacebar at the location where you want to make a copy. You can press the Spacebar as many times as needed to make multiple copies.
Tip 3: Mirroring an object
To mirror an object, select it with the Pick tool. Hold down the Ctrl key (Cmd key for Mac users) and drag a side handle to the opposite side.
To make a mirrored copy, do the same thing, but while still holding the left mouse button, press the right mouse button.

Tip 4: Rotating an object
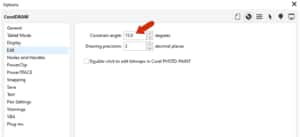
Click an object with the Pick tool to select it, then click again to display the rotation handles. If you hold the Ctrl key (Cmd key for Mac users) while rotating an object, the rotation will be in 15-degree increments.
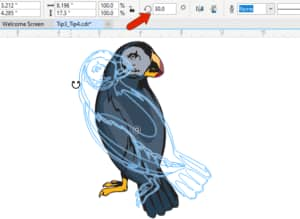
You can change the rotation increments by choosing Tools > Options > CorelDRAW (CorelDRAW > Preferences > CorelDRAW for Mac users) and selecting the Edit option on the left. Then enter a new value in the Constrain angle field.
Tip 5: Selecting objects in a group
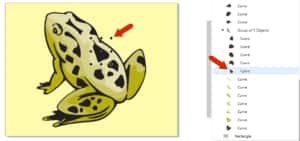
When the object you want is inside a group, or a in group within a group, it can be tough to select that object with the Pick tool. But a handy shortcut is to keep the Ctrl key (Cmd key for Mac users) pressed while selecting. When a group is selected, the handles are circles rather than squares, and you can keep Ctrl-or Cmd-clicking to drill down into subgroups, to get the object you want.
To select multiple objects within the same group, press Shift while also holding Ctrl or Cmd.
Tip 6: Selecting multiple objects
In a crowded drawing, it can be tough to use a marquee selection that surrounds multiple objects, particularly when zoomed in. But if you hold the Alt key while dragging the marquee…

…you’ll select everything the marquee encloses or touches.
Tip 7: Zoom shortcuts
Here are a few Zoom shortcuts:
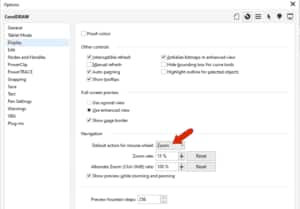
- Your mouse scroll wheel can be used to zoom in and out, based on where your cursor is located. If you prefer to use the scroll wheel for scrolling instead, choose Tools > Options > CorelDRAW (CorelDRAW > Preferences > CorelDRAW for Mac users) and on the Display page, you can change the Default action for mouse wheel from Zoom to Scroll.
- Pressing the Z shortcut key activates the Zoom tool, where you can left-click to zoom in and right-click to zoom out.
- If you want a quick zoom without activating the Zoom tool, PC users can press F2. You can either click to zoom in or drag a zoom window. Pressing F3 zooms out on the Mac, Cmd + (plus) and Cmd – (minus) zoom in and out.
- To zoom to one or more selected objects, press Shift + F2 on the PC, or Cmd + 3 on the Mac.
- To zoom to all objects, you can double-click the Zoom tool icon, or press F4 on the PC or Cmd + 2 on the Mac.
To learn more, watch the full tutorial How to Use the Pan and Zoom Tools.
Tip 8: Editing PowerClip content
If you want to edit the contents of a PowerClip, first select it with the Pick tool then hold down the Ctrl key (Cmd key for Mac users) and click the object again. The PowerClip outline appears in blue.

Now you can select and adjust the object inside. When you’re finished editing, hold down Ctrl or Cmd and click in a blank space to exit the PowerClip editing.

This technique can also be used on a Symbol, Rollover, or Symmetry. To learn more about PowerClip, watch the full tutorial Clipping Objects into Other Objects.
Tip 9: Returning to the default workspace
For PC users, a great feature of CorelDRAW is the ability to customize toolbars and other parts of the interface. But if you accidentally move or remove a tool or another component from its default spot, you may want to start over with the default settings.
To do this, close CorelDRAW, then press and hold the F8 key while re-launching. To reset on a Mac, you can hold Shift while re-launching.
Answer Yes when you see the popup asking about resetting to factory defaults. Keep in mind that you’ll lose any customizations you’ve set up.

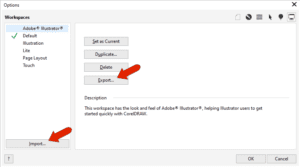
For PC users, if you want to save your customized settings before you reset to the default workspace, choose Tools > Options > Workspaces, and use the Export option to save the settings you want as a CDWS file. Now you can bring back the saved workspace any time by clicking the Import button at the bottom of the window.
Tip 10: Selecting all objects
To select all objects, you can use the familiar Ctrl + A shortcut (Cmd + A for Mac users) but you can also do the same thing by simply double-clicking the Pick tool icon. This will select all objects in the drawing window, including objects that are off the page.
Tip 11: Selecting all nodes
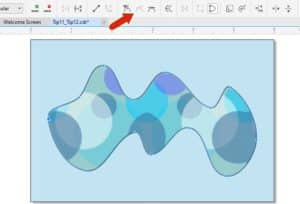
To select all nodes along an object, first select the object with the Pick tool, then double-click the Shape tool icon on the Toolbox.

When all nodes are selected, you can use the options on the property bar to change them all at once, such as making them smooth or symmetrical.
Tip 12: Selecting all nodes on a subpath
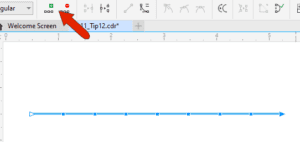
Now let’s say we want to break a curve into subpaths, which you can do with the Shape tool, by adding a break point and clicking the Break Curve icon on the property bar.
To select all nodes in a subpath, while the Shape tool is still active, keep Ctrl and Shift pressed, or Cmd and Shift on the Mac, while selecting any node on that path.
To learn more about the different types of nodes and node editing, watch the full tutorial How to Design Curves.
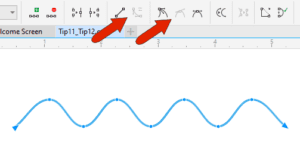
Tip 13: Creating zigzag and wavy lines
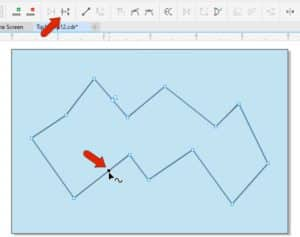
Here’s a quick way to make a zig-zag line. First create a line using the Freehand or 2-Point Line tool.
Then select the end node with the Shape tool, and either click the Add Nodes icon on the property bar or press the plus sign on your numeric keypad. This places a node in the center of the line. Press the Add Nodes icon or plus sign repeatedly to add more nodes at each midpoint, producing a set of evenly spaced nodes.
Press the Ctrl or Cmd key and keep it held down as you use the Shape tool to select every other node and move them together.

For a wavy line, double-click the Shape tool icon to select all nodes, click the Convert to Curve icon on the property bar, then click the Smooth node or Symmetrical node icon, also on the property bar.
Tip 14: Text formatting shortcuts
Here are a few shortcuts for text layout and formatting. Each involves the keyboard commands Ctrl + K for breaking text apart and Ctrl + L for combining text. For Mac users, these keyboard commands are Cmd + K and Cmd + L.
1a. For multiple lines of artistic text, if you select the text and press Ctrl + K it will break the text into separate artistic text objects for each line.
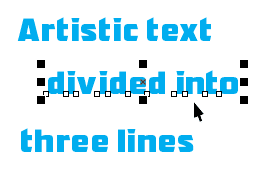
1b. To re-combine them into one artistic text object, select each line in order while pressing the Shift key, then press Ctrl + L.

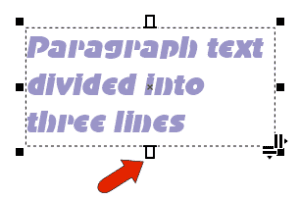
1c. The same is true for paragraph text: Ctrl + K breaks the text into separate objects for each line. If you select all the lines and combine them with Ctrl + L, you’ll have to extend the text box.
2a. This applies to words and characters as well. For artistic text, selecting and pressing Ctrl + K breaks a sentence into words, and if a word is selected, pressing Ctrl + K breaks the word into characters.

2b. Ctrl + L combines the individual characters back into words, and individual words back into sentences. Paragraph text can be broken into words and characters the same way.
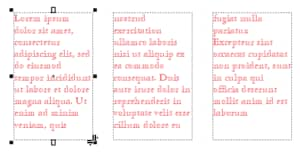
3. And finally, if you have paragraph text divided into columns, Ctrl + K breaks the text into separate objects for each column.
To learn more, explore the tutorial series Working with Text in CorelDRAW.
Tip 15: Combining words in the correct order
Here’s another tip about using the keyboard command Ctrl + L or Cmd + L to combine text. If you just have a small amount of text objects to select, this can be done easily by pressing the Shift key and selecting each one in order with the Pick tool. But if you have a lot of separate words or characters that you want to combine, it is easier to select them by using the Pick tool to draw a selection marquee around all of them at once. However, when you press Ctrl + L to combine all the words or characters within the marquee selection, they will be combined in the wrong order.

To correct the order, press Ctrl + Z (Cmd + Z for Mac users) to undo. With the words still selected, press Ctrl + L or Cmd + L again, to get the right order.

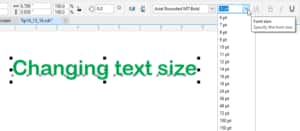
Tip 16: Changing text size
The most well-known method for changing the size of text is to use the Font size drop-list on the property bar. But there are also keyboard shortcuts for changing the size of a selected text object.
For Windows users, press Num Lock to activate the number pad on your keyboard and use the Text tool to select the text. Then hold down the Ctrl key and press 6 on the number pad. This increases the text according to the preset list of sizes in the Font size drop-list, and Ctrl + 4 decreases text size the same way.
For Mac users, Cmd + 6 increases the font size by 10 points, and Cmd + 4 decreases the font size by 10 points.
Using Ctrl + 8 or Cmd + 8 increases the font size one point at a time, and Ctrl + 2 or Cmd + 2 decreases the font size one point at a time.
Tip 17: Copying object attributes
Copying attributes, such as outlines, fills, effects, and other properties, can be done in a few different ways.
1a. Select one or more objects that you want to copy the attributes to, then go to Edit > Copy Properties From. The Copy Properties window will pop up and you can select the properties you want to copy.
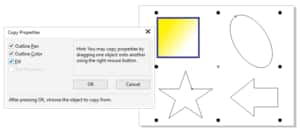
1b. Once you’ve selected which properties you want to copy, click OK then click the object whose attributes you want to copy from.
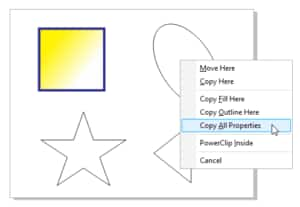
2a. For Windows users, select the object you want to copy properties from with the Pick tool, then right-click and hold down the right mouse button while dragging it onto the object you want to copy properties to. When you release the mouse button, you’ll get a menu with options to copy fill, outline, or all properties.
2b. For Mac users, hold down the Shift key while dragging with the right mouse button, which copies the object fill to the target object.
3a. The Attributes Eyedropper is another tool for quickly copying attributes and other properties to several objects at once. You can find this tool in the same tool group as the Color Eyedropper. Once you activate the Attributes Eyedropper, the property bar provides options to choose the properties to copy, as well as any transformations and effects.

3b. Click the object whose attributes you want to copy, then click the objects where the attributes are to be applied.
To learn more, watch the full tutorial How to Use the Eyedropper Tools.
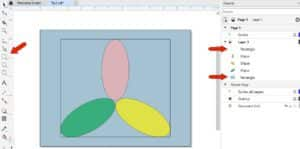
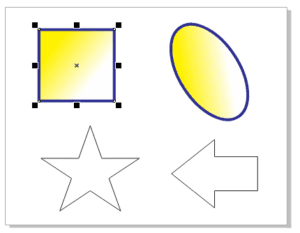
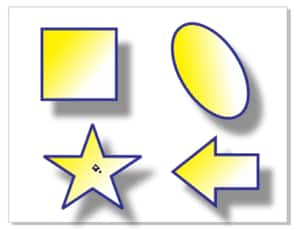
Tip 18: Attributes for combined or welded objects
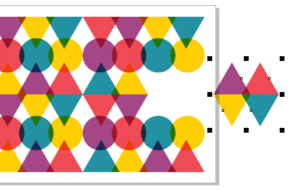
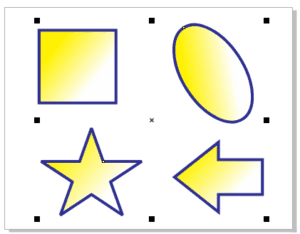
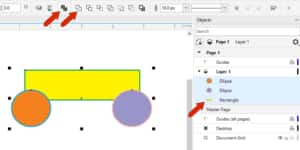
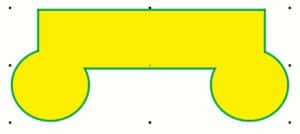
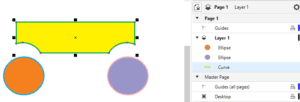
If you marquee-select multiple objects and use either the Combine or Weld commands on the property bar, the resulting object will have the attributes of the object that was created first – the one at the bottom of the order in the Objects docker.
In this example, if we marquee-select the rectangle and 2 circles then press the Weld icon, the resulting object will have the attributes of the yellow rectangle.
But if you select the objects one at a time while pressing the Shift key, the resulting objects will have the attributes of the last object selected. In this example, the purple circle was selected last, so after we welded the objects, the resulting curve has the properties of the purple circle.

Tip 19: Trimming objects
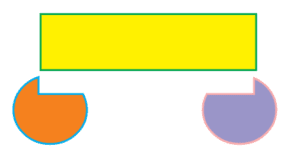
Selection order is also important when using the Trim tool. If you marquee-select objects and click the Trim icon on the property bar, it’s the bottom object that gets trimmed by the objects above.
But by selecting the objects one at a time, you can control what gets trimmed by holding down the Shift key and selecting objects individually. The last object selected will be the one that gets trimmed.
In this example, we selected the rectangle first, then one of the circles, and trimmed. We then selected the rectangle, followed by the second circle. So the result is both circles that have been trimmed by the rectangle.
To learn more, watch the full tutorial How to Weld, Trim and Combine Objects.
Tip 20: Editing barcode objects
To create a barcode, choose Object > Insert > Barcode and follow the steps in the wizard.

If you want to learn more about creating barcodes, watch the full tutorial How to Make a Barcode.
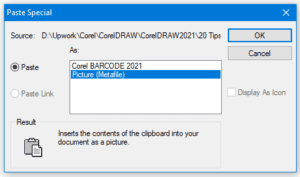
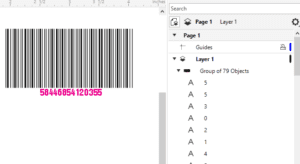
The resulting barcode object can be edited by double-clicking to reopen the wizard, but you can’t change color or font. To make these adjustments, you can use Ctrl/Cmd + X to cut the barcode, or Ctrl/Cmd + C to copy it, then choose Edit > Paste Special and choose the Picture (Metafile) option.
As you can see in the Objects docker, the new Picture (Metafile) object is a group of vector objects, which you can ungroup, select text and change color, font, etc., then regroup again.
If you’ve enjoyed these tips and want to see more, check out the tutorial 10 CorelDRAW Tips for Better Productivity, and visit our Graphic Design Tips home page.
Start your FREE 15-day trial and embark on a design journey with powerful tools for vector illustration, layout, photo editing, typography, and collaboration.
