
In this tutorial, CorelDRAW Master Stefan Lindblad share his process for creating an aged, “ruined” photo effect in PHOTO-PAINT. Beginning with a regular photo, you will see how to transform it step-by-step using a variety of effects and tools such as merge modes for blending, lenses for color toning and adjustment, adding textures, fills and transparencies and more. In learning how to create this unique effect, you will also gain many insights that can be applied in other PHOTO-PAINT projects.
Thanks for watching! We hope you found this tutorial helpful. You will find a written version of this tutorial below, and a printable PDF copy to download on the Download Resources tab above.
Start your FREE 15-day trial and embark on a design journey with powerful tools for vector illustration, layout, photo editing, typography, and collaboration.
Download these free resources:
Written tutorial (PDF, 2.1 MB)
Sample images (Zip file, 8.4 MB)
CorelDRAW Graphics Suite resources
Quick Start Guide (PDF, 2 MB)
Keyboard Shortcuts (PDF, 3.5 MB)
CorelDRAW and Corel PHOTO-PAINT user guides
For CorelDRAW Graphics Suite subscription and perpetual licenses (2018 to 2024), languages include English, Português do brasil, 简体中文, 繁體中文, Čeština, Deutsch, Español, Français, Italiano, 日本語, Polski, Русский
CorelDRAW Community
CorelDRAW learning center
Facebook
X (formerly Twitter)
YouTube
PHOTO-PAINT projects
Introduction to PHOTO-PAINT
What’s new in CorelDRAW Graphics Suite
 CorelDRAW Graphics Suite
 Ultimate Vector Bundle Vol. 1
 CorelDRAW Standard 2021
 Ultimate Vector Bundle Vol. 2
 Corel Vector
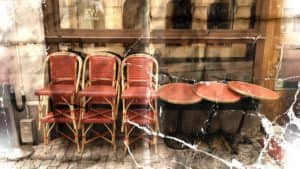
Creating a “ruined” photo effect in PHOTO-PAINT
Giving a photograph an old ruined look and feel can be a very effective way to illustrate a story. Depending on what you’re aiming at, Corel PHOTO-PAINT has many tools you can use.
Click on any of the images below to view full-size.
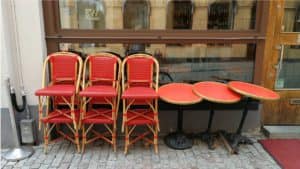
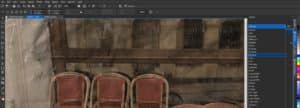
The photo I’m using for this ruined look tutorial was taken in my hometown Stockholm, outside a café in Old Town. To make the photograph look worn out, or “ruined”, I used Merge Mode blending techniques and imported textures from image samples; as well as using fills and transparencies.
STEP 1: Document setup
If you are using the sample photo and texture images to follow along with this tutorial, download them here and save them on your computer.
- In PHOTO-PAINT, open your photo by going to File > Open (or Ctrl + O on Windows or Cmd + O on Mac).
- Make sure the Objects docker/inspector is open (Window > Dockers/Inspectors > Objects).
- Duplicate the photo by right-clicking on it and selecting Duplicate (or use Ctrl + D or Cmd + D).
The reason for duplicating the photo is to preserve the original photo in case you are not happy with the effects – you can easily delete the duplicate and start over from the original photo.
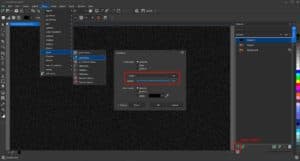
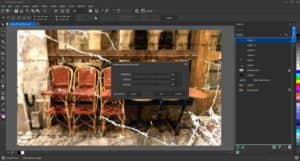
STEP 2: Adding noise
The first step in the aging process is to add noise to create an overall effect of a faded, grainy photo.
- Click on the New Object icon at the bottom of the Objects
- Select the Fill tool and fill the new object with black.
- Go to Effects > Noise > Add Noise.
- For Noise type choose Gaussian.
- Increase the Level and Density sliders to 100 and click OK.
In the Objects docker/inspector dropdown menu select a Merge Mode. I decided to go with Screen for this tutorial. You can also lower the opacity of the object with grains by lowering the value to 95 in the Opacity slider, next to the Merge Mode dropdown.
STEP 3: Adding color and toning
To add an old sepia tone to the image, select the duplicated photo and go to Effects > Camera > Sepia Toning. Change the Amount to age to 100 and click OK.
To bring back some of the red in the photo, go to the Objects docker and lower the opacity. For this tutorial and photo, I chose opacity value 60.
TIP: If you would like to change the Amount to age of sepia toning effect later, simply delete this object in the Objects docker. Then create a new duplicate of the Background object and redo the procedure.
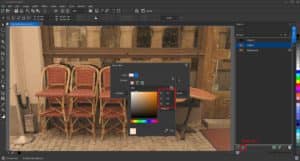
Now we are going to add another color tone, this time by using a lens.
- Click on the New Lens icon at the bottom of the Objects
- Select Photo Filter from the list in the New Lens dialog box and click OK.
- In the color window, select a color or enter the RGB values (I used R-252, G-226, B-199 in this tutorial).
STEP 4: Texture effect #1
In this project, I used two photos for texture effects. At the end of this tutorial I have provided additional information on how I created the texture effects #1 and #2 from scratch.
For the first texture I used a photo of crumpled office paper.
- Import the JPG file into your PHOTO-PAINT document.
- Place the paper image so it covers the entire café photo.
- Use the corner handles to resize if necessary.
- In Objects docker, choose Texturize in the Merge Mode
- Adjust the transparency slider to the desired effect.
STEP 5: Texture effect #2
To give the photo an old paper scratched-off effect, exposing the original white photocopy paper, I used a second textured image. This texture is a transparent PNG image with white scratches that I created by taking a photo of a concrete wall.
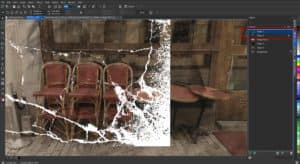
- Import the second textured image and then duplicate it (Ctrl + D or Cmd + D).
- Go to Object > Mirror > Horizontally and then Object > Mirror > Vertically.
- Now you can place one of the white scratch images on one side of the image, and the second white scratch image on the other side.
- Use the Pick tool to resize, rotate or reposition these objects until you are happy with the look.
TIP: You can use the Eraser tool to erase parts of the white scratch texture if it is too much.
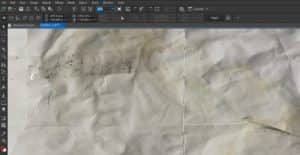
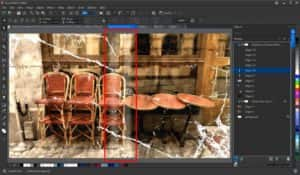
STEP 6: Adding paper folds
The next step is to add the effect of paper folds or creases, using the crumpled office paper image.
- Go to File > Open to open this image in a new document.
- Select the Rectangle Mask tool and draw a narrow marquee around the middle fold.
- Press Ctrl + C to copy.
- Go to File > New to create a new document and then press Ctrl + V to paste the mask selection.
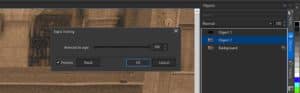
- Select the Color Transparency tool on the left toolbar, and in the Property Bar adjust the Tolerance level to 5 and the Smoothing level to 10 (you can play with these settings to find the look that you prefer).
- Click and drag on the paper fold to apply the transparency and you will see parts of the image are removed.

Select the Eraser tool on the left toolbar, and on the Property Bar click the Nib shape dropdown and select a soft nib (I used #47). Use the Eraser tool to remove some of the hard edges so the paper fold will blend in better.
Copy the paper fold image, go back to your main project and paste it. For this project I put the first fold vertically in the center of the photo. I then made three duplicates, rotated each of them horizontally and placed two of them on the left-hand side and the third on the right-hand side. To rotate, use the Pick tool or enter a value in the Angle of rotation field on the Property Bar.
You can use different Merge Modes to blend the paper folds. I chose to use Divide for the vertical fold in the middle and Multiply for the three horizontal folds.
At this point I wanted to adjust the brightness of the image.
- In the Objects docker, click the New Lens icon and select Brightness-Contrast-Intensity.
- The values I used are Brightness-25, Contrast-74, and Intensity-25.
- Click OK.
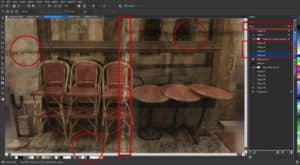
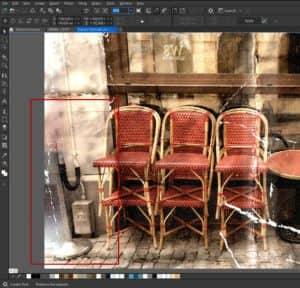
STEP 7: Final touches with fills and transparency
As a final touch I used fills and transparency to add the effect of the photo being exposed to sunlight or oxidation in a few areas. First, I added this effect on either side of the middle vertical fold.
- Click on the New Object icon at the bottom of the Objects
- Select the Rectangle Mask tool and draw a narrow vertical rectangle on the left side of the fold.
- Use the Fill tool to fill it with white then click on the Remove Mask icon on the Property Bar.
- Select the white rectangle with the Pick tool and duplicate it (Ctrl + D).
- With the rectangle still selected, hold down the Ctrl key and drag to the right to position the duplicated rectangle on the right side of the fold.
- Change the opacity of both rectangles to 15.
- Select the Eraser tool, and using the same soft nib as before, erase along the sides of both rectangles to remove the hard edges.
Next I added this effect on the left edge of the photo, following the same process but with a different fill. Instead of filling the rectangle with white, double-click on the Fill tool in the left toolbar to open the Edit Fill dialog box (you can also open this window by clicking on the Edit Fill icon that appears in the Property Bar when the Fill tool is activated).
Change the fill type to Fountain Fill, then click on the Fill picker dropdown to select a fill. For this project I used Blue Horizon (Fountain Fill 018).
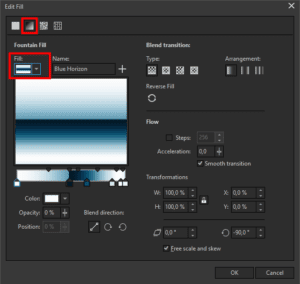
The default setting is a blue and white divided fill effect. You can edit and change the colours if you like by selecting each little handle and using the colour picker to choose a new color.
Click OK to close the window and click with the Fill tool to fill the rectangle mask with the fountain fill. In the Objects docker, lower the transparency until you are happy with the effect (I used 20 this time).
Now you can follow the same steps as before to duplicate the rectangle, move it to the right side, and then use the Eraser tool to get rid of the hard edges so that the rectangles blend into the photo better.
And here is the final result. I hope these tips and tricks give you a few ideas for your own project. Happy editing and don’t forget to check out the bonus tips below to learn how to create your own textures.
Bonus tips: Creating your own textures
Texture #1: Crumpled office paper
To create an aged paper texture, I used the left-over espresso coffee at the bottom of the cup. Added a tad bit of water and stirred it around in the cup. Took an A4-sized office paper sheet. Fold it multiple times randomly and crumpled it. Unfolded it straight, poured water on it. Placed it flat on the kitchen sink. Poured the coffee water on the paper and stirred around with my fingers. And left it to dry for a moment. (Sunny day in the window, or radiator, if it’s a cold autumn or winter day). Once it is dry, take a photo with your camera, Smartphone or scanner. Import it to your photo in PHOTO-PAINT.
Texture #2: Cracked concrete texture
I took a photo of scratches on a stone, brick or concrete wall and opened it up in PHOTO-PAINT. Converted it to Black and White via the Menu bar: Image > Convert to Black & White 1 bit. In the Conversion Method dialog box select Line Art. Remember to reduce the number of scratches you need with the slider in the dialog. And click OK. Then redo conversion and choose Convert to RGB Color 24 bit instead. And click OK. You now have black spots, scratches etcetera. Perfect to ruin your photo with!
Start your FREE 15-day trial and embark on a design journey with powerful tools for vector illustration, layout, photo editing, typography, and collaboration.
