
Start your FREE 15-day trial and embark on a design journey with powerful tools for vector illustration, layout, photo editing, typography, and collaboration.
Download these free resources:
Written Tutorial (PDF, 727 KB)
CorelDRAW Graphics Suite resources
Quick Start Guide (PDF, 2 MB)
Keyboard Shortcuts (PDF, 3.5 MB)
CorelDRAW and Corel PHOTO-PAINT user guides
For CorelDRAW Graphics Suite subscription and perpetual licenses (2018 to 2024), languages include English, Português do brasil, 简体中文, 繁體中文, Čeština, Deutsch, Español, Français, Italiano, 日本語, Polski, Русский
CorelDRAW Community
CorelDRAW learning center
Facebook
X (formerly Twitter)
YouTube
What’s new in CorelDRAW Graphics Suite
Introduction to PHOTO-PAINT
PHOTO-PAINT projects
In this written tutorial, CorelDRAW Master Stefan Lindblad show you how to design an illustration, in street art style. You will learn tips and techniques for tracing, grouping and combining objects, exporting Corel PHOTO-PAINT files, using lens correction to adjust and straighten images, using Merge Modes to add effects, and adding Gaussian Blur.
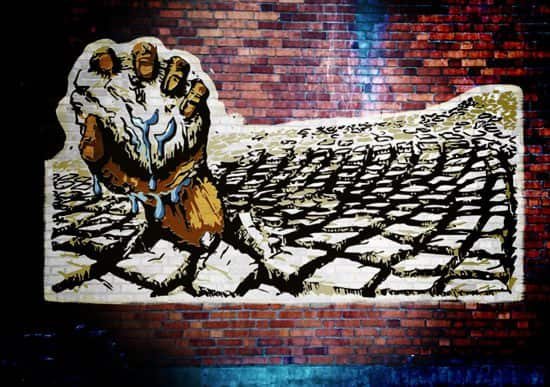
Start with an original drawing on paper. With PHOTO-PAINT and CorelDRAW, creating street art images, and later printing them out as stencils, is no problem. You have the perfect graphic software for this in front of you. Creating a Street Art editorial illustration for a magazine is no different, you just need a few extra tweaks and learn the word ’Superimposed’. This Street Art illustration will be placed on a brick wall. In others words, there is photo manipulation in play here.
Click on any of the images below to view full-size.
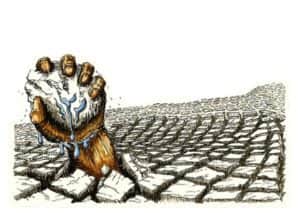
I’m using a drawing I made in my sketchbook, with pens and markers. And this will increase the amount of work in comparison to creating the image as a vector from scratch in CorelDRAW.
PowerTRACE and CorelDRAW
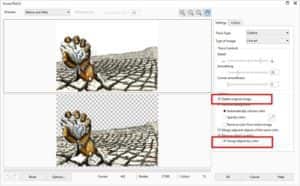
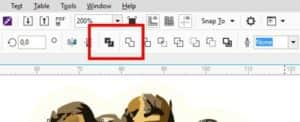
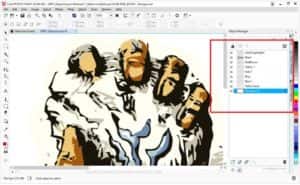
Import the drawing into CorelDRAW (Ctrl + I). Select the image and click Trace Bitmap on the property bar. Choose Outline Trace > Line Art. Select the Options section in the PowerTRACE dialog window: Group Objects By Color.
Go to Trace Controls and drag the Detail slider to the left. It reduces the amount of details, but also the number of colors. Now select Delete Original Image. Try to reduce the amount of colors to a bare minimum then click OK.
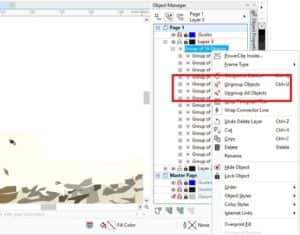
Choosing Group Objects By Color in PowerTRACE has created a group of objects in CorelDRAW. It´s now very easy to ungroup each group of objects (in the layer that was created with PowerTRACE), and place individually in layers of their own. Combine these into one curve object using the Weld or Combine tool (Ctrl + L), on the Property bar.
Attention: some curve objects you weld are actually better off if you use the Combine method instead (next to Weld).
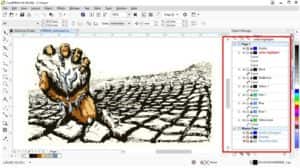
Continue doing so with each group of objects, by right-clicking and choosing Ungroup Objects. This will decrease the number of objects even further. And you also save time when moving to PHOTO-PAINT.
At this stage, there is one thing that needs attention. And that is, if you prefer to have the background layer solid, you need either to close the gaps now in CorelDRAW, or later in PHOTO-PAINT. In this case, simply use the Paint tool, and fill in those gaps.
Export with maintained layers
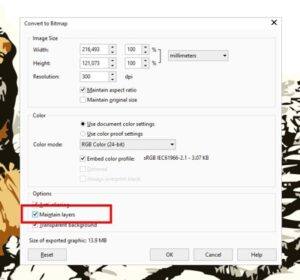
Now go to File > Export > File format, and choose .CPT. In the Export dialog, now choose Maintain Layers. It will convert all layers with curve objects, into individual objects in PHOTO-PAINT, with the names retained. So remember to place all curves into individual layers in CorelDRAW before exporting to CPT. If you’re working for print choose 300 dpi of course, and make sure that you work in the same color space.
Superimposition techniques: Working with lens adjustment objects and merge modes
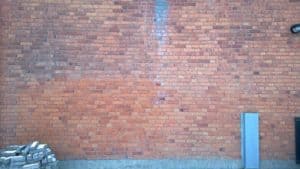
Moving to PHOTO-PAINT. Start by opening a photo of a brick wall. The image will be opened on an image tab. I took this photo of a building in my own neighborhood myself. Use Straighten Image command from the Image menu (or the corner handles), to straighten the image if needed. If necessary, use the Crop tool from the toolbar to place focus on that part of the wall that is essential for your image.
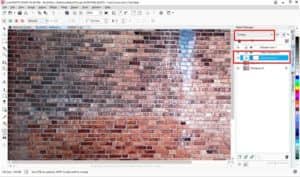
Select the Background Object (Brick wall photo). Then go to Adjust > Straighten Image and choose Correct Lens Distortion. In my case, with my photo, I moved the slider to the left to a value of -79.6 which works great. It both straightened and cropped away parts of the photo I didn’t want to keep.
In the Objects docker, click on the New Lens icon at the bottom of the panel and choose the Sharpen Lens. In my case an ”Edge Level” value of 25 is fine.
In the Objects docker, click on New Lens again and choose Tone Curve Lens. For my photo, I applied a small S-curve, dragging the lower left side down, giving me a tone value of X 74 and Y 45, which works great. You don’t need to be too exact here with the value. This way I get a darker and more defined feel and removing that milky grey feel the photo originally had. Decide for yourself by looking at the effect as you adjust the image. Go with what works for your image. And go back and adjust again if needed later on.
Adding intensity and depth to the brick wall
Now, right-click the background object and choose Duplicate. Go to New Lens > Grayscale. You now have two objects of the brick wall. Choose New Lens > Grayscale, drag the Opacity slider, in my case, to 80. Go to Merge Mode > Overlay. This creates a more intense feel to the brick wall. This places the Grayscale Lens Object over the duplicated brick wall photo object.
Always remember that these settings may vary a lot, depending on what your photo and your illustration look like. All images have their own individualities.
Back to the drawing. It is now a vector that has become a bitmap. And because the vector illustration is now, in effect, color separated layers, it will be much easier for us, working in PHOTO-PAINT, to apply image adjustment and merge mode effects to each object in the Objects docker.
Import the vector art image, and while all objects are selected, right-click and choose Group. Then hold down the Shift key and resize the image (up or down), with the corner handles to place it on the brick wall where you like to have it. Now click Save. Never forget to save now and then.
Now drag that group down, and place between the duplicated brick wall object and the Grayscale Lens object.
You can now right-click and ungroup the vector art group, if that works better for your image. I ungroup the objects myself.
I now apply various Merge Mode effects on each illustration object. I also cover the gaps on the base object, which I call the Yellow base. And then duplicate it. I rename it to ”Yellow base 2”. And keep Merge Mode as Normal and set the Opacity slider to 74.
I then re-select the first Yellow base, and choose Merge mode > Saturation > Opacity 100. And then for the other illustration objects I apply Merge mode > Normal to object Blue 1 and Blue. No Merge Mode for the Kaki object, just Normal. For object Yellow 1 I chose Merge Mode > Multiply > Opacity 100.
The RedBrown Object: Merge Mode > Multiply > Opacity 100. And finally, the Black object – the outlines I just keep Normal with an opacity of 100. I could add effects to it but because the outline is within the Yellow base objects, inside the border so to speak, I keep it. If it was an outline around the entire illustration, I might have added more effects to the outline.
Before finishing off, I select the Group object, but not expanding it, which contains the two Yellow base and Yellow base 2 objects. And using my Wacom pen I select the Eraser tool from the toolbox. Choose a more fuzzy eraser brush nib, and simply erase parts of the outline. Giving it a more integrated feel, with the brick wall background. This also simulates how a real bristled brush would possibly make it look like.
At this stage I create a New Lens object > Vibrance. In the Vibrance Lens, drag Vibrance to a value of about 98, and Saturation to the left at about -12. It might not seem much, but it gives a more vibrant touch to the colours.
And finally, to finish off, I create a new object, fill it with black, and choose Merge Mode > Overlay > Opacity slider 47.
Right-click the object and select the command Create a Clip Mask. Pick the Ellipse Mask tool from the toolbar. With the Fill tool, fill with black color. Go to the Menu Bar > Effects > Blur > Gaussian Blur.
And here it is, finished!
 CorelDRAW Graphics Suite
 Ultimate Vector Bundle Vol. 1
 CorelDRAW Standard 2021
 Ultimate Vector Bundle Vol. 2
 Corel Vector
Start your FREE 15-day trial and embark on a design journey with powerful tools for vector illustration, layout, photo editing, typography, and collaboration.
