In this tutorial, CorelDRAW Master Stefan Lindblad show you how to make a double exposure collage. You will learn tips and techniques for combining multiple images into one object, using Merge Modes to apply and blend effects, removing backgrounds, working with masks and selections, and adding highlights.
Thanks for watching! We hope you found this tutorial helpful. You will find a written version of this tutorial below, and a printable PDF copy to download on the Download resources tab above.
Start your FREE 15-day trial and embark on a design journey with powerful tools for vector illustration, layout, photo editing, typography, and collaboration.
Download these free resources:
Written tutorial (PDF, 557 KB)
CorelDRAW Graphics Suite resources
Quick Start Guide (PDF, 2 MB)
Keyboard Shortcuts (PDF, 3.5 MB)
CorelDRAW and Corel PHOTO-PAINT user guides
For CorelDRAW Graphics Suite subscription and perpetual licenses (2018 to 2024), languages include English, Português do brasil, 简体中文, 繁體中文, Čeština, Deutsch, Español, Français, Italiano, 日本語, Polski, Русский
CorelDRAW Community
CorelDRAW learning center
Facebook
X (formerly Twitter)
YouTube
PHOTO-PAINT projects
Introduction to PHOTO-PAINT
What’s new in CorelDRAW Graphics Suite
 CorelDRAW Graphics Suite
 Ultimate Vector Bundle Vol. 1
 CorelDRAW Standard 2021
 Ultimate Vector Bundle Vol. 2
 Corel Vector
Creating a double exposure collage
Working with double exposure and collage techniques − and in this case double exposure effects − can be very inspiring and make a strong visual impression. The cool thing about collage, (apart from Pablo Picasso and Georges Braque being credited for coining the term collage in European western art around 1912), is that it is primarily about assembling multiple images into one. Basically, it’s the same with the double exposure effect technique, because the thinking behind it is similar − using multiple objects and images, to create one image. In this tutorial, we will be blending it all together.
For this tutorial, I’ll be using photos included in Corel CONNECT Content Exchange, part of CorelDRAW Graphics Suite, and my own created bitmap texture, to give it a worn-out postcard-ish feel.
Create a New Image Document in Corel PHOTO-PAINT (File > New). Then import two photos via Corel CONNECT > Content Exchange > Photos > Animals. One of a Bald Eagle and one of a Gorilla.
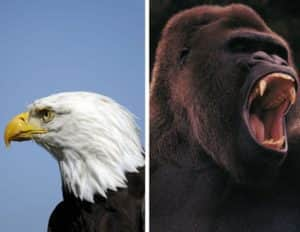
Remove any irrelevant backgrounds. In this case the blue sky behind the Eagle, and areas around the Gorilla. When you’re finished, select the photos in the Object Manager Docker, and click the Combine Icon in the bottom of the Docker to combine both images into one object. Extend the object below, by using the Paint Tool (P), and paint black underneath the area of the Eagle and Gorilla. You will use this entire area later, for your double exposure effect. I paint black right on the same object.
I then use the Lightness Merge Mode in the Object Manager Docker, for blending the effect. With other photos, you might like to go with the Multiply Merge Mode effect. It all depends on your particular photo.
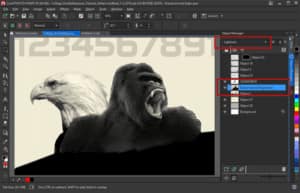
It’s easy to remove backgrounds in PHOTO-PAINT, and you can use different methods. One is quick and easy, and the other more elaborated and often used, using image adjustment effects. Both ways have their strengths.
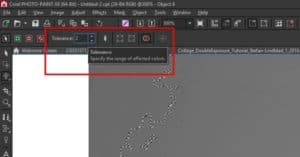
For the quick and easy method, use the Color Transparency Tool (2), in the Toolbox. I use this method for this tutorial’s Double Exposure illustration. Remember to look at the Property Bar when you pick the Color Transparency tool. By default, the Property Bar values are set to Tolerance=10 and Smoothing=20. This works great for the Bald Eagle photo. Adjust the settings if needed.

For the more elaborate method use a combo of Channels and Contrast Enhancement effects to create a good contrast. The goal is to isolate the area to keep, and remove the rest. You can also choose other adjustment tools. For example, the Greyscale Lens Object (Object > Create > New Lens > Grayscale), which I would have used, in case the Color Transparency tool didn’t produce a good enough job.
So, when using a photo with a more complex background, rather than a plain-colored background, try the Greyscale Lens Object (you can also click on the New Lens icon in the Object Manager Docker). Or try the Desaturate Lens in combination with the Tone Curve Lens, or Contrast Enhancement Lens. Drag the handles to create a big black object. Then pick the Magic Wand Tool (W), to select the entire object. Select Invert Mask (Ctrl+Shift+I), on the Property Bar if needed, and click Delete on the keyboard. All this depends really on the complexity of your photos.
Tip! When using the Magic Wand tool and other Mask tools, explore the Tolerance level on the Property Bar. It can help you make a more detailed, closer mask selection. For the Eagle Photo object, I would set the tolerance level to 2.
Now import a new photo, people on bicycles for example, and place it below the Eagle and Gorilla object, just above the Background Object in the Object Manager Docker. I set the Merge Mode effect to Normal.
Select the Eagle and Gorilla object by clicking Ctrl+M on the keyboard. This creates a mask
Select the Bicycle photo. Right-click and choose Copy. Right-click again, and choose Paste > Into Selection. This place a new object on top in the Object Manager Docker. Drag this object down, and place it just above the Background Object. It is now underneath the Eagle-Gorilla object.

Tip! For safety, make a duplicate of the Eagle-Gorilla Object and turn off the visibility by clicking on the eye icon −in case you change your mind later, and want to start anew.
Select the original Eagle-Gorilla Object, and pick the Eraser Tool (X), and using a soft, fluffy nib, erase. I choose a fluffy type of nib to get a more natural, worn-out feel when erasing. This will basically uncover the bicycle photo underneath. A simple round, soft nib would have erased too much at once.
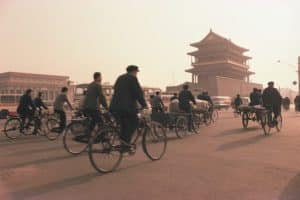
To brighten the image, for example the people, bicycles etc. in the photo, simply create a new Object in the Object Manager Docker and place this underneath the bicycle photo object. Pick the Paint tool and paint white with a round, soft nib on the new object.
Now we’re basically finished with the creation of the Double Exposure effect image.
To finish it off, pick a yellow color from the bicycle photo with the Eyedropper tool (E), and the Fill tool (F), and fill on a new object just above the Background Object.
I add some text and my own created texture, covering the entire image, to give it a more worn-out and scratched feel.
And a final touch of highlights to the gorilla’s teeth and the eagle’s nose, using the Effect Brush (V), from the Toolbox and selecting the Dodge & Burn effect from the drop-down list on the Property Bar. I recommend before using the Dodge & Burn effect on any object, to first create a duplicate of the Object (right-click the object in the Object Manager Docker and select Duplicate), and then turn it off for safe keeping, just in case you like to redo the effect, or not have an effect applied at all.
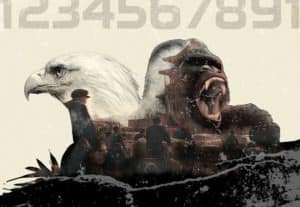
Here is the finished double exposure collage.
Start your FREE 15-day trial and embark on a design journey with powerful tools for vector illustration, layout, photo editing, typography, and collaboration.

