
CorelDRAW provides a wealth of clip art, but sometimes you just want to use your own creations. This tutorial shows how to use PowerTRACE to isolate part of a photo, making it easy to use photographed objects as clip art.
NOTE: If you are using a CorelDRAW subscription, the CONNECT Content can be found on the first tab of the Assets docker/inspector, a subscription-exclusive feature. To learn more about the Assets docker/inspector, watch the full tutorial.
Thanks for watching! We hope you found this tutorial helpful. You will find a written version of this tutorial below, and a printable PDF copy to download on the Download resources tab above.
CorelDRAW provides a wealth of clip art, but sometimes you just want to use your own creations. This tutorial shows how to use PowerTRACE to isolate part of a photo, making it easy to use photographed objects as clip art.
Thanks for watching! We hope you found this tutorial helpful. You will find a written version of this tutorial below, and a printable PDF copy to download on the Download resources tab above.
Start your FREE 15-day trial and embark on a design journey with powerful tools for vector illustration, layout, photo editing, typography, and collaboration.
Download these free resources:
Written tutorial for Windows (PDF, 1 MB)
Sample Images (ZIP, 3MB)
CorelDRAW Graphics Suite resources
Quick Start Guide (PDF, 2 MB)
Keyboard Shortcuts (PDF, 3.5 MB)
CorelDRAW and Corel PHOTO-PAINT user guides
For CorelDRAW Graphics Suite subscription and perpetual licenses (2018 to 2024), languages include English, Português do brasil, 简体中文, 繁體中文, Čeština, Deutsch, Español, Français, Italiano, 日本語, Polski, Русский
CorelDRAW Community
CorelDRAW learning center
Facebook
X (formerly Twitter)
YouTube
What’s new in CorelDRAW Graphics Suite
Working with bitmaps
Templates, clipart, symbols, and styles
 CorelDRAW Graphics Suite
 Ultimate Vector Bundle Vol. 1
 CorelDRAW Standard 2021
 Ultimate Vector Bundle Vol. 2
 Corel Vector
How to make clipart from a photo
In this tutorial, we’ll cover how to make clipart from a photo using the PowerTRACE feature in CorelDRAW.
Click on any of the images below to view full-size.
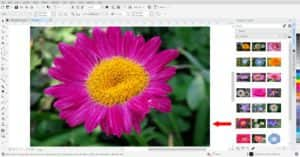
To begin, open the photo that you want to work with. In this example, we have a collection of flower photos in the CONNECT Content docker (Window > Dockers > CONNECT Content) that we will be using, and we have dragged one of them into the document.
Converting raster images to vector images
A photo (usually JPG or PNG file format) is a raster image and therefore not very useful as clipart, since it can’t be enlarged without losing sharpness and quality. The photo must be converted to a vector image using PowerTRACE.
Select the photo with the Pick tool and go to Bitmaps > Outline Trace > Clipart. This opens the PowerTRACE window, displaying the default Before and After views.
NOTE: Under the Bitmaps > Outline Trace menu you will see that there are other tracing methods, which will be discussed later in this tutorial.
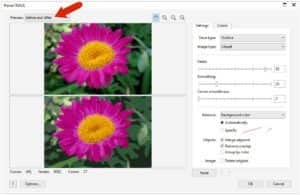
You can switch the Preview mode to Large Preview to see more detail, or Wireframe Overlay to see the actual vector curves and fill colors that will be created. In Wireframe Overlay mode, you can use the slider to adjust the translucency of the curves.
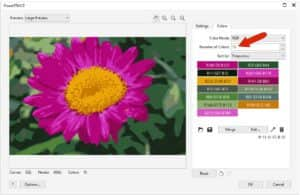
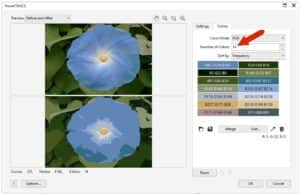
Click on the Colors tab and set the number of colors you want your clipart image to contain. In this case, 5 or fewer colors shows very little detail; increasing to about 13 works well. You can also reduce the number of colors by combining colors: press the Shift key while selecting them and then click Merge.
On the Settings tab you can adjust the level of Detail, Smoothing, and Corner smoothness. You can specify a background color to remove, but since our photo has several colors in the background, we will leave this option alone. Check Group by Color, which will make same-color curves easy to remove as groups.

Click OK and PowerTRACE will create the new vector object, which will be placed directly on top of your photo. You can use the Pick tool to move it aside for comparison. In the Objects docker (Window > Dockers > Objects), you will see that the new vector object is a group comprised of multiple objects, each of which are groups of same-color curves.
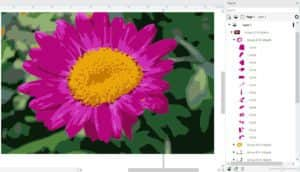
In order to isolate just the flower, we need to delete any color groups that are not pink or yellow. Select an unwanted color group in the Objects docker and then press Delete on your keyboard or click the Delete icon (trashcan) at the bottom of the Objects docker.
TIP: Hold down the Ctrl key to select multiple objects or groups and then delete all at once.
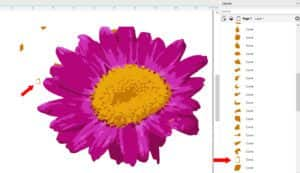
In this example, we have a few gold objects that need to be removed but they are part of the color group that also contains objects we want to keep (the center of the flower).
To remove single objects from within a group, either hold down the Ctrl key and double-click on the object to select it, or select it in the Objects docker, then delete. Now we are left with our clipart flower image, which we can save as a .CDR file to use in future documents.

Other tracing methods to make clipart
The Outline Trace method has several options you can experiment with, to see which works best to make clipart from your photo. With our second flower photo, the Clipart option only yields a maximum of 14 colors, which isn’t quite enough to produce results we’re happy with.
For better results, try the other options, such as Detailed Logo, High Quality Image, or Low Quality Image, all of which use different default settings. In this example, using the Low Quality Image option produces 24 colors, which works well for this clipart flower.

Saving and using your clipart
Once you have used PowerTRACE to make clipart from a photo, save the clipart image as a .CDR file. To use the clipart image, simply open as you would any .CDR file.
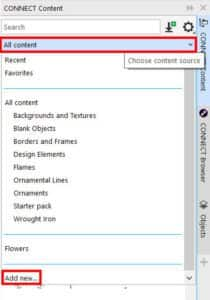
You can also create a specific folder for your clipart and add it as a content source in the CONNECT Content docker.
In the CONNECT Content docker, open the Choose content source dropdown and select Add new, then click Create alias. Browse to the location on your computer where you saved your clipart folder and select it, then click the Select Folder button.
Now when you click on the Choose content source dropdown you will see the new folder you added. If your folder contained both .CDR files and raster images like JPG and PNG, you can toggle on or off the Show vector and Show raster images icons to view only one type if you wish.
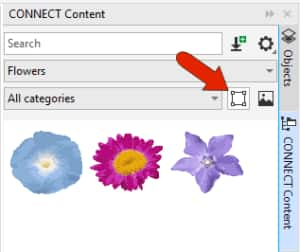
To add images from the CONNECT Content docker to your document, simply drag them in or click the Import icon in the bottom left corner of the docker.

Start your FREE 15-day trial and embark on a design journey with powerful tools for vector illustration, layout, photo editing, typography, and collaboration.

Comments (4)
Reader Interactions
Comments
How to make clip art from picture
Hi Xasan Mohamed,
If you want to make clipart from a bitmap image such as a photograph, please follow the steps in the tutorial above. If you want to make clipart from a vector image such as a graphic design or illustration, here is a tutorial that will show you how to customize the image if you wish, and how to add it to the CONNECT content. https://learn.corel.com/tutorials/how-to-customize-clipart-in-coreldraw/
Best regards,
The Discovery Center team
Bom dia, por favor verificar a possibilidade de colocar os vídeos em português.
Grata,
Mª Antonia
Oi Maria,
Você pode assistir ao vídeo com legendas no seu idioma:
– Clique no ícone “Configurações/Settings” no canto inferior direito do player de video
– Clique em “Legendas/Subtitles” e selecione seu idioma
– Se o seu idioma não estiver listado, clique em “Inglês (gerado automaticamente)/English (auto-generated)”, clique em “Traduzir automaticamente/Auto-translate” e selecione seu idioma.
Cumprimentos para você
The Discovery Center team
Este comentário foi traduzido usando o Google Tradutor