
Corel has a vast repository of all sorts of vector clipart that can be used in a variety of graphic design projects, but you’re not limited to using a clipart image in its original form only. In this tutorial, you’ll learn how to customize clipart to suit your designs, by adding and removing elements, changing colors, and editing shapes.
NOTE: If you are using a CorelDRAW subscription, the CONNECT Content can be found on the first tab of the Assets docker/inspector, a subscription-exclusive feature. To learn more about the Assets docker/inspector, watch the full tutorial.
Thanks for watching! You will find a written version of this tutorial below, and a printable PDF copy to download on the Download resources tab above.
Corel has a vast repository of all sorts of vector clipart that can be used in a variety of graphic design projects, but you’re not limited to using a clipart image in its original form only. In this tutorial, you’ll learn how to customize clipart to suit your designs, by adding and removing elements, changing colors, and editing shapes.
Thanks for watching! You will find a written version of this tutorial below, and a printable PDF copy to download on the Download resources tab above.
Start your FREE 15-day trial and embark on a design journey with powerful tools for vector illustration, layout, photo editing, typography, and collaboration.
Download these free resources:
Written tutorial (PDF, 1 MB)
CorelDRAW Graphics Suite resources
Quick Start Guide (PDF, 2 MB)
Keyboard Shortcuts (PDF, 3.5 MB)
CorelDRAW and Corel PHOTO-PAINT user guides
For CorelDRAW Graphics Suite subscription and perpetual licenses (2018 to 2024), languages include English, Português do brasil, 简体中文, 繁體中文, Čeština, Deutsch, Español, Français, Italiano, 日本語, Polski, Русский
CorelDRAW Community
CorelDRAW learning center
Facebook
X (formerly Twitter)
YouTube
What’s new in CorelDRAW Graphics Suite
Templates, clipart, and symbols
CorelDRAW tools
 CorelDRAW Graphics Suite
 Ultimate Vector Bundle Vol. 1
 CorelDRAW Standard 2021
 Ultimate Vector Bundle Vol. 2
 Corel Vector
How to customize clipart
For a fast way to create graphic elements, you can start with clipart from Corel’s vast repository. In this tutorial, we’ll see how to customize clipart by changing properties, editing nodes, and adding and removing elements.
Click on any of the images below to view full-size.
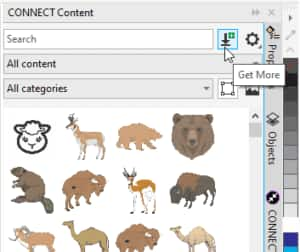
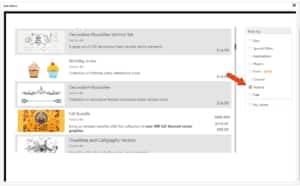
To start exploring clipart, CorelDRAW subscribers can find content on the Local and Network Assets tab of the Assets docker/inspector. Non-subscribers can find clipart content in the CONNECT Content docker/inspector (Window > Dockers > CONNECT Content).
You may just see the few items that came in the Starter Pack, but clicking the Get More icon opens a list of Corel’s Content packs.
The image packs, such as Earth and Nature or Transportation, contain either raster images or vector objects, or a combination.
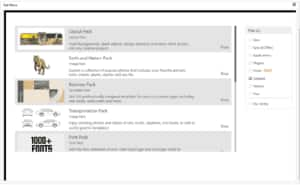
Click one of the free ones and download and install, which will quickly create and populate new categories in the CONNECT Content docker.
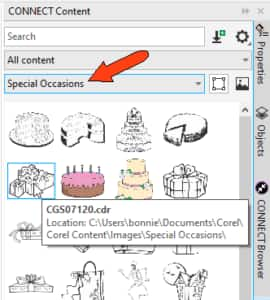
In this example, after installing the Modern Life pack, there is a long list of categories to peruse, such as Special Occasions. Each of these objects is a small CDR file, and you can hover over any object to see where the file is stored in your computer.
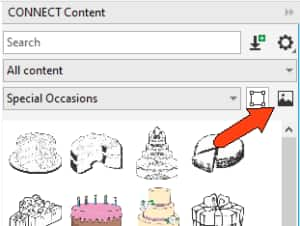
You can display only vector clipart by disabling the Raster Images icon.
In addition to CDR format, other vector clipart formats can be imported as well, such as EPS, WMP, or SVG, to name a few.
To expand the Get More list to show a huge amount of vector clipart, click the Vector filter. This displays all packs listed as Vector Art.
After you purchase a vector art pack, you’ll receive an .EXE file. Running this file adds a CorelDRAW file to your computer that contains all the vector objects. Each of these objects is a group of vector curves.
Even in a vast collection of vector clipart, you may not find exactly what you’re looking for. However, it’s a lot easier to start with clipart that can be customized, rather than build vector art from scratch.
Changing colors and fills
One way to customize clipart is to change the colors of elements within the clipart image, either to a different solid color or to a fill. In this example, we want to add a gift box to this sale banner.

The clipart we’ll use comes from a set of birthday vector icons. We’ll be using the green and yellow gift box, which we copy with Ctrl + C.

We paste (Ctrl + V) the gift box onto our banner image, then use the Pick tool to resize and move the box into place.

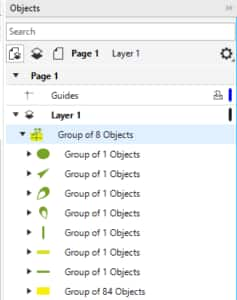
In the Objects docker, the gift box is a group, which you can rename by right-clicking on it. Opening the group shows the list of curves it contains. You could ungroup and edit curves, but to stay more organized, it’s better to keep the group intact and edit objects within.
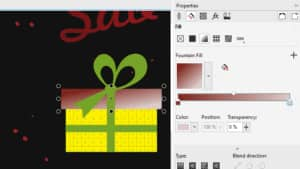
The colors of the box aren’t right for this banner, so let’s make some changes. First, select the lid of the box, which is inside the overall box group. This can be done with the Pick tool, by holding the Ctrl key while clicking.

Now open the Properties docker, click the Fill tab, switch to Fountain Fill, and use two shades of red to fit with the red of the text.
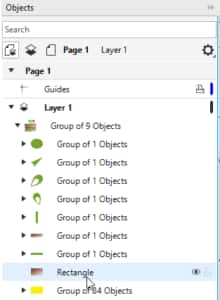
The box below the lid is a group comprised of 84 objects, but one simple rectangle is all we need. Select this group.

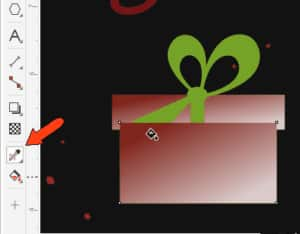
Trace the group by pressing Shift and double-clicking the Rectangle tool.
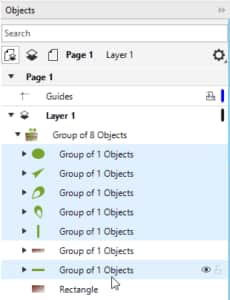
Now you can use the Attributes Eyedropper to copy the properties from the lid.
The new rectangle was added outside the group, so in the Objects docker, drag it just above the original box group.
Now you can delete that original group. Next we’ll change the bow, and here it’s easier to use the Objects docker to Ctrl-select all of the green objects.
Change the fill to fountain here as well, using a gold gradient.

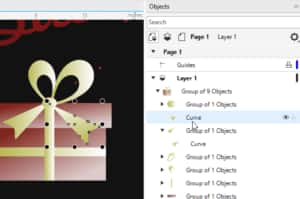
The ribbon could use another end section, so Ctrl-select the current end shape, use Ctrl + C and Ctrl + V to copy and paste, then move and rotate with the Pick tool.

This new curve is outside the gift box group, so drag it inside the group, just below the oval at the center of the bow.
In order to save this gift box as clipart to use in future files, you can save it alone as a CDR file. Select the box, choose File > Save As, and check Selected only.
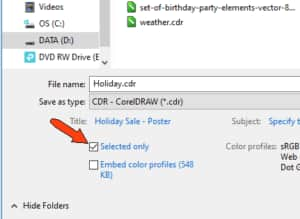
You could save the file to one of the folders that came with your content download. Or you can save it to a folder you’ve set up for customized clipart.
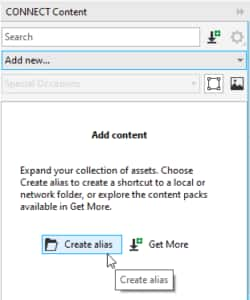
To make any folder searchable in the CONNECT Content browser, open the list of categories, and choose Add new at the bottom. Then click Create Alias and browse to and select the desired folder.
Now that folder appears in the list of categories, and you can drag in what’s inside. The clipart is imported as a group with the same name as the file name you used when saving.
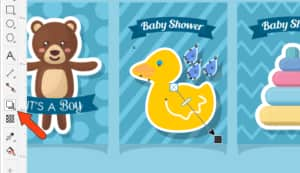
Changing lines and shapes
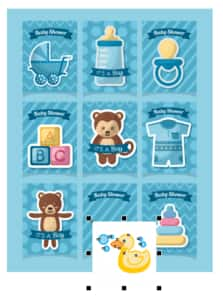
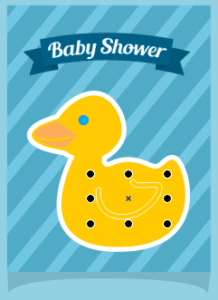
For a second example, we’ll add one more object to complete a set of sticker graphics that will be used to create stationery for a baby shower.
The duck clipart is from the Baby and Kids category from the Modern Life pack.
Unlike with the gift box in the previous example, this clipart has a white background. So Ctrl-click this rectangle and press Delete.
You can also Shift-Ctrl click all of the bubble inner circles and delete them, then do the same for the larger bubble circles.
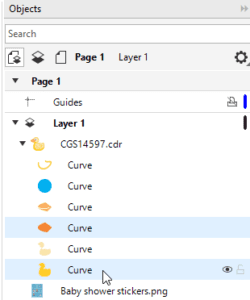
We need to make some changes to this duck so that it has the same shadowed white outlines found in the other images. In the Objects docker, open the group and select the base curves for the body and beak.
Use Weld command on the property bar to make them into one filled curve.
Now use the Properties docker, and the Outline tab, to give this new curve a 4 pt white outline.
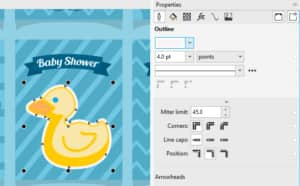
Remove the light-yellow curve inside the duck as well. And for the curve of the wing, select it and give it a white outline.
Instead of a closed, filled curve for the wing, let’s make it a thick, open curve. Switch to the Shape tool, select and delete segments, then double-click to add some new nodes, which can be moved around to get a wavier curve.

Then with the Pick tool active, increase the outline thickness.

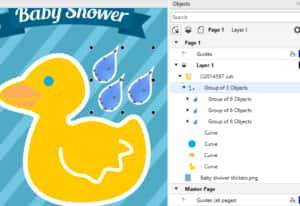
This duck can use some raindrops, and there is a nice set of raindrops in one of vector packs available to purchase. Ctrl-click to select the group of drops, and Ctrl-click once more to select just one drop.

Copy and paste, and move the drop over to the duck.
Open the group that comprises the drop, selects its base curve, and give it a thick, white outline to match.
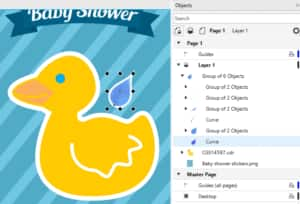
Then make two more copies of the entire raindrop group, make a group of the three drops, and move the group inside the duck group.
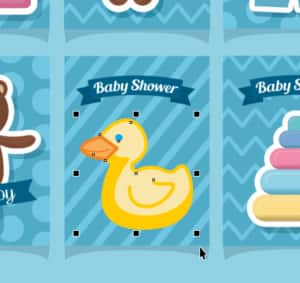
To add a drop shadow to match that of the other objects, activate the Shadow tool, click and drag to shadow the entire group, remove any feathering, and reduce the shadow opacity. Now the duck sticker looks rather consistent with the other stickers.
Start your FREE 15-day trial and embark on a design journey with powerful tools for vector illustration, layout, photo editing, typography, and collaboration.

Comments (2)
Reader Interactions
Comments
Dear Sirs,
I have the following questions:
1. Can I use vector graphics publicly, e.g. in films?
2. Do I have to give a reference to the source in graphics that I use professionally?
3. Can I use the graphics in the original or adapted form in flyers without incurring fees?
Regards
Dieter Keller
Hi Dieter,
Please visit https://www.corel.com/en/clipart-and-photos/ to see the requirements for use of vector graphics.
Best regards,
The Discovery Center team