In this tutorial you’ll learn how to use the Transparency tool in CorelDRAW to apply different types of transparencies and how to adjust the settings to create unique effects. Using the sample exercise file we will demonstrate how to apply Uniform, Fountain and 3 different Pattern transparencies; how to adjust the level of opacity; and how to modify the appearance using merge modes and transparency styles. Once you get familiar with the Transparency tool in CorelDRAW, there is no limit to the different effects and looks you can create!
Thanks for watching! You will find a written version of this tutorial below, and a printable PDF copy and exercise file to download on the Download resources tab above.
In this tutorial you’ll learn how to use the Transparency tool to apply different types of transparencies and how to adjust the settings to create unique effects. We will demonstrate how to apply Uniform, Fountain and Pattern transparencies; how to adjust the level of opacity; and how to modify the appearance using merge modes and transparency styles. Once you get familiar with the Transparency tool, there is no limit to the different effects and looks you can create!
Thanks for watching! We hope you found this tutorial helpful. You will find a written version of this tutorial below, and a printable PDF copy to download on the Download Resources tab above.
Start your FREE 15-day trial and embark on a design journey with powerful tools for vector illustration, layout, photo editing, typography, and collaboration.
Download these free resources:
Exercise file (Zip file, 4 MB)
Written tutorial for Windows (PDF, 853 KB)
Written tutorial for Mac (PDF, 638 KB)
CorelDRAW Graphics Suite resources
Quick Start Guide (PDF, 2 MB)
Keyboard Shortcuts (PDF, 3.5 MB)
CorelDRAW and Corel PHOTO-PAINT user guides
For CorelDRAW Graphics Suite subscription and perpetual licenses (2018 to 2024), languages include English, Português do brasil, 简体中文, 繁體中文, Čeština, Deutsch, Español, Français, Italiano, 日本語, Polski, Русский
CorelDRAW Community
CorelDRAW learning center
Facebook
X (formerly Twitter)
YouTube
What’s new in CorelDRAW Graphics Suite
CorelDRAW tools
Color, fills, and transparency
 CorelDRAW Graphics Suite
 Ultimate Vector Bundle Vol. 1
 CorelDRAW Standard 2021
 Ultimate Vector Bundle Vol. 2
 Corel Vector
How to use the Transparency tool in CorelDRAW
In this tutorial we will go through a variety of exercises to demonstrate how to use the Transparency tool and how to adjust the various settings for each type of transparency.
Click on any of the images below to view full-size.
The Transparency tool can be found in the CorelDRAW Toolbox on the left-hand side of the interface, above the Eyedropper tool. It looks like a black and white checkerboard. Once the tool is activated you will notice that the property bar along the top changes to show the transparency types. When a transparency type is selected, the property bar will display additional options.
There are 5 types of transparencies:
- Uniform
- Fountain
- Vector pattern
- Bitmap pattern
- Two-color pattern/texture
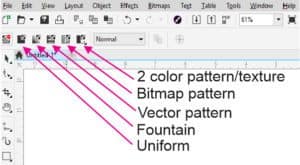
For each transparency type you can apply a Merge Mode, which will specify how the color of a transparency is combined with the color of the object behind it. Each transparency type also has a Transparency Picker, which allows you to select from different styles of transparency. You can apply a transparency to the fill of an object, the outline of an object or both. You can also adjust the opacity of the transparency and edit more details about the transparency.
How to apply a uniform transparency
Exercise 1: T-shirt mockup
In our first exercise we are going use a uniform transparency to make a t-shirt mockup look more realistic. Often a white or solid color design placed on a t-shirt photo will look like a sticker just stuck on there. We can apply a transparency effect to give the appearance that the logo is actually printed on the garment. Select the Transparency tool and then select Uniform Transparency in the property bar. Adjust the Transparency slider to 15.
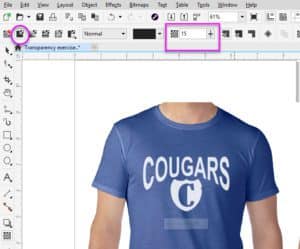
With a slight transparency, the logo is a little less opaque and looks like it is inked on the garment. If you want to see the difference, click on the No Transparency icon to remove the transparency, then click on the Uniform Transparency icon to re-apply the transparency. The effect is slight, but enough to make the t-shirt mockup look realistic.
Exercise 2: Adding a color cast to a photo
Another use of uniform transparency is to add a color cast to a photo, in this case a photo being used for a musician’s Facebook cover image. Select the image, hold down the Shift key on your keyboard and double-click the Rectangle tool. This will create a rectangle the same size as the photo. Next, choose a dark forest green on the Color palette and your rectangle will be filled with that color. Now let’s add our transparency. With the green rectangle selected, activate the Transparency tool and then click the Uniform Transparency icon. You can adjust the opacity using the Transparency slider to get the look you want.

How to apply a fountain transparency
Exercise 1: Adding a highlight to a graphic
In this exercise, we are going to use a fountain transparency to add a highlight to two different graphic images: a button for a website and a light bulb. A fountain transparency is a gradient that fades from white (less transparent) to black (more transparent). On our web button we have the red button shape and a solid white shape on top. Applying a fountain transparency will make the white shape look like a highlight.
Select the white shape with the Pick tool then activate the Transparency tool. You can select the Fountain Transparency icon in the property bar, or simply click and drag inside the white shape from the top down to the bottom. The fountain transparency is applied, softening the bottom edge so that it looks like it’s fading into the button. You can tweak it by dragging on the black handle to adjust the fading edge to make it just right.

Let’s try the same effect on our light bulb graphic. Apply the fountain transparency the same way by dragging from the center out towards the right side. The default for fountain transparency is Linear, which worked well on the web button but not for the light bulb. Choose the Elliptical fountain transparency instead.
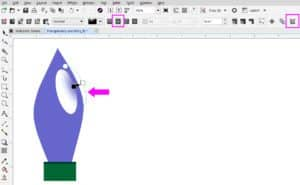
You can adjust the location of the fountain transparency by clicking on the blue dotted line and dragging it to move it.
We also need to reverse the transparency, so that it fades out towards the edge, not in towards the center. Click the Edit Transparency icon (at the far right of the property bar), then click the Reverse transparency icon and click OK.
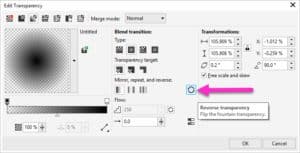
Then you can drag the black color handle to adjust the fade of the transparency so that the edges of the white highlight shape are soft.
Exercise 2: Using the Transparency Picker and merge modes
Let’s return to the Facebook cover image and we will use some other transparency options to add effects. Activate the Transparency tool and apply a fountain transparency by dragging from the top to the bottom. Click on the Transparency Picker dropdown arrow to open the library of fountain fills.
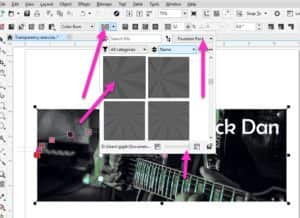
Try applying different fills and using the handles and sliders to create different looks
- Click and drag the center white rectangle to reposition the fill.
- Click and drag the white circle to adjust the length and angle of the fill.
- Click on any of the colored squares and use the slider to adjust the opacity.
- Activate the Pick tool and click on a color in the Color palette to change the color of the fill.
Note: If you are using CorelDRAW 2018 and higher, you can add more fills by going to Welcome Screen > Get More/Store and clicking on the Content tab along the top. Here you can find free fill packs that you can download and install.
Now let’s look at Merge Modes. Click on the Uniform transparency icon in the property bar. This will remove the fountain transparency and return to the solid, single color cast. We will use a merge mode to create a sepia effect. Click on the orange color in the Color palette. Select the Color Burn merge mode from the dropdown list. Adjust the Transparency slider to 52.

How to apply pattern transparencies
In this exercise you will learn how to create different effects on a thank-you card using Vector, Bitmap, 2-color and Texture transparencies. First, select the Vector Pattern transparency icon in the property bar. Click on the Transparency Picker dropdown and select the pattern you would like to use. You can adjust the scale and angle of the pattern by dragging the handles, and adjust the opacity for the Foreground and Background colors using the transparency sliders.
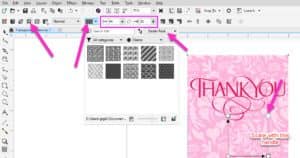
Next, click on the Bitmap Pattern transparency icon in the property bar. Check out the options in the Transparency Picker and select one you like. You can make adjustments to a bitmap pattern transparency the same as you did for the vector pattern transparency.
Note: as with the fountain transparency fills, if you are using CorelDRAW 2018 and higher you can find more vector and bitmap patterns free to download from Welcome Screen > Get More/Store > Content. If you are using a previous version of CorelDRAW, these extra patterns will already be installed.
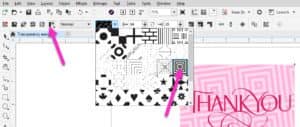
Now let’s try a two-color transparency. With the Transparency tool selected, click on the Two-color Transparency icon in the property bar. Choose a pattern from the Transparency Picker, and experiment with different looks using the same adjustment tools as the Bitmap and Vector pattern transparencies.
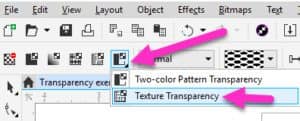
Finally, let’s try a Texture transparency. Click on the black arrow in the bottom right corner of the Two-color Transparency icon in the property bar and select Texture Transparency.
Select any texture you like adjust the scale, angle, foreground and background levels as before.
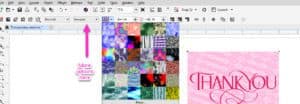
Don’t forget, you can change the color of your transparency fill or pattern by activating the Pick tool and selecting a different color in the Color palette.
Now that you are familiar with the Transparency tool in CorelDRAW, there is no limit to the different looks and effects you can create.

Start your FREE 15-day trial and embark on a design journey with powerful tools for vector illustration, layout, photo editing, typography, and collaboration.

