
Start your FREE 15-day trial and embark on a design journey with powerful tools for vector illustration, layout, photo editing, typography, and collaboration.
What’s New in CorelDRAW Graphics Suite
PHOTO-PAINT PROJECTS
Introduction to PHOTO-PAINT
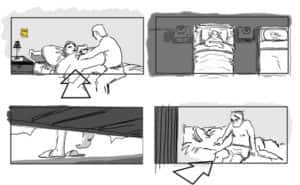
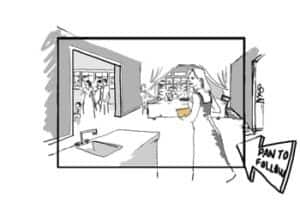
A storyboard is a series of images, usually with frames, that tells a story for a movie, TV production, or other projects. For example, I use storyboards for multiple illustrations of children’s books and for landscape projects in the early planning stage. Storyboards are also used in commercial advertising campaigns when the art director prefers to present a story with drawings before conveying it with photos. In this tutorial, you will learn how to create a storyboard using Corel PHOTO-PAINT.
Like comics, storyboards often have frames around the images, but they don’t necessarily need to look like comics in style or form. A storyboard may consist of many pages with a single frame or multiple frames on one or more pages, usually in combination with explanations, arrows, and other directional information moving the story forward. Pages in storyboards are also known as ”panels.”
Whether you use pen and paper and scan your drawings or draw from scratch by using graphics software and a pen tablet, time is usually of the essence when you create a storyboard. That is why I use PHOTO-PAINT, which is perfect for the task.
In the following paragraphs, I will provide some pointers for storyboard creation and share with you how PHOTO-PAINT can help you produce a storyboard.
Set up the image
If you are scanning a drawing for a storyboard (File > Acquire Image > Acquire), choose 300 dpi just in case you need a high-quality printout of the storyboard later.
To draw your illustration from scratch in PHOTO-PAINT by using a pen tablet, first open the Create a New Image dialog box (File > New), set the resolution to 300 dpi, choose the RGB color mode, and specify the size of the image. If you need to convert to the Grayscale color mode later, simply click Image > Convert to Grayscale.
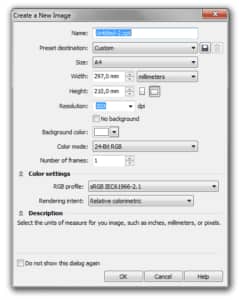
The image dimensions should allow for all storyboard elements: the illustration itself, the frame around the illustration, and white space for text directions and arrows that you may want to add later.
The frame around the image simulates a camera format such as movie, full screen, TV widescreen, or CinemaScope so it should match the size and the aspect ratio of the camera format. (The aspect ratio describes the relationship between the width and height of an image.) In my storyboards, I most often use the aspect ratios 4:3, 16:9, or 2.39:1, and I specify the measurements in pixels in Corel PHOTO-PAINT. For example, the frame size for the Widescreen HD (High Definition) camera format in pixels can be any one of the following combinations: 1920 x 1080, 1280 x 720, 852 x 480, which all have the aspect ratio of 16:9. I prefer to set the image size to at least 1920 x 1080 pixels at 300 dpi for the correct aspect ratio, and then increase the image width and height to allow for white space, arrows, and text directions around the frame. Having set the appropriate aspect ratio, I can adjust the image size later in the process.
After setting up the image, make sure to save the settings as a preset by clicking the Add destination button next to the Preset destination list box. Later you can reuse this preset for all your storyboard illustrations. You will quickly appreciate the benefit of using custom presets when you need to create numerous (80 or so) illustrations for a storyboard.
Add the frame
Either draw the frame, or add a frame created with PHOTO-PAINT or CorelDRAW. You can import the frame (File>Import) or copy and paste the frame for each new storyboard image you create in PHOTO-PAINT. Both methods are as easy as dragging and dropping a frame in your image.
Create and organize the illustration
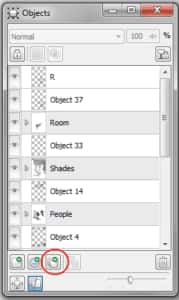
Now, you can draw your illustration by using the drawing and painting tools in the program. Note that the ability to group objects in PHOTO-PAINT is very useful for a project like this, especially when you need to group multiple objects to organize your content. In addition, grouped objects can be moved, edited, and transformed as a single entity, making it easier to edit your illustration. To group objects, select them in the Objects docker, and click the New Group button.
Add arrows and directions
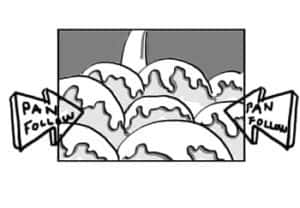
Arrows are often added to indicate camera movement, such as tilt, panning, and point of view (POV). In addition to arrows, you can add text below or around the image with any additional directions about setting up the shot such as close-up, long shot, mid shot, and so on. Knowing the terms used in filming will help you provide directions and explanatory text when you create storyboards for movies and TV productions.
Set up your composition. The composition should be balanced so that the eye of the viewer is drawn to the elements that are the focus of the shot. When you position the elements, be sure to place the focus on the background for long shots, or to place your elements in the foreground for close-ups.You can take advantage of the grid and guidelines (Tools >Options, Document category) to set up your composition.
These time-saving features can help you align and position the elements of your illustration. The easiest way to add guidelines is by dragging them from the rulers to where you want the focal point and the horizon to be in the illustration. If the rulers are not displayed, click View > Rulers. I find the rulers so useful that I have added a custom button to the property bar to show and hide them as needed. With Update X6.2, the rulers can be set to show by default (Tools > Options, Workplace category >Display).
In addition, the Guidelines docker will let you add angled guidelines, and rotate and modify existing guidelines. Rotated guidelines can be placed at a variety of angles to help you achieve a perfectly balanced composition.
Batch-convert storyboard images to JPEG or PNG
Batch processing is my secret love when I create storyboards. I once sat next to a fellow storyboard artist, also a freelancer, at a café. Coincidentally, we had both just finished storyboards for our respective clients. While we were sitting in the café, he received a phone call from his client and told him he would need a day to convert the storyboard images to JPEG or PNG.
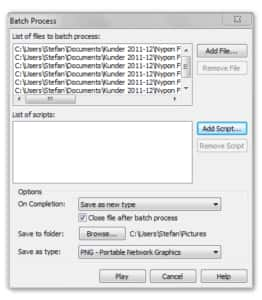
When my client called, I told him I needed 5 minutes to convert the images to JPEG or PNG, zip up the files, and send him the WinZip (.zip) file. My fellow storyboard artist burst out after the call, “5 minutes to convert 80 illustrations to PNG! Are you out of your mind?” Despite all his experience with competitive graphics software, he had never discovered the Batch Process feature (known as “Actions” in his program).
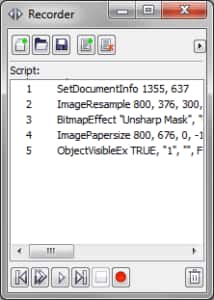
While I was completing my job, I showed him how to use the Batch Process feature (File > Batch Process) and how to record a script in PHOTO-PAINT (Windows > Dockers > Recorder). I usually record custom scripts that are specific for my illustrations. Because I like to draw in large scale for better quality, I need to resize and process the images at the end.
To record the script, I open an image, click the New Script button in the Recorder docker, and then click the Record button. Next, I resample the image (Image > Resample), add an Unsharp mask effect (Effects > Sharpen > Unsharp mask), and make any other additional tweaks.
Finally, I export the image to a Web-compatible format (File > Export for Web). After I stop recording, I save the script and use it to batch process all my storyboard images.
Deeply impressed, my friend started trying to figure out how to batch process and record scripts in the competitive software. I finished my task and went for a coffee refill.
We hope you found this tutorial helpful and we would love to hear your feedback in the Comments section below.
 CorelDRAW Graphics Suite
 Ultimate Vector Bundle Vol. 1
 CorelDRAW Standard 2021
 Ultimate Vector Bundle Vol. 2
 Corel Vector
Start your FREE 15-day trial and embark on a design journey with powerful tools for vector illustration, layout, photo editing, typography, and collaboration.

Reader Interactions