In this tutorial you will learn how to use transitions. This simple editing technique is an easy way to make your video projects look smoother, polished and much more professional. Adding transitions to your media clips is very easy – just select one and drag it onto your timeline in between two clips. Pinnacle Studio also offers many customization options so you can personalize each transition to your liking.
Thanks for watching! You will find a written version of this tutorial below, and a printable PDF copy to download on the Download resources tab above.
Download these free resources:
Written tutorial (PDF, 508 KB)
Pinnacle Studio User Guide and Help Files
Studio Backlot
Pinnacle learning center
YouTube
Download a FREE 15-day trial and discover all the essential and advanced video editing features that Pinnacle Studio delivers to make your videos look their best.
What’s new in Pinnacle Studio
Beginner video editing techniques
Effects, filters, and transitions
Featured products
 Pinnacle Studio 26 Ultimate
 Studio Backlot Membership
 Pinnacle Studio 26
 Vision FX 2.0
How to use transitions in Pinnacle Studio
In this tutorial, you’ll learn all the different ways you can add transitions to the video clips or photos on your timeline, plus options for advanced editing.
Changing your default transition settings
Before you begin adding transitions to your video projects, you can change the default transitions settings if you wish.
- Go to Setup > Control Panel and click on Project Settings.
- Adjust the Default Duration for Transitions.
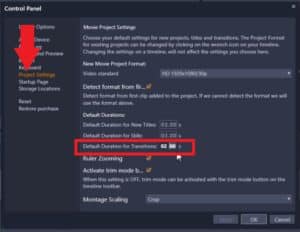
Now each time a new transition is added to your timeline, it will be your default length automatically.
Viewing transitions
You can access the Transitions library by clicking on the Transitions icon (lightning bolt symbol). There are many categories listed for you to choose from. Clicking on Transitions at the top of the list will display all transitions in the library window.
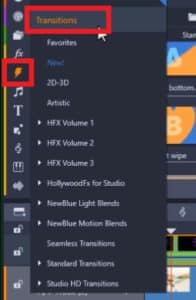
To preview a transition before adding to your timeline, click on the transition and then press play in the preview pane.

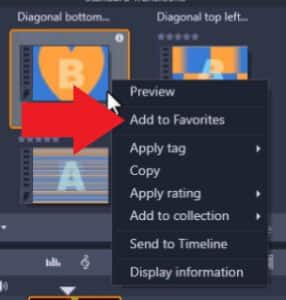
To add a transition to your Favorites list, right-click on the transition and select Add to Favorites.
Adding transitions
There are a couple different ways to add transitions to your timeline:
- Drag a transition from the library and place it in between the two clips you want to transition. An icon will appear between the clips and show you a small image of the transition type you used.
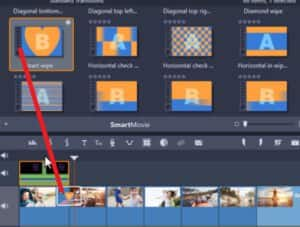
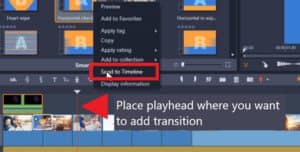
2. Move your timeline playhead to where you want to add the transition, then right-click on a transition and select Send to Timeline. The transition will be added to where you had your playhead positioned.
Removing or replacing transitions
To remove or replace a transition, right-click on the transition and select Transition.
- click Remove if you want to get rid of the transition.
- click Replace by if you want to replace the existing transition with one of your Recently Used Transitions or a crossfade.

NOTE: Another way to replace transitions is to choose a new one from the Transitions library and drag it overtop of the transition you want to replace on your timeline.
How to add the same transition between each clip
- Drag a transition onto the first clip of your timeline.
- Highlight all your media on A/V Track 2 (or where you have placed your photo and video clips) and right-click on the transition.
- Then select Transition > Ripple.
- This will cause a ripple effect down the timeline and this transition has now been applied between each clip.

Advanced transition editing
Right-click on the transition you want to edit and click on Transition > Edit. This will open the Editor window.
Depending on the transition you are working with, there will be different options you can adjust, including the placement of the transition.
In this example, you can adjust the edge softness or add a colored border to the transition.

Adding a quick fade or cross dissolve
If you want to add a fade at the end of a clip, you don’t even have to select a transition from the library. Just hover over the end of the clip you want to add a fade to until this arrow pops up.
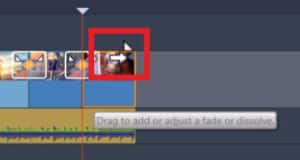
Then click and drag to the left or right (depending on where you want to put the transition) which will create a nice fade. You can adjust any of the other transitions on your timeline in the same way.
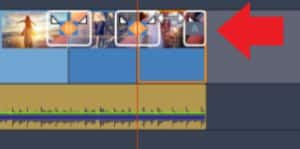
Now that you have learned how to use transitions, browse through the Transitions library and start experimenting with different effects. You’ll see how easily transitions can add a professional look to your video projects.
Download a FREE 15-day trial and discover all the essential and advanced video editing features that Pinnacle Studio delivers to make your videos look their best.


Comments (1)
Reader Interactions
Comments
The transitions for this particular Presentations are exactly same as past versions. Would have been nice to see diagonal (linear corner) wipes and matrix wipes that are linear (from top, bottom, or either side) instead of random.