
In this tutorial, you’ll learn how to add a rainbow to your photos. We’ll start with a graphic of a rainbow and show you how to use layer blend modes and layer opacity, Gaussian blur and the Eraser tool to customize the rainbow according to your image and make it blend naturally within your landscape shot.
Thanks for watching! We hope you found this tutorial helpful. You will find a written version of this tutorial below, and a printable PDF copy to download on the Download resources tab above.
Download your FREE 30-day trial and make every shot your best shot with PaintShop Pro, your all-in-one photo editing and design software.
Download these free resources:
Written tutorial (PDF, 610 KB)
Rainbow graphic (PNG, 147 KB)
PaintShop Pro resources
Keyboard shortcuts (PDF, 173 KB)
PaintShop Pro User Guides
Partner and User websites
PaintShop Pro User Forum
Scrapbook Campus (Tips and tricks, workshops, master classes, and more)
Creation Cassel (Scripts, picture tubes, and other PaintShop Pro tools, plus weekly freebies)
PaintShop Pro Maniacs (Facebook group)
PaintShop Pro (Facebook group)
What’s new in PaintShop Pro
Artistic tools and projects
Adding effects
Featured products
 PaintShop Pro 2023 Ultimate
 AI HDR Studio 3.0
 PaintShop Pro 2023
 Vision FX 2.0
How to add a rainbow to photos
In this tutorial, you’ll learn how to add a rainbow to your photos. We’ll start with a graphic of a rainbow and show you how to use layer blend modes and layer opacity, Gaussian blur and the Eraser tool to customize the rainbow according to your image and make it blend naturally within your landscape shot.
How to add the rainbow graphic to your photo
Open your photograph and the rainbow graphic in PaintShop Pro’s Edit tab. Depending on your photo, you may want to add a complete rainbow, a partial rainbow, or even a double rainbow!
If you want to add a complete rainbow:
- Copy the rainbow graphic (Ctrl + C or Edit > Copy).
- Switch to your photo and paste it in (Ctrl + V or Edit > Paste as New Layer).
If you want to add a partial rainbow, you can trim the graphic before adding it to your photo:
- Activate the Selection tool.
- Click and drag to draw a box around the part of the rainbow you want to use.
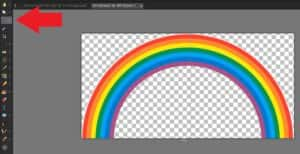
- Copy the selection (Ctrl + C or Edit > Copy).
- Switch to your photo and paste it in (Ctrl + V or Edit > Paste as New Layer).
How to adjust and customize the rainbow
In this section we will cover a number of tools and techniques that you can use to customize the rainbow and make it look more realistic. The tools and settings are specific to the sample photo used in this tutorial, so be sure to experiment with settings to see what works best for your photo.
- Make sure you have the Layers palette open by going to Palettes > Layers.
- Use the Pick tool to position the rainbow where you want it, and drag on the nodes to resize the rainbow.

- In the Layers palette, change the Blend Mode from the drop-down menu to Screen or Soft Light.
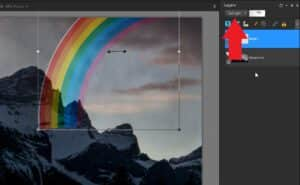
These Blend Mode options will lighten up the colors of the rainbow and also make it blend in better with the photo behind it.
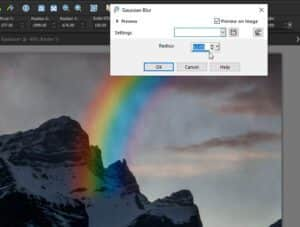
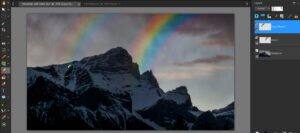
Now we need to blur the colors together even more so it looks realistic within the sky.
- Go to Adjust > Blur > Gaussian Blur.
- Adjust the radius until the rainbow blends naturally into the sky background behind the mountain. For this photograph, I’ll adjust the radius somewhere between 60 and 65.
Adjusting the shape and perspective
You may need to make some slight adjustments to the shape and perspective of the rainbow depending on your main photograph.
- Select the Pick tool.
- Under Mode on the property bar, use Shear or Perspective to adjust the image by dragging the control handles.
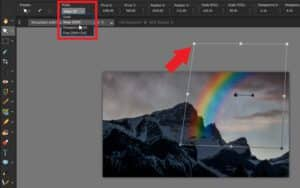
Use Shear to skew the layer vertically or horizontally.
Use Perspective to correct the perspective or apply a false perspective.
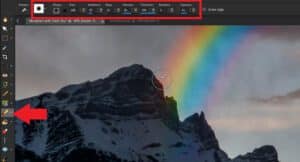
Blending with the Eraser tool
Now we need to make the ends of the rainbow slowly fade away into the sky behind the mountain.
- Select the Eraser tool on the left toolbar.
- On the property bar, choose a round brush shape and adjust the brush size.
- Decrease the Hardness level to about 25, the Density level to around 55, and change the Opacity level to around 40.
Now start erasing over the ends of the rainbow slowly to give the illusion the rainbow is disappearing into the sky.
As you continue up the rainbow, decrease the Opacity level even more so it has a gradual blend into the brighter rainbow at the top.
As a final touch, change the Opacity level of the layer in the Layers palette to make the entire rainbow blend even better with the background and depending how bright or faint you want the rainbow.

How to add a double rainbow
- Right-click on the rainbow layer in the Layers palette and select Duplicate.
- Use the Pick tool to resize and reposition the rainbow as needed.
- In the Layers palette, decrease the layer opacity level even more.
- Try another blend mode like Dodge or Burn to give it a lighter or darker effect.
- Clean up any areas you want removed with the Eraser tool.
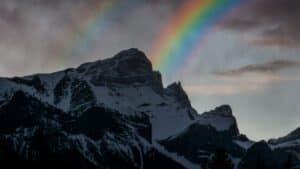
And now we’ve added a beautiful rainbow effect on our photograph giving it a nice colorful touch!
Download your FREE 30-day trial and make every shot your best shot with PaintShop Pro, your all-in-one photo editing and design software.

Comments (1)
Reader Interactions
Comments
It’s actually hard to find a rainbow that is not a double rainbow; it takes special circumstances to see only a single bow.
However, the secondary (outside) rainbow is much dimmer that the primary rainbow (and therefore often overlooked) – and the colors are reversed. The red of the primary bow faces the red of the secondary bow.
The darkest part of the sky is the region between the rainbows; it’s called Alexander’s band (after Alexander the Great, not ragtime).
Finally, when a rainbow is visible, the sun in behind you. The red of the primary rainbow is almost 45 degrees above where the shadow of your head might be. (It does not have to be raining or sunny where you are.) I could go on, but your finished photo does not look realistic.