
The Depth of Field effect in PaintShop Pro has great tools that allow photo editors to emphasize a particular object or subject while de-emphasizing what’s around it. Use Depth of Field to make an object pop with clarity while blurring everything in the background. In this tutorial, we’ll show how, quick, easy and fast it is to a Depth of Field effect.
Thanks for watching! We hope you found this tutorial helpful. You will find a written version of this tutorial below, and a printable PDF copy to download on the Download resources tab above.
Download your FREE 30-day trial and make every shot your best shot with PaintShop Pro, your all-in-one photo editing and design software.
Download these free resources:
Written tutorial and sample images (Zip, 2 MB)
PaintShop Pro resources
Keyboard shortcuts (PDF, 173 KB)
PaintShop Pro User Guides
Partner and User websites
PaintShop Pro User Forum
Scrapbook Campus (Tips and tricks, workshops, master classes, and more)
Creation Cassel (Scripts, picture tubes, and other PaintShop Pro tools, plus weekly freebies)
PaintShop Pro Maniacs (Facebook group)
PaintShop Pro (Facebook group)
What’s new in PaintShop Pro
Artistic tools and projects
Adding effects
Featured products
 PaintShop Pro 2023 Ultimate
 AI HDR Studio 3.0
 PaintShop Pro 2023
 Vision FX 2.0
Creating a Depth of Field effect in PaintShop Pro
Using your camera to add depth effects can be a daunting and complex task. The Depth of Field tool in PaintShop Pro is used to create an area of focus and also de-focus the rest of the photo in order to draw attention to a particular subject. Let me show you how and allow you to follow along.
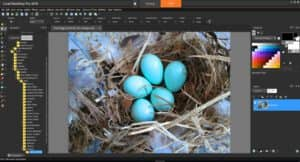
Here is the photo I will be working with in this tutorial.

In PaintShop Pro, make sure you are working in the Essentials or Complete workspace (go to File > Workspace to change workspace). Open your photo on the Edit tab.

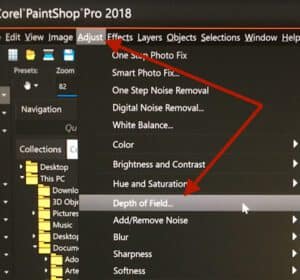
It’s okay if your interface looks different from the screenshot, as we’ll be doing all of our work in a separate area. Go to Adjust > Depth of Field.
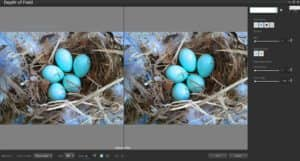
Here we see a Before window and an After window. Currently, both images look exactly the same.
Over on the right is our collection of Depth of Field tools. Watch the video tutorial to learn more about their functions.

Click on the Circular Selection tool.
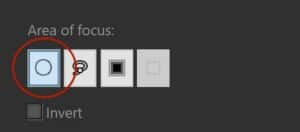
Draw a circle (from the center) that surrounds your object.
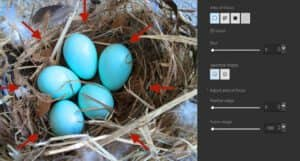
To edit your selection, grab anywhere inside your selection to reposition it. Grab any of the small nodes around the circle to resize your selection.
Using the slider or numerical input, try a couple settings. For this image I chose a Blur setting of 25.


To adjust the blur transition between the foreground and background, choose a setting from the Feather edge setting (in this example I used 50).

To adjust the amount of focus on the background, choose a setting from the Focus range slider (in this example I used 40).
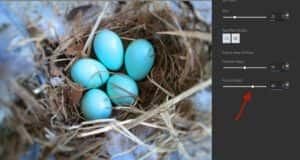
Once you’re pleased with your choice, click OK to return to the main window and view your results!

Download your FREE 30-day trial and make every shot your best shot with PaintShop Pro, your all-in-one photo editing and design software.
