PaintShop Pro includes a variety of fun photo filters that you can use to easily apply effects to your images. In this tutorial we will review the Instant Effects palette, where you can find a collections of photo filters for landscape, portrait, retro, black and white, artistic and other styles. You will learn how to add a single effect, how to layer multiple effects, and how to apply effects to just a selected object or area in your photo.
Thanks for watching! We hope you found this tutorial helpful and we would love to hear your feedback in the Comments section at the bottom of the page. You will find a written version of this tutorial below, and a printable PDF copy to download on the Download Resources tab above.
Download your FREE 30-day trial and make every shot your best shot with PaintShop Pro 2023, your all-in-one photo editing and design software.
Download these free resources:
Written Tutorial and Sample Images (Zip, 4 MB)
PaintShop Pro resources
Keyboard shortcuts (PDF, 173 KB)
PaintShop Pro User Guide (PDF, 25.4 MB)
What’s New in PaintShop Pro
Artistic Tools and Projects
Adding Effects
Featured products
 PaintShop Pro 2023 Ultimate
 AI HDR Studio 3.0
 PaintShop Pro 2023
 Vision FX
Adding Photo Filters with Instant Effects
In this tutorial, you’ll learn how easy it is to use PaintShop Pro’s Instant Effects to add a variety of fun photo filters to your images.
You’ll learn all about the different filter categories you can choose from, how to apply Instant Effects to a photo, and how to combine multiple Instant Effects to create a truly unique image!
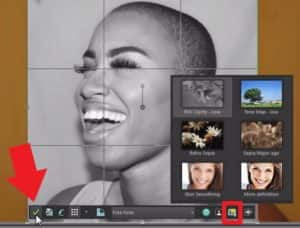
Accessing Instant Effects using the Crop Tool
If you are using PaintShop Pro 2019 or higher, you can access the most popular photo filters as part of the crop workflow, allowing you to quickly apply Instant Effects directly from the Crop toolbar.
- Activate the Crop tool.
- Click and hold down on the Instant Effects icon and then you can click on the various photo filters to try them out.
- Select the Instant Effect of your choice, then click on the green check icon to both apply the effect and crop your image.
How to Use the Instant Effects Palette
To display the Instant Effects palette, go to View > Palettes and choose Instant Effects (or use Shift + F2 on your keyboard).
You can adjust the size of the palette by clicking on the edge and dragging it to the left so that the preview area is larger, and you can easily test out different effects.
- Click on the dropdown menu under the preview area to see the different categories of photo filters available to choose from.
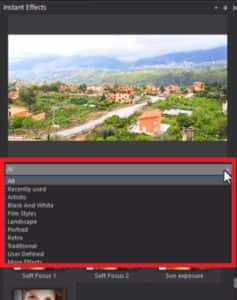
The Instant Effects options are grouped together in categories, the first being “Recently Used” which is a collection of the last 10 effects that were applied.
- The Artistic section contains effects that make images look like drawings, paintings and other works of art.
- There is a section dedicated entirely to Black and White filters.
- Film Styles contains a variety of effects to make it look like your photos were taken in a different time period or era.
- Landscape Effects are best used to change the look and feel of outdoor shots.
- Portrait Effects allow youto fix or enhance photographs of people and faces.
- Retro Effects add dynamic color changes to transform the feel of your image.
- Traditional Effects are a quick way to apply commonly used filters such as brightness, contrast or vignettes to an image.
How to Preview and Apply Instant Effects
With your photo open, click on the category of your choice, such as Landscape.
- Click once on any effect in the category and the results will display in the preview pane at the top of the palette.
- Double-click on an effect and it will be applied to your image.
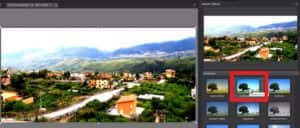
- To remove an effect, click on the Undo icon.
How to Add Multiple Effects to the Same Image
You can also add multiple effects to the same image to really produce a unique style and feel to your photographs.
In this example we are using a portrait of a woman, so we will start with the Portrait category and apply the Smart Photo Fix P2 filter. Next, we will apply the Retro Green filter from the Retro category.
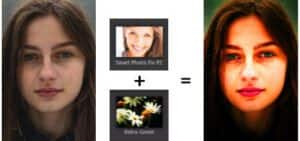
Now the edited portrait is much more vibrant than the original and the woman’s eyes really pop with the combination of these two photo filters.
How to Apply Instant Effects to a Selection
Instant Effects are applied only to the selected layer of your image. So, if you want to use these photo filters on a selected object or just a portion of your image, you can do that by creating a selection on a new layer. You can add Instant Effects to a selection from your image if you really want to make the subject or background stand out.
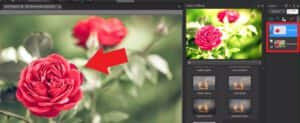
In this example we have a photo of some red roses and we will apply Instant Effects to one of the roses, so that it really stands out from the rest of the image.
- Make sure the Layers palette is displayed (go to View > Palettes > Layers or press F8 on your keyboard).
- Activate a selection tool such as the Smart Selection Brush tool and click to brush over the flower to select it.
- Go to Selections and choose Promote Selection to Layer to make the flower as its own layer.
- Go back to Selections and click Select None (or use Ctrl + D).
- In the Layers palette, click on the Background image layer to make it the active layer.
- In the Instant Effects palette, select the Black and White category and double-click on the BW Clarify high filter.
And now you can see the red rose really stands out against the black and white background.
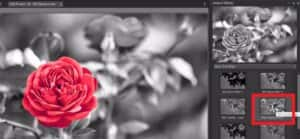
To really make the rose stand out, we can add a second Instant Effect to it.
- Click on the rose layer in the Layers palette to make it the active layer.
- In the Instant Effects palette, select the Retro category and double-click on the Retro Dark filter.
And now you’ll have a beautiful image of a really crisp dark red rose against a black and white background!

These are some of the many ways you can have fun with photo filters and create beautiful unique images using the many Instant Effects available in PaintShop Pro!
Download your FREE 30-day trial and make every shot your best shot with PaintShop Pro 2023, your all-in-one photo editing and design software.


Reader Interactions