
In this tutorial, we’ll explore the Property bar in CorelDRAW. This toolbar is context-sensitive, meaning that it changes to display the most commonly used commands and settings related to whichever tool is active at that time. For example, when the Text tool is active, the Property bar displays commands such as text formatting, alignment, and editing tools. You can also customize the Property bar to change its size or position, add or remove commands, and change display preferences such as icon size.
Thanks for watching! We hope you found this tutorial helpful. You will find a written version of this tutorial below, and a printable PDF copy to download on the Download Resources tab above.
Start your FREE 15-day trial and embark on a design journey with powerful tools for vector illustration, layout, photo editing, typography, and collaboration.
Download these free resources:
Written tutorial (PDF, 843 KB)
CorelDRAW Graphics Suite resources
Quick Start Guide (PDF, 2 MB)
Keyboard Shortcuts (PDF, 3.5 MB)
CorelDRAW and Corel PHOTO-PAINT user guides
For CorelDRAW Graphics Suite subscription and perpetual licenses (2018 to 2024), languages include English, Português do brasil, 简体中文, 繁體中文, Čeština, Deutsch, Español, Français, Italiano, 日本語, Polski, Русский
CorelDRAW Community
CorelDRAW learning center
Facebook
X (formerly Twitter)
YouTube
What’s new in CorelDRAW Graphics Suite
Introduction to CorelDRAW
 CorelDRAW Graphics Suite
 Ultimate Vector Bundle Vol. 1
 CorelDRAW Standard 2021
 Ultimate Vector Bundle Vol. 2
 Corel Vector
Exploring the Property bar in CorelDRAW
In this tutorial, we’ll review the icons and options on CorelDRAW’s Property bar, which displays the most commonly used settings and commands for whichever tool is currently active.
Click on any of the images below to view full-size.
By default, the Property bar runs below the CorelDRAW Standard toolbar, which is just under the Menu bar.

For Windows users, if you don’t see the Property bar, right-click anywhere in any other toolbar and choose Property bar. The Window > Toolbars menu is another place where you can toggle toolbars on and off.
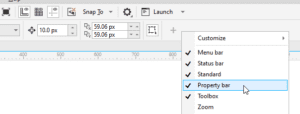
For Windows users, If you want this toolbar, or any other toolbar, to appear in a different spot, you can right-click in a toolbar and toggle off Lock Toolbars. You can then grab the toolbar by its left edge and place it anywhere, drag an edge to resize it, or drag it back to any edge to dock it in place.
To keep toolbars from moving, right-click again in a toolbar and toggle Lock Toolbars back on.
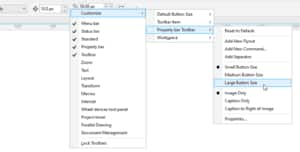
Windows users can also change the size of icons on this toolbar, by right-clicking in the Property bar and choosing Customize. With Default Button Size you can change the icon size throughout all toolbars, or you can do this just for the Property bar.
Now let’s look at how this toolbar works. The Property bar is context-sensitive, which means that the icons it contains depend on which tool is active, and what objects, if any, are selected.
For example, while the Pick tool is active, and nothing is selected, the options are for the file itself: page size and orientation, drawing units, default nudge and duplicate distances, etc.
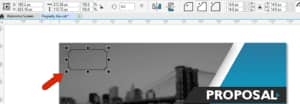
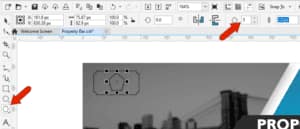
When you select an object, the first options include object origin, position, size, scale, and rotation.
These options are common to all types of selected objects and groups of objects, including shapes, lines, and text.
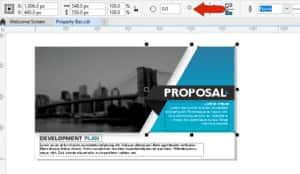
If you make a change in the drawing window, such as dragging a size node to enlarge the object, values update in the Property bar.
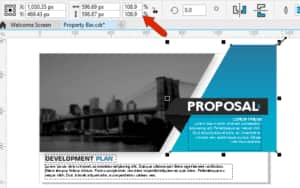
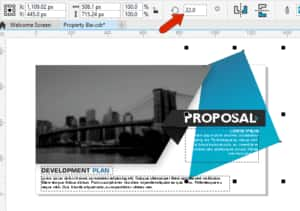
You can also make changes using Property bar fields, such as rotating the selected object.
The rest of the options on the Property bar will vary, depending on the active tool or the type of selected object.
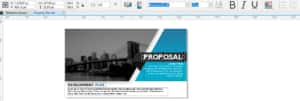
For example, when text is selected, the position and size options remain, and the rest of the Property bar icons are relevant to text, including the font list and options for size and formatting. All these options can be changed.
When the Rectangle tool is activated but nothing is selected, the position and size options are grayed out because nothing is created or selected yet. But you can set tool-specific options such as chamfered corners with a specific corner radius.

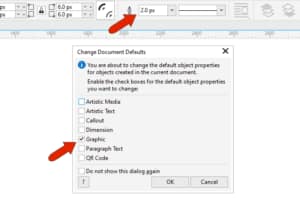
Note that if nothing is selected and you change certain general properties, such as outline width, the change will become the default for similar tools – in this case, all graphic tools.
When you then draw the rectangle, it has the specified corners and outline properties you set on the Property bar. And since the new rectangle is selected, the size and position options are available.
As long as the rectangle remains selected, everything can be changed, such as scale factor or line style.
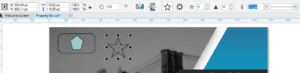
Each tool has tool-specific options on the Property bar. For example, the Polygon and Star tools have an option to set the number of sides.
As another example, the Common Shapes tool has a dropdown menu where you can select your shape.

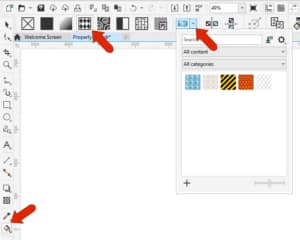
The Interactive Fill tool has options for different types of fills, including Uniform, Fountain, Vector pattern, and more. Selecting a fill type changes the Property bar icons. For Fountain fill, the options are relevant to gradients, for Bitmap pattern fill there is a pattern selection menu, etc.
For any selected object, CorelDRAW remembers the tool used to create it. So if you have a star in your drawing, and use the Pick tool to select it, the star options will appear on the Property bar.
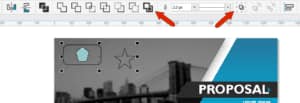
If multiple objects are selected, the Property bar options include shaping tools such as Combine, Weld, and Trim, as well as Group and Ungroup, and the icon that opens the Align and Distribute docker.
For Windows users, regardless of the options that appear on the Property bar, the last icon is a plus sign, also called the Quick Customize icon. Clicking this icon displays the default list of Property bar icons for the current context.
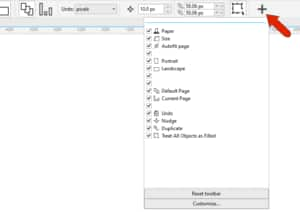
You can uncheck an icon to remove it, select an icon to add it back in, reset the toolbar, or choose Customize to add a tool.
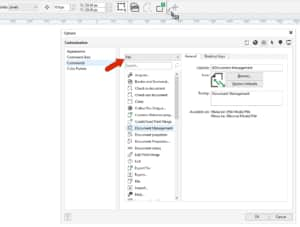
Clicking Customize opens the Options window. Choose the category of commands, such as File in this example, and drag icons directly into the Property bar. You can remove an icon by dragging it off or by right-clicking on it and choosing Customize > Toolbar Item > Delete.
These added icons will appear on the Property bar for the current context. The icons will not appear if a different tool is selected or if different object types are selected.
For other customization options, right-click in the Property bar and choose Customize > Property bar Toolbar. The option to add a new command appears here as well, and you can also add a new flyout.
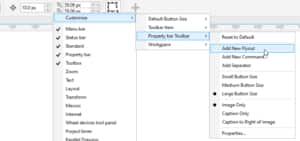
The flyout comes in empty, in the spot where you right-clicked. To add new icons to the flyout, click Quick Customize, then click Customize, and drag icons onto the flyout, then into the correct position within the flyout.
Like with adding individual icons, a flyout is also context-sensitive.
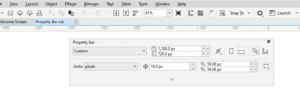
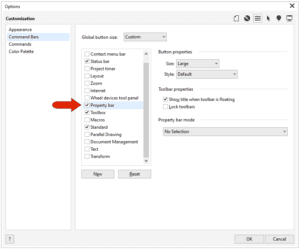
The customize menu for the Property bar also has a Properties option. Property bar is selected on the left, and several customization options can be set on the right.
Start your FREE 15-day trial and embark on a design journey with powerful tools for vector illustration, layout, photo editing, typography, and collaboration.
