
In this tutorial, we’ll review each of the tools and features on CorelDRAW’s Standard toolbar. If you are new to CorelDRAW, this will help you get familiar with basic commands like New, Save, Open and Print, and introduce you to some handy display features like rulers, full screen preview, and guidelines. You’ll also learn about shortcuts for these tools and some options for customizing the appearance of the toolbar.
Thanks for watching! We hope you found this tutorial helpful. You will find a written version of this tutorial below, and a printable PDF copy to download on the Download Resources tab above.
Start your FREE 15-day trial and embark on a design journey with powerful tools for vector illustration, layout, photo editing, typography, and collaboration.
Download these free resources:
Written tutorial (PDF, 450 KB)
CorelDRAW Graphics Suite resources
Quick Start Guide (PDF, 2 MB)
Keyboard Shortcuts (PDF, 3.5 MB)
CorelDRAW and Corel PHOTO-PAINT user guides
For CorelDRAW Graphics Suite subscription and perpetual licenses (2018 to 2024), languages include English, Português do brasil, 简体中文, 繁體中文, Čeština, Deutsch, Español, Français, Italiano, 日本語, Polski, Русский
CorelDRAW Community
CorelDRAW learning center
Facebook
X (formerly Twitter)
YouTube
What’s new in CorelDRAW Graphics Suite
Introduction to CorelDRAW
CorelDRAW tools
 CorelDRAW Graphics Suite
 Ultimate Vector Bundle Vol. 1
 CorelDRAW Standard 2021
 Ultimate Vector Bundle Vol. 2
 Corel Vector
Exploring the Standard toolbar in CorelDRAW
In this tutorial, we’ll review the icons and options on CorelDRAW’s Standard toolbar. The toolbar we’ll be using here is specific to the Windows version of CorelDRAW Graphics Suite. CorelDRAW Standard and Essentials also have this toolbar, but with slightly fewer tools.
Click on any of the images below to view full-size.
By default, the Standard toolbar runs across the top of the CorelDRAW interface, just below the menu bar.

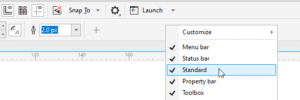
If you don’t see this toolbar, right-click anywhere in any other toolbar and choose Standard.
The Window > Toolbars menu is another place where you can toggle toolbars on and off.
If you want the Standard toolbar, or any other toolbar, to appear in a different spot, you can right-click in a toolbar and toggle off Lock Toolbars. You can then grab any toolbar by its left edge and place it anywhere and drag an edge to resize it.

Dragging a toolbar back to any edge docks it in place. To keep toolbars from moving, right-click again in a toolbar and toggle Lock Toolbars back on.
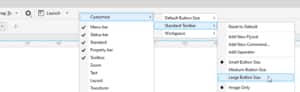
To change the size of icons on this toolbar, right-click in the Standard toolbar and choose Customize. With the Default Button Size option, you can change the icon size throughout all toolbars, or you change icon size just for the Standard toolbar.
Now let’s look at each option in the Standard toolbar.
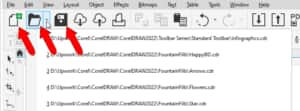
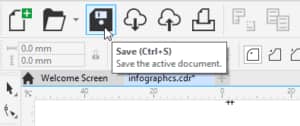
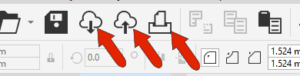
As in most other applications, the first icon is New, which starts a new CorelDRAW file. Next comes Open, and clicking the drop-down arrow for this tool opens a list of recent files you can choose to open again. The familiar Save icon is next, which is only enabled after you make a change in your file.
CorelDRAW files are saved in CDR format.
Keyboard shortcuts can be seen when hovering over an icon, and they are generally standard for common tools. For example, we have Ctrl + N for New, Ctrl + S for Save, etc.
The next two icons are Open from Cloud and Save to Cloud. Every user of CorelDRAW Graphics Suite 2019 and later can access CorelDRAW.app with their Corel account credentials, and store files in their Cloud account. For users with a CorelDRAW Graphics Suite subscription, there are also exclusive collaborative features, such as live comments.
To learn more about collaboration and Cloud features, watch our full tutorial Managing Cloud Files and Collaboration.
Another familiar icon is Print, which opens a multi-tab window with numerous print options.
The next set of icons are Cut, Copy, and Paste, with the familiar shortcuts of Ctrl + X, Ctrl + C, and Ctrl + V. If you draw an object and keep it selected, Copy saves the object to the clipboard, Cut removes it while keeping it in the clipboard, and Paste brings it back in.
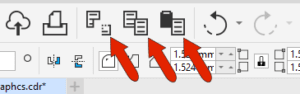
Undo and Redo are next, with shortcuts of Ctrl + Z and Ctrl + Shift + Z. You can click Undo repeatedly to go back one step at a time, or use the drop-down to return to a specific step. Redo works the same way.

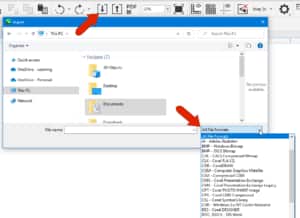
Import, or Ctrl + I, is for bringing other files into your drawing, and you can click the All File Formats list to see what can be imported.
Export, or Ctrl + E, is used for saving your CorelDRAW file, or selected objects, to a format other than CDR. Click the Save as Type drop down to see the extensive list of available formats, and the available options depend on the selected format.
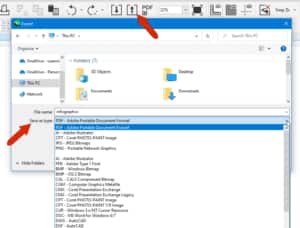
Publish to PDF is used just for PDF export and has a wealth of settings. To learn more, view our full tutorial on publishing to PDF.

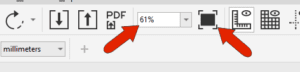
Next comes Zoom levels. If you use your mouse wheel to zoom in or out, you will see the zoom percentage update, or you can enter an exact value.
To learn more about zoom, watch our full tutorial How to Pan and Zoom in CorelDRAW.
The Full-screen preview icon displays the contents of your drawing in full-screen mode, with no toolbars or menus. You can end full-screen mode by pressing any key or clicking a mouse button.
The next three icons control the display of reference elements. Rulers appear along the top and left edges, in the current units which can be set in the property bar.
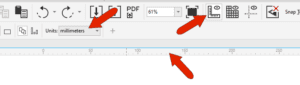
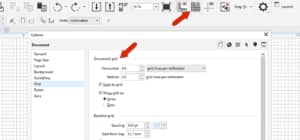
Show Grid turns on the default document grid, whose properties you can change by right-clicking on a ruler and choosing Grid Setup. In Document Grid, you can change the spacing of grid lines, switch to grid dots, and toggle Snap to Grid. We’ll look at snaps a bit farther on.
The last reference display option is Guidelines. These are added from the Guidelines docker, which you can open by choosing Window > Dockers > Guidelines. Or they can be added by dragging from a ruler into the desktop.

If the Snap Off icon is enabled, then no snaps will be working, and no tooltips appear while your cursor is moving around. To use snaps, toggle off this icon, or press Alt + Q. Then you can use the Snap To menu to choose the snaps you want.
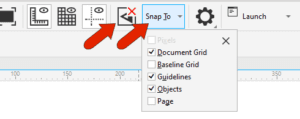
When snaps are on, the cursor identifies and moves to the exact location of certain objects, such as a grid point, edge, node, midpoint, etc. You can use these points for drawing or moving.

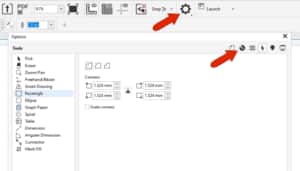
The Options icon opens the Options window, with icons at the top right to open several tabs.
- CorelDRAW options: Define how several features in the interface will work, like snapping, text, warnings, and more.
- Customization options: Control the appearance of the interface.
- Tools options: Set tool defaults. For example, open Rectangle and choose default corners and their radii.
- Global options: Control system-related options such as file locations and formats, and privacy settings.
- Workspace options: Choose from different workspaces. The Default workspace is active, but, as an example, if you switch to Lite and set as current, you’ll have a smaller set of displayed tools to work with. You can also create customized workspaces that contain the tools you use most often. To learn more, watch our full tutorial How to Customize the CorelDRAW Workspace.
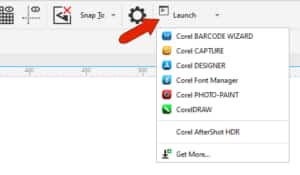
Finally, we have the Launch menu, which launches other Corel applications, such as Corel CAPTURE or Corel PHOTO-PAINT. The Get More option opens the Store in the Welcome Screen, where you can filter the list to see what you might want to add.
Start your FREE 15-day trial and embark on a design journey with powerful tools for vector illustration, layout, photo editing, typography, and collaboration.

Comments (2)
Reader Interactions
Comments
Help me, i cannot login coreldraw.app
Please visit our support page at https://www.coreldraw.com/en/support/ and submit a support ticket or start a chat session with an agent who can help you with this issue.