
In this tutorial, you will learn how to use the Flood Fill tool in PaintShop Pro to fill areas with colors, gradients, or patterns. The Flood Fill tool allows you to fill all pixels or pixels you specify with your selected colors. This is a very useful tool when working with graphic design projects if you want to change or experiment with the color scheme.
Thanks for watching! We hope you found this tutorial helpful. You will find a written version of this tutorial below, and a printable PDF copy to download on the Download Resources tab above.
Download your FREE 30-day trial and make every shot your best shot with PaintShop Pro, your all-in-one photo editing and design software.
Download these free resources:
Written tutorial (PDF, 1 MB)
PaintShop Pro resources
Keyboard shortcuts (PDF, 173 KB)
PaintShop Pro User Guides
Partner and User websites
PaintShop Pro User Forum
Scrapbook Campus (Tips and tricks, workshops, master classes, and more)
Creation Cassel (Scripts, picture tubes, and other PaintShop Pro tools, plus weekly freebies)
PaintShop Pro Maniacs (Facebook group)
PaintShop Pro (Facebook group)
What’s new in PaintShop Pro
PaintShop Pro tools
Working with color and fills
Featured products
 PaintShop Pro 2023 Ultimate
 AI HDR Studio 3.0
 PaintShop Pro 2023
 Vision FX 2.0
How to use the Flood Fill tool
In this tutorial, you will learn how to use the Flood Fill tool in PaintShop Pro to fill areas with colors, gradients, or patterns. The Flood Fill tool allows you to fill all pixels or pixels you specify with your selected colors. This is a very useful tool when working with graphic design projects if you want to change or experiment with the color scheme.
Basics of the Flood Fill tool
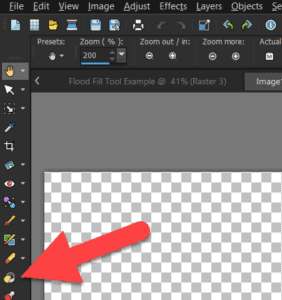
The Flood Fill tool is represented by a paint bucket icon on the Tools toolbar. You can also activate this tool by pressing F on your keyboard.
If you don’t already have the Materials palette open, go to Palettes > Materials or press F6. In the Materials palette, choose the foreground or background color with which to fill the area.
If the standard palette doesn’t have exactly the right shade you want, you can click on the dropdown menu to browse through many different palettes.
Or you can choose a custom color by clicking on the Foreground or Background Properties box to bring up the Material Properties window.
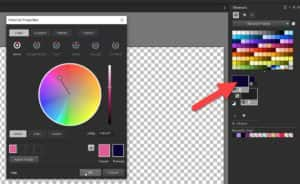
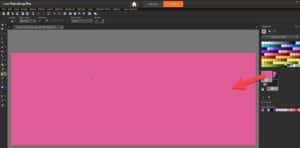
From here, you can select the exact color you want from the color wheel. Click on the blank canvas to fill it with your chosen color. Left-click to fill with the Foreground color or right-click to fill with the Background color.
How to use and customize the Flood Fill tool
When we use the Flood Fill tool, all colors that are similar to the color you clicked will be filled.
To alter the range color that will be filled, you can adjust the Tolerance control on the Tool Options palette. 0 is for exact matches only and 200 is for all colors.
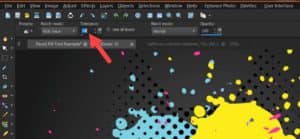
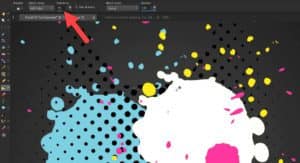
I want to fill this yellow splash design with white.
- Select the desired color from the Materials palette, and then left click on the yellow splash to fill it with white.
- Adjust the Tolerance level to get a better result if the edges are not completely filled in with your desired color.
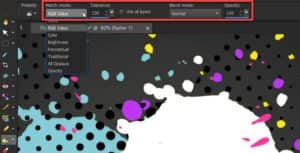
There are several options you can choose from the Tool Options palette.
- Select the Match Mode from the drop-list.
We have the Match Mode set as the default RGB Value which fills pixels that match the red, green, and blue values of the pixel you click.
- Choose an option from the Blend Mode drop-list to specify how filled pixels are blended with pixels of underlying layers.
- You can limit the flood fill to matching pixels of the current layer only by unmarking the Use all layers check box.
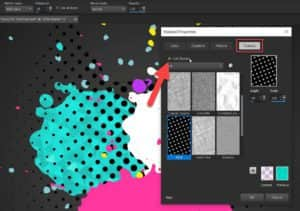
How to fill with a pattern
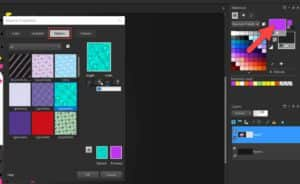
- Click on the Foreground and Stroke Properties box to open the Materials Properties window.
- Select the Pattern tab and choose the pattern you like and adjust the Angle and Scale of the pattern as desired. Then click OK.
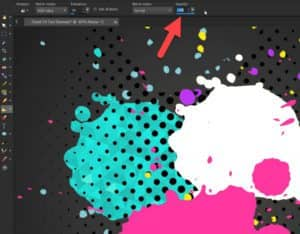
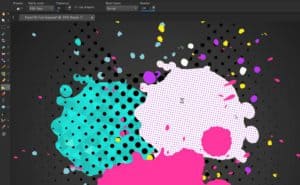
Click on the splash to fill it with your chosen pattern. You can experiment with the different blend modes or adjust the Opacity slider as well.
At 100 percent opacity, the paint covers everything; at 1 percent opacity, the paint is almost completely transparent.
How to fill with a texture
You can use textures with the current color, gradient, or pattern for foreground and background strokes or fills.
- Click on the Foreground properties box, then select the color of the texture you want to add.
- Click on the Texture tab, and mark the Add Texture check box.
- Select the texture you want to add and make any adjustments to the Angle or Scale of the texture.
- Press OK.
- Left click to fill with your chosen texture.
How to fill text, shapes, and other design elements
The Flood Fill tool also makes it easy to change the colors of any shapes or design elements you have added to your project.
- Select the layer or element you want to adjust.
- Then when you click to use the Flood Fill tool, press OK to convert the current layer to a raster layer if prompted.
- Then use the Flood Fill tool as desired on your text or shapes.

How to tint or colorize a photo with the Flood Fill tool
- Open up your photo in PaintShop Pro.
- Select the color of tint from the Materials palette.
- Choose Color (Legacy) from the Blend Mode list box on the Tool Options palette.
- Set the Tolerance to 200 and adjust the Opacity level to experiment with the intensity of the tint you want to add to the image.
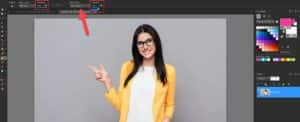
A low opacity level will give the photo a light tint, and a high opacity level will give it a more intense tint.
Simply click on the image to give it a tint or colorized effect!

The Flood Fill tool makes it easy to get creative and experiment with your photographs and design projects.

Download your FREE 30-day trial and make every shot your best shot with PaintShop Pro, your all-in-one photo editing and design software.

Comments (2)
Reader Interactions
Comments
Cannot get the flood tool to work. JPG. PSPIMAGE. Raster. Background. Really frustrating.
Also, my keyboard shortcuts don’t work with Photoshop. Used to. Works for other software.
I think 2002 ultimate must be a real dog.
Hi Bill,
I’m sorry to hear you are having issues with PaintShop Pro. For the keyboard shortcuts, try going to View > Customize, click on the Keyboard tab and then click the Reset All button. For the Flood Fill tool, is it not working at all, or not giving you the results you wanted? One thing to check (if you haven’t already) is the settings on the Tool Options palette along the top, such as Match Mode and Tolerance. Adjusting these settings may help. Also, if your file has multiple layers make sure the layer is active in the Layers palette before trying to fill.
Hope this helps!
The Discovery Center team