
In this tutorial, you’ll learn how to use the Move tool to quickly move elements or layers on your canvas. This is especially useful for working with multiple elements on the canvas when you’re creating collages or custom graphics.
Thanks for watching! We hope you found this tutorial helpful and we would love to hear your feedback in the Comments section at the bottom of the page. You will find a written version of this tutorial below, and a printable PDF copy to download on the Download Resources tab above.
Download your FREE 30-day trial and make every shot your best shot with PaintShop Pro, your all-in-one photo editing and design software.
Download these free resources:
Written tutorial (PDF, 614 KB)
PaintShop Pro resources
Keyboard shortcuts (PDF, 173 KB)
PaintShop Pro User Guides
Partner and User websites
PaintShop Pro User Forum
Scrapbook Campus (Tips and tricks, workshops, master classes, and more)
Creation Cassel (Scripts, picture tubes, and other PaintShop Pro tools, plus weekly freebies)
PaintShop Pro Maniacs (Facebook group)
PaintShop Pro (Facebook group)
What’s New in PaintShop Pro
PaintShop Pro Tools
Getting Started with PaintShop Pro
Featured products
 PaintShop Pro 2023 Ultimate
 AI HDR Studio 3.0
 PaintShop Pro 2023
 Vision FX 2.0
How to Use the Move Tool
Click on any of the images below to view full-size.
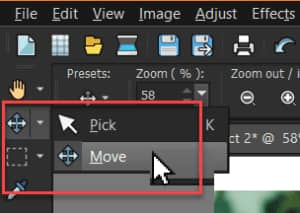
The Move tool can be found in the tool group flyout under the Pick tool. Alternatively, you can press M on your keyboard to activate it.
The Move tool allows you to move elements on the canvas.
- To move an element, click the element to select it.
- Then click and drag to move the image or element on the canvas to a new position.

What is the Difference Between the Move Tool and Pick Tool?
Both the Pick tool and the Move tool can be used to move objects, elements, or layers on the PaintShop Pro canvas. With the Pick tool you can also resize, rotate, and distort the objects or layers, which you can’t do with the Move tool.
You may prefer to use the Move tool to move layers and objects because there is no risk of accidentally resizing or distorting any of the elements which could happen while using the Pick tool.
Using the Move Tool with Layers
If you are working on a project with multiple layers on the canvas, it is recommended that you open the Layers palette (go to Palettes > Layers or press F8).
- Select the layer you want to move and use the Move tool to click and drag the element to its new position.

You can move the contents of an entire layer anywhere within the image canvas.
If you move part of a layer off the canvas, the layer is not cropped — you can move it back to the canvas or increase the canvas size to display the hidden area.
However, once you save or export the image as a JPG or PNG file, the layer will be cropped.
- When the Move tool is activated, you can use the arrow keys to move the active image or layer.
- Hold down CTRL while you use the arrow keys to move by 10 pixels or hold down Shift to move by 50 pixels.

How to Move Objects/Layers Together or Independently
The Move tool allows you to move certain objects together, whereas the Pick tool allows you to move single objects independently.
For example, if you have two or more shapes on the same vector layer, with the Move tool you just have to move one and the rest will move with it.

If you only want to move one of the shapes, use the Pick tool.
How to Link Layers
You can link layers to have them move together on the image canvas when you move one layer with the Move tool.
- Hold down CTRL and select the layers that you want to link on the Layers palette, then click the Link/Unlink button.
- Now you can use the Move tool to move the layers together on the image canvas.

The Move tool will help you to quickly move layers on the canvas as you create your custom projects and designs in PaintShop Pro.

Download your FREE 30-day trial and make every shot your best shot with PaintShop Pro, your all-in-one photo editing and design software.
