
In this tutorial, you’ll learn how to make your photos look more professional by removing unwanted people or objects with the Object Remover tool. The Object Remover tool lets you remove objects when the surrounding area is fairly uniform in color and texture – just identify the area to remove and then choose a source area from another part of the photo to cover it.
Thanks for watching! We hope you found this tutorial helpful and we would love to hear your feedback in the Comments section at the bottom of the page. You will find a written version of this tutorial below, and a printable PDF copy to download on the Download Resources tab above.
Download your FREE 30-day trial and make every shot your best shot with PaintShop Pro, your all-in-one photo editing and design software.
Download these free resources:
Written tutorial (PDF, 2 MB)
PaintShop Pro resources
Keyboard shortcuts (PDF, 173 KB)
PaintShop Pro User Guides
Partner and User websites
PaintShop Pro User Forum
Scrapbook Campus (Tips and tricks, workshops, master classes, and more)
Creation Cassel (Scripts, picture tubes, and other PaintShop Pro tools, plus weekly freebies)
PaintShop Pro Maniacs (Facebook group)
PaintShop Pro (Facebook group)
What’s New in PaintShop Pro
PaintShop Pro Tools
Photo Restoration
Featured products
 PaintShop Pro 2023 Ultimate
 AI HDR Studio 3.0
 PaintShop Pro 2023
 Vision FX 2.0
How to Use the Object Remover Tool
In this tutorial, you’ll learn how to make your photos look more professional by removing unwanted people or objects with the Object Remover tool. The Object Remover tool lets you remove objects when the surrounding area is fairly uniform in color and texture – just identify the area to remove and then choose a source are from another part of the photo to cover it.
Click on any of the images below to view full-size.
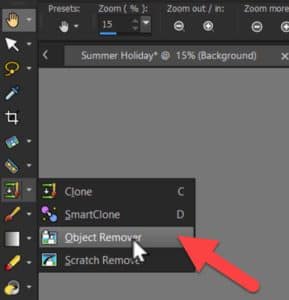
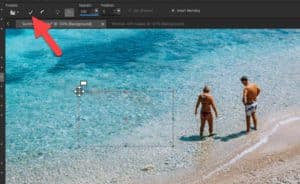
To use the Object Remover tool, click on the dropdown arrow beside the Clone Brush tool on the Tools toolbar and select the Object Remover icon.
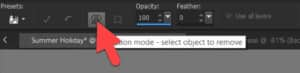
Once you activate the Object Remover tool, there are several options on the Tool Options palette:

- Feather Control: Feather a selection made with the Freehand Selection tool by adjusting the Feather control before you make your selection.
- Opacity Control: Adjust the opacity of the source material that you will use to replace the object you want to remove by adjusting the Opacity control.
- Use all layers: If you are working with multiple layers, you can select or deselect the Use all layers check box to choose source material from all layers as though they were merged. (Do not mark this check box if you want to choose source material from the current layer only).
- Smart Blending: Blend edges when applying the source material more naturally by choosing the Smart Blending option.
In this example, we will keep the options as they are by default, with Smart Blending enabled.
How to Make a Selection
- From the Tool Options palette, choose the Selection Mode button.
- Click and drag to draw a selection around the part of the image that you want to remove.
NOTE: You can also create a selection by using any of the selection tools before you activate the Object Remover tool. To learn more about the selection tools, watch our full tutorials:
Introduction to Selection Tools, How to Use the Magic Wand Selection Tool, Making a Fine-detail Selection
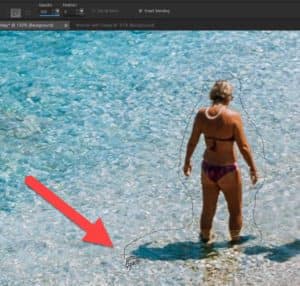
In this example, I want to remove the woman from this photograph, so I’ll drag a selection around her.
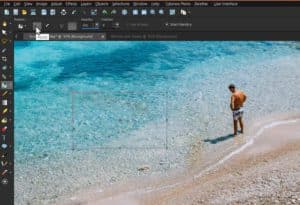
Go back to the Tool Options palette and click the Source Mode button. This button allows us to select the background pattern to replace the object.
Once we click the Source Mode button, a rectangle will be displayed in the image window.
Position the rectangle over the area that you want to replace the previous selection. I want to replace her with part of the shorefront. Drag the handles on the rectangle to resize it, or drag the rotation handle on the rectangle to rotate it.
TIP: Try to make the rectangle as large as, or slightly larger than, the area you are removing.
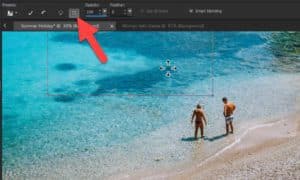
After you have made your selection, click the Apply button on the Tool Options palette and the object or subject will now be removed from your photograph.
If you’ve just completed this process, but you’re not happy with the results on your own image, there are a few other things you can try:
- You could click Undo to start over from scratch.
- Alternatively, you can keep the selection area active (and don’t deselect). Then click the Apply button again – each time you do this, PaintShop Pro will fill the space with a slightly different replacement selection (as long as your source area is not too small).
- You can also adjust the Opacity or Feather settings to see if that helps.
TIP: you can hide the selection marquee by going to Selections > Hide Marquee, to better view the results while keeping the selection area active.
To deselect the selection, go to Selections > Select None or press CTRL + D on your keyboard.
In this second example, I’ll show you how you can use some of the other options from the Tool Options palette.
I want to remove the dog, so it is just a photo of a woman with her geese. Before making the selection, I’ll adjust the Feather control to 10. This will help blend the source pattern and soften the edges even more.
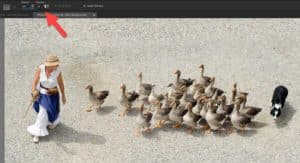
Now I’ll draw the selection around the dog and its shadow.
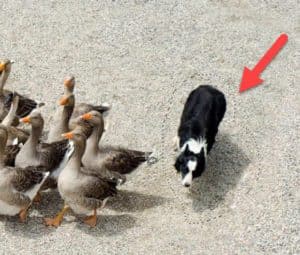
Once again, click on the Source Mode button and adjust the rectangle to select the background pattern.
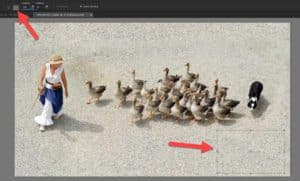
Then click the checkmark to apply and the dog has been removed.

And just like that I’ve seamlessly removed the dog from my photograph. The Object Remover tool is a great way to quickly remove unwanted objects or subjects from your photos in just a few steps!
Download your FREE 30-day trial and make every shot your best shot with PaintShop Pro, your all-in-one photo editing and design software.
