
In this tutorial, you’ll learn how to use the Zoom tool in PaintShop Pro to zoom in and out while you are editing your images and photos. This basic tool is very helpful in any photo editing project: you can zoom in to get a closer look at image detail, zoom out to view a larger portion of the image, or magnify a specific area of an image that you want to work on.
Thanks for watching! We hope you found this tutorial helpful and we would love to hear your feedback in the Comments section at the bottom of the page. You will find a written version of this tutorial below, and a printable PDF copy to download on the Download Resources tab above.
Download your FREE 30-day trial and make every shot your best shot with PaintShop Pro, your all-in-one photo editing and design software.
Download these free resources:
Written tutorial (PDF, 536 KB)
PaintShop Pro resources
Keyboard shortcuts (PDF, 173 KB)
PaintShop Pro User Guides
Partner and User websites
PaintShop Pro User Forum
Scrapbook Campus (Tips and tricks, workshops, master classes, and more)
Creation Cassel (Scripts, picture tubes, and other PaintShop Pro tools, plus weekly freebies)
PaintShop Pro Maniacs (Facebook group)
PaintShop Pro (Facebook group)
What’s New in PaintShop Pro
PaintShop Pro Tools
Getting Started in PaintShop Pro
Featured products
 PaintShop Pro 2023 Ultimate
 AI HDR Studio 3.0
 PaintShop Pro 2023
 Vision FX 2.0
How to Zoom in PaintShop Pro
In this tutorial, you’ll learn about how to use the Zoom tool options to zoom in and out while you are editing your images and photos.
You’ll learn how you can zoom in to get a closer look at image detail, zoom out to view a larger portion of the image, and how to magnify a specific area of an image.
How to Use the Zoom Tool
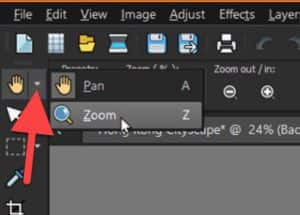
- Select the dropdown arrow beside the Pan tool at the top of the Tools toolbar and select the Zoom tool button or press Z on your keyboard.
Zoom Tool Options
- Adjust the Zoom Level percentage by using the slider.
- Magnify the image by a specific percentage by typing in a value in the Zoom % control on the Tool Options
- Select the Zoom In/Out buttons to zoom in or out in smaller increments.
- Select the Zoom In More/Zoom Out More buttons to zoom in or out in much larger increments.

You can click the 1:1 button to zoom the image to 100% or click on the Fit Image to Window button to view the entire image on your screen.
Other Quick Ways to Zoom In and Out:
While you have the Zoom tool selected:
- To zoom in, left click the area of your image that you want to magnify.
- To zoom out, right click on the area of your image that you want to zoom out from.
While you have other tools selected:
- Scroll your mouse wheel forward and backward to zoom in and out. This is especially useful if you are using another tool while you want to adjust the zoom level.
TIP: To quickly zoom in on a specific part of your image, drag your mouse to outline a rectangle around the area of your image you want to zoom in on.

Release your mouse, and the image will zoom in on that area. This is useful if you want to do some really detailed editing and need to zoom up closely on a specific part of your image.
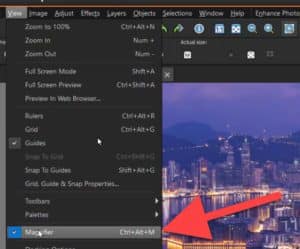
How to Turn on the Magnifier Mode
- Go to View > Magnifier or press CTRL + Alt + M on your keyboard to place the cursor in magnifier mode.
- Position your cursor over the area of the image that you want to magnify.
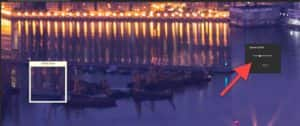
You can adjust the Zoom Level slider from 100% all the way up to 1000%.

- To turn off the magnifier mode, choose View > Magnifier again.
These different zoom tool options will make it easier to edit your images and photographs with perfect precision!
Download your FREE 30-day trial and make every shot your best shot with PaintShop Pro, your all-in-one photo editing and design software.
