
In this tutorial you will learn how to use the PNG Optimizer to remove a single-color background to create an image with a transparent background. We will also review in-depth the different settings in the PNG Optimizer, for optimizing both transparent and non-transparent images, and how to use the PNG Wizard to streamline the optimization process.
Thanks for watching! We hope you found this tutorial helpful and we would love to hear your feedback in the Comments section at the bottom of the page. You will find a written version of this tutorial below, and a printable PDF copy to download on the Download Resources tab above.
Download your FREE 30-day trial and make every shot your best shot with PaintShop Pro, your all-in-one photo editing and design software.
Download these free resources:
Written Tutorial and Sample Images (Zip, 1 MB)
PaintShop Pro resources
Keyboard shortcuts (PDF, 173 KB)
PaintShop Pro User Guides
Partner and User websites
PaintShop Pro User Forum
Scrapbook Campus (Tips and tricks, workshops, master classes, and more)
Creation Cassel (Scripts, picture tubes, and other PaintShop Pro tools, plus weekly freebies)
PaintShop Pro Maniacs (Facebook group)
PaintShop Pro (Facebook group)
What’s New in PaintShop Pro
Working with Transparency
PaintShop Pro Tools
Featured products
 PaintShop Pro 2023 Ultimate
 AI HDR Studio 3.0
 PaintShop Pro 2023
 Vision FX 2.0
Removing Single Color Backgrounds with the PNG Optimizer
PaintShop Pro has many levels of photo transparency capabilities. This tutorial will help you understand one of the most important transparent-capable file formats, especially for images on the web, the PNG. The PNG Optimizer in PaintShop Pro helps you not only optimize transparent images but can also be used to remove a single-color background to create an object (such as a web or clipart image) with a transparent background.
PNG, which stands for Portable Network Graphic, is a common file format that allows for various color palettes and transparency, for the purpose of blending with other images or backgrounds when being placed onto web pages, or used in photo editing and graphics projects.
The PNG Optimizer in PaintShop Pro adjusts and saves files in the PNG format, with option settings for transparency, color, size and download times to make loading webpages more efficient. The PNG Optimizer is a non-destructive tool, in that it will not alter the original image but saves a new version instead.
Click on any of the images below to view full-size.
Let’s begin by exploring a couple of PNG options in the program. First, open PaintShop Pro in the Edit tab and open the 2 PaintShop Pro boxshot images that are included in the zip file, available to download in the tutorial description at the top of the page.
Go to Window > Tile Vertically. Select each image and click the Fit Image to Window icon in the toolbar.
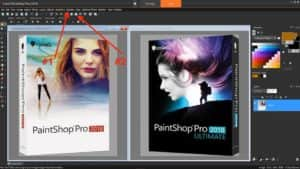
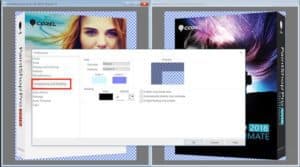
Notice the grey and white checkerboard pattern around the boxes. This indicates what areas of the image are already transparent. You can change the appearance of the checkerboard pattern by going to File > Preferences > General Program Preferences > Transparency and Shading.
In this panel, you can make several different aesthetic adjustments to the grid size, color scheme and shading.
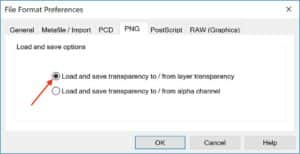
You can also determine if your final image uses a transparency from a layer or an alpha channel by going to File > Preferences > File Format Preferences > PNG. Most common transparencies come from layers, so make sure Load and save transparency to/ from layer transparency is selected and click OK.
Exploring the PNG Optimizer
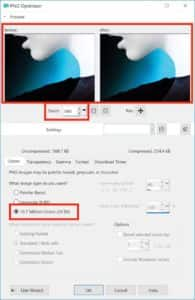
Now let’s look at how the PNG Optimizer works. Select the black box shot image you have open and go to File > Export > PNG Optimizer. Under What image type do you want, make sure 16.7 Million Colors (24 Bit) is checked.
In the Preview Before and After windows, locate the blue area under the chin of the lady. Increase the Zoom setting to 500 and pan to the blue under her neck. Both the Before and After windows should look the same.
Now select the Palette-Based option under What image type do you want and note the change in file size. Note also the Dithering option becomes available (whereas it was greyed out when 16.7 Million Colors was selected). Dithering is the feature that can be used to combine existing colors that are in your palette to mimic another color that is not in your palette.
You can see that the blue area under her chin now has many visible bands of color. Change the Dithering value to 100% and zoom in on Preview window to see how dithering greatly reduces color-banding when palette-based colors are used.
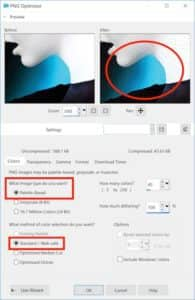
Set the image type back to 16.7 Million Colors (24-bit), zoom back out in the Preview window until you can see the checkerboard pattern again and then click on the Transparency tab.
Under What type of transparency do you want, select No transparency and you will notice that the checkerboard pattern has disappeared in the After window. If you were to click OK at this point, the PNG Optimizer would create an image without a transparent background.
Now select Single color transparency again, and make sure Existing image or layer transparency is also selected. Click OK and save this file on your computer.
There are a few other tabs in the PNG Optimizer, for advanced features such as Gamma values, format, and download times. Unless you have some very specific needs related these features, you can just leave them at the default settings.
- The Gamma setting helps the image appear consistent across multiple display devices.
- The Format settings affects how the image is displayed on a computer with a slow Internet connection.
- The Download Times give you an estimate of the download time at four modem speeds.
If you want to test out the PNG image you just created and saved, here is a neat way to do it using the Google Chrome internet browser.
- Open a new tab in the Chrome browser and drag and drop your newly optimized image right onto the new tab. The default background in this situation is black, and it should completely surround the box image.
- Right-click on the browser page and select Inspect.
- Click on the color chip and select a new background color, and you will see the transparency around the box has still been preserved.

Changing a Single-Color Background to Transparent
Let’s now try an image with a solid color background. Open the Heart1.PNG file in PaintShop Pro. In the Layers palette, you will see that this is a background layer, and background layers cannot be transparent.
To change this, right-click on the background layer in the Layers palette and click on Promote Background Layer. This will change it to a raster layer, which can include transparency.
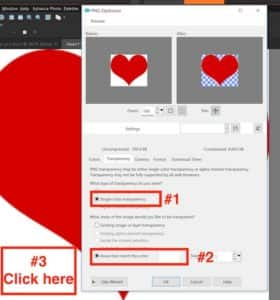
Go to Export > PNG Optimizer. On the Transparency tab select Single color transparency and Areas that match this color.
Click the color chip and use the eyedropper tool to click on the white background of the heart image. You can also use the color wheel or slider to select the color, but using the eyedropper to pick the color right from the image will ensure an exact match.
Click OK, and you’ll see in the After window, that white is now transparent. Click OK again and save your image.
If you want to test out the transparency of this new image, follow the same steps above to drop it onto a Chrome internet tab.
For the last part of this tutorial, we’ll take a quick look at the PNG Optimizer Wizard to streamline the entire process.
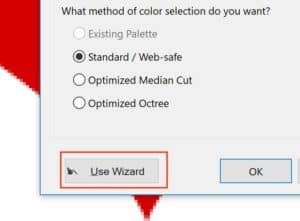
Go to File > Export > PNG Optimizer again and click on the Use Wizard button.
The wizard will now walk you through these steps:
- On page 1 select the image type. Palette-based will produce a smaller file size but 16.7 Million Colors will result in better image quality.
- On page 2 select the transparency type, using Convert matching colors to transparent if you are trying to remove a single-color background, or Existing if your image already has transparency
- On page 3 click the color chip and use the eyedropper to sample the background color. If your background is already transparent, you can skip this step and just click Next.
- On page 4 select the color option that best suits your needs
- On page 5 you can adjust the slider to choose image quality and file size.
- On page 6 you will see the results of the settings you selected. If you are not satisfied with the results, use the Back button to go back through pages 1-5 to make adjustments.
Download your FREE 30-day trial and make every shot your best shot with PaintShop Pro, your all-in-one photo editing and design software.
