
There are many ways to create original photo masks. In this tutorial, you will learn step-by-step how to use the Shape tool and the Text tool to create shapes and words, and then turn them into masks. This process offers more flexibility than using the Text and Shape cutter, with the added advantage of being able to save your new masks to use in future projects.
NOTE: If you are using PaintShop Pro 2022 or higher, check out the new Frame tool that you can use to create text and shape frames.
Thanks for watching! You will find a written version of this tutorial below, and a printable PDF copy to download on the Download resources tab above.
Download your FREE 30-day trial and make every shot your best shot with PaintShop Pro, your all-in-one photo editing and design software.
Download these free resources:
Written tutorial (PDF, 1MB)
Sample images (Zip, 2 MB)
PaintShop Pro resources
Keyboard shortcuts (PDF, 173 KB)
PaintShop Pro User Guides
Partner and User websites
PaintShop Pro User Forum
Scrapbook Campus (Tips and tricks, workshops, master classes, and more)
Creation Cassel (Scripts, picture tubes, and other PaintShop Pro tools, plus weekly freebies)
PaintShop Pro Maniacs (Facebook group)
PaintShop Pro (Facebook group)
What’s new in PaintShop Pro
Working with masks
PaintShop Pro tools
Featured products
 PaintShop Pro 2023 Ultimate
 AI HDR Studio 3.0
 PaintShop Pro 2023
 Vision FX 2.0
Creating masks from text and shapes
In this tutorial, we’ll go over how to use shapes and text in order to create masks. These masks can be for one-time use or they can be saved for repeated use.
Click on any of the images below to view full-size.
How to create masks from shapes
We will start by creating a mask from a shape. You can do this from any image, or from a blank canvas. We will demonstrate how to use the Shape Cutter tool first, to illustrate the difference between the cutter and masks.
- Open the Daisies sample image in the Edit workspace
- Activate the Preset Shape tool (1) and select a shape from the Shape list.
- Enable Create as vector (2) so that the shape can be used for cutting.
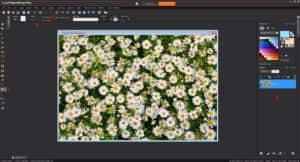
- Click and drag to place your shape on the image, and the shape will appear on its own vector layer in the Layers palette (3).
- Click the Shape Cutter icon (4) and PaintShop Pro will create a new image with the filled star shape on a transparent background.

While this had the same result as applying a star-shaped mask, we haven’t actually made a mask yet. To get started on that, we will close the cutout shape without saving and return to the flower image, where we’ll use Undo to remove the extra shape layers.
Creating a shape mask
Next add a new layer (1) on top of the flower background and use the Flood Fill tool (2) to fill this new layer.
We also need to create a new image using File > New (3). We used 5 x 7 in the tutorial video, but the size isn’t important because mask sizes can be adjusted when used.
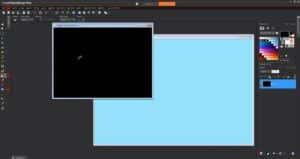
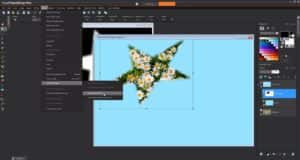
Now, Flood Fill this rectangle with black. Click Preset Shape (4) again and the previously selected shape is still the current shape. With Retained Style unchecked, the star will be filled with the background color (5). This is going to be a mask, so set that background color to white. Drag your shape onto the image, stretching and rotating it as needed.
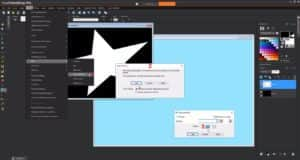
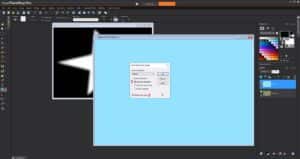
To make this shape less sharp, we can add a blur. Choose Adjust > Blur > Gaussian Blur (1) and click OK on the message that says the vector layer must be converted to a raster layer first (2). Then adjust the blur radius (3) until you are satisfied with the effect and click OK again.
Applying our shape mask
Go back to the solid covered flower image, and with the solid layer active, click the New Mask Layer (1) icon and choose From Image.
Choose our new shape image from the dropdown menu, select the Source Luminance option (2), and invert (3) the mask so that the solid border will show, and the center will be blocked. This produces a similar result as the shape cutter, this time with blurred edges.
Saving masks
When a mask is applied from an image, it automatically fills the canvas. We could adjust it with the Pick Tool every time, but that doesn’t sound very convenient. For more placement flexibility, lets save the mask as a preset.
With the mask layer selected, I’ll choose Layers > Load/Save Mask > Save Mask to Disk. Note that the preview image shows a white background and a black star, which is because the star image was inverted before it was applied to the flowers. Name your mask and click Save.
Using saved masks
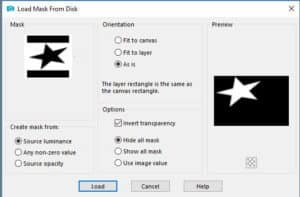
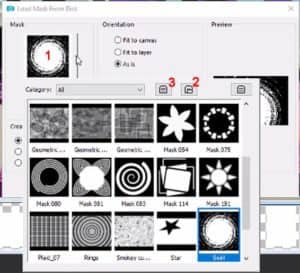
Now we can apply this mask anywhere! We opened a birthday photo and added a solid filled layer below it. With a photo layer active, choose Layers > Load/Save Mask > Load Mask From Disk. Find your new mask from the alphabetical list, choose “as is” so that the mask placement can be easily adjusted, and make this a Hide All mask so that the rest of the photo layer will be blocked.
The mask was saved with a white background and a black star, so now we need to invert it again, to make the star white and the background black.
With the mask layer active, we can use the Pick tool to adjust it. We used it to highlight the stars of our birthday photo.
Advanced shapes
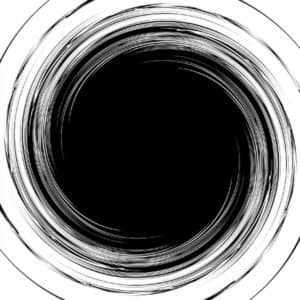
We are not limited to the pre-installed shapes that come with PaintShop Pro! Our next image is a swirl: black in the center, white along the edges, and some bits of gray in between.
We could use From Image to apply this mask to any photo, but if we want to use the mask more than once, we can save it as a preset as well. As before, we can do this by first applying this image as a mask onto any other image, but it’s also easy to do by applying the mask to itself.
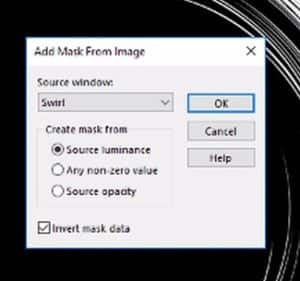
To do this, choose From Image, leave the source image as itself, invert it so that black will be on the outside, and apply. Then with the mask layer selected, use Layers > Load/Save Mask > Save Mask to Disk to name and save it. That’s it!
Back to our birthday photo, we want to remove the current mask and replace it with the swirl.
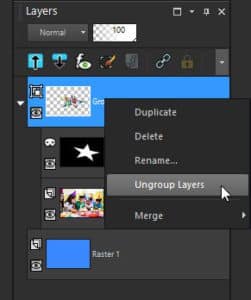
We can’t just delete the mask group layer because that will delete the photo layer it contains. So instead, right click on the mask group and ungroup it. Then delete the star mask and choose not to merge it with the layer below.
Now the photo layer is active. Load From Disk and find our swirl. As before, use “as is” and Hide All, and uncheck Invert. After applying, use the Pick Tool to adjust.
Using text as a mask
Text can also be made into a mask. Using our beach photo as the base, we’ll click the Text tool (1), and set our font. The colors don’t matter since the text will be cut from the photo. Click on the photo and start typing. Double-click to finish. Then, adjust the size and placement.
If we only wanted to apply this to the one image, we could use the text as a cutout like before. We’ve already been through that, so instead we will skip right to making a text mask.
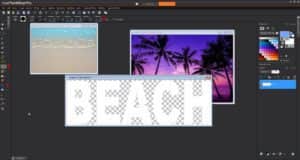
With the background color set to white, activate the Color Replacer tool (2). Set a high tolerance (3) and right click and drag to replace all colors with white. The transparent background is treated as a black color for the mask.
We could also create this mask image by using the Text tool to create white letters on a black or transparent canvas. Instead of saving this text as a preset (we’ve already done that too), we will apply it back to the daytime beach photo.
Masking one image into another
Choose From Image, select our text image, make it not inverted, and apply. To fill in the transparency below the mask, we will open the beach sunset photo and drag its photo layer onto the daytime image. Then, we can drag the new sunset layer below and outside the mask group.
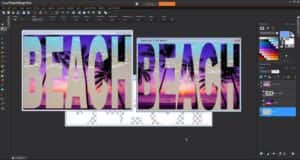
To see how the reverse image would look, go back to the sunset photo and apply the same text image as the mask. Then, go back to the daytime image, find its original photo layer, and drag it on to the sunset. Finally, do the same layer move, placing the beach below the sunset mask group and adjust its size.
One last note about masks on the disc. If you choose Layers > Load Save Mask > Load Mask From Disk and click the current mask, you can click File Locations to see where mask images are stored.
The first folder located in C:\Users (and so on) has PaintShop Pro’s pre-installed masks, and the folder located in C:\ProgramData (and so on) has the masks we’ve saved. Finally, if we click Resource Manager (3), we can delete, rename, copy, or move mask images.
Download your FREE 30-day trial and make every shot your best shot with PaintShop Pro, your all-in-one photo editing and design software.

Comments (1)
Reader Interactions
Comments
This tutorial was super helpful and simple. Thanks!