
With the interactive Block Shadow tool, you can add solid vector shadows to objects and text to add a sense of depth and dimension to your designs. Unlike drop shadows and extrusions, block shadows consist of simple lines and fewer nodes, making them ideal for screen printing and sign making.
Thanks for watching! We hope you found this tutorial helpful. You will find a written version of this tutorial below, and a printable PDF copy to download on the Download Resources tab above.
Learn how to add depth and dimension to your designs with the Block Shadow tool in CorelDRAW. This feature is similar to the Extrude tool but simplified, greatly reducing the number of lines and nodes in shadows. Therefore, the vector objects produced by the Block Shadow tool are ideal for CorelDRAW users working with cutters and plotters. In this tutorial we’ll demonstrate how to enhance a sports emblem design with block shadow, and show you how to adjust the depth, color and other settings.
Thanks for watching! We hope you found this tutorial helpful. You will find a written version of this tutorial below, and a printable PDF copy to download on the Download Resources tab above.
Start your FREE 15-day trial and embark on a design journey with powerful tools for vector illustration, layout, photo editing, typography, and collaboration.
Download these free resources:
Written tutorial and sample file for Windows (Zip file, 2 MB)
Written tutorial and sample file for Mac (PDF, 731 KB)
CorelDRAW Graphics Suite resources
Quick Start Guide (PDF, 2 MB)
Keyboard Shortcuts (PDF, 3.5 MB)
CorelDRAW and Corel PHOTO-PAINT user guides
For CorelDRAW Graphics Suite subscription and perpetual licenses (2018 to 2024), languages include English, Português do brasil, 简体中文, 繁體中文, Čeština, Deutsch, Español, Français, Italiano, 日本語, Polski, Русский
CorelDRAW Community
CorelDRAW learning center
Facebook
X (formerly Twitter)
YouTube
What’s new in CorelDRAW Graphics Suite
CorelDRAW tools
 CorelDRAW Graphics Suite
 Ultimate Vector Bundle Vol. 1
 CorelDRAW Standard 2021
 Ultimate Vector Bundle Vol. 2
 Corel Vector
How to use the Block Shadow tool
Block shadow basics
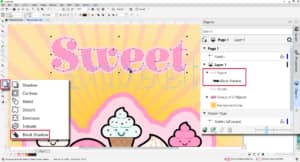
The Block Shadow tool is part of the Effects tool group on the left toolbar. When you select an object, such as the “Sweet” text, the property bar features several settings that control the appearance and behavior of the block shadow. By default, the block shadow color is black.
To create a block shadow, click and drag, using the blue lines to preview size and placement. Release the mouse button to complete the shadow.
The block shadow appears in the Objects docker (or Objects inspector for Mac users) as part of the object to which it was applied.
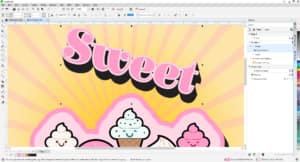
A block shadow can also be applied to a group of objects, such as the cartoon characters, using the same process as above.
If you change the size, shape, or placement of the object that has a block shadow applied, the block shadow updates accordingly.
A selected block shadow can be removed by clicking the Clear block shadow button on the property bar.
Adjust block shadow depth and direction
When the Block Shadow tool is active and a shadowed object is selected, you can adjust the depth and direction by dragging the vector handle in any direction.
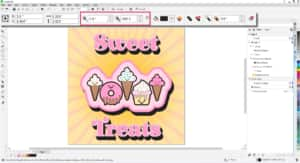
For precise adjustments, type a value in the Depth and Direction fields on the property bar. Note these settings if you want to replicate the same block shadow effect on another object.
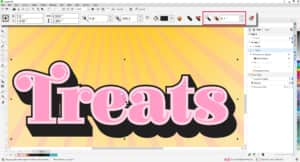
In this example, we set the Depth to 0.4” and Direction to 300, then replicated those settings for the group of cartoon characters and the “Treats” text.
Change the block shadow color
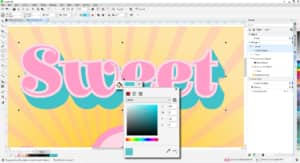
There are a few ways to change the color of the block shadow:
- Click the vector handle, then select a color from the color picker.
- Select a color in the Block shadow color picker on the property bar.
- Drag a color swatch from a color palette to the vector handle.
Adjust the outlines
By default, block shadows are generated from the object outline. So when you apply a shadow to the “Treats” text, whose letters are outlined in light pink, the block shadow effect includes the outline.
A block shadow generated from the outline can be expanded using the Expand block shadow box on the property bar.
Here is an example of a block shadow generated from the object outline and expanded to 0.1”.
When you disable the Generate from object outline button, the outlines remain but the shadow itself applies only to the filled part of each letter.
Remove holes
Depending on your design and the size of the block shadow, you may have holes in some places, such as between the “Tr” and “ts” in this example.
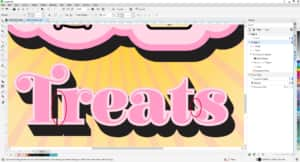
If you prefer a solid block shadow, click the Remove holes button on the property bar. Removing the holes will help to simplify the design for professional printing. Otherwise, removing or keeping the holes is just a matter of your design preference.
Printing and exporting options
The Block Shadow tool offers additional options for printing and exporting.
To set the block shadow to print on top of underlying objects, click the Overprint block shadow button on the property bar.
To trim overlapping areas between the object and its block shadow, click the Simplify button on the property bar.

Try the Block Shadow tool today and see how you can easily add extra depth and dimension to your designs.
Start your FREE 15-day trial and embark on a design journey with powerful tools for vector illustration, layout, photo editing, typography, and collaboration.
