
CorelDRAW’s Extrude tool is used to make objects appear three-dimensional, by projecting points from an object and joining them to create the illusion of three dimensions. In this tutorial, we’ll explore the different types of extrusions and show you how to add extrusions to objects and text, how to edit extrusions and change vanishing points, how to copy an extrusion from one object to another, and how to add bevel edges, fills and lighting to an extrusion.
Thanks for watching! We hope you found this tutorial helpful and we would love to hear your feedback in the Comments section at the bottom of the page. You will find a written version of this tutorial below, and a printable PDF copy to download on the Download Resources tab above.
Start your FREE 15-day trial and embark on a design journey with powerful tools for vector illustration, layout, photo editing, typography, and collaboration.
Download these free resources:
Written tutorial (PDF, 958 KB)
CorelDRAW Graphics Suite resources
Quick Start Guide (PDF, 2 MB)
Keyboard Shortcuts (PDF, 3.5 MB)
CorelDRAW and Corel PHOTO-PAINT user guides
For CorelDRAW Graphics Suite subscription and perpetual licenses (2018 to 2024), languages include English, Português do brasil, 简体中文, 繁體中文, Čeština, Deutsch, Español, Français, Italiano, 日本語, Polski, Русский
CorelDRAW Community
CorelDRAW learning center
Facebook
X (formerly Twitter)
YouTube
What’s New in CorelDRAW Graphics Suite
CorelDRAW Tools
 CorelDRAW Graphics Suite
 Ultimate Vector Bundle Vol. 1
 CorelDRAW Standard 2021
 Ultimate Vector Bundle Vol. 2
 Corel Vector
How to Use the Extrude Tool in CorelDRAW
In this tutorial, we’ll explore the different types of extrusions and show you how to add extrusions to objects and text, how to edit extrusions and change vanishing points, how to copy an extrusion from one object to another, and how to add bevel edges, fills and lighting to an extrusion.
Click on any of the images below to view full-size.
Extrude Tool Basics
The Extrude tool is part of the Effects tool group.
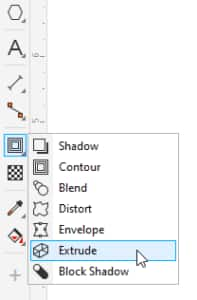
There is also an Extrude docker, or Extrude inspector for Mac users, which can be opened by going to Window > Dockers > Effects > Extrude. The options in the Extrude docker are the same ones that appear on the property bar when the Extrude tool is activated.
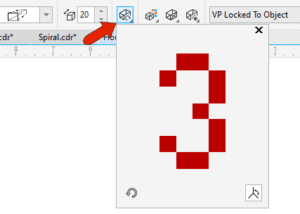
Activate the Extrude tool and click the object to extrude. To create the extrusion, click anywhere on the object again, and drag in the direction of the extrusion.
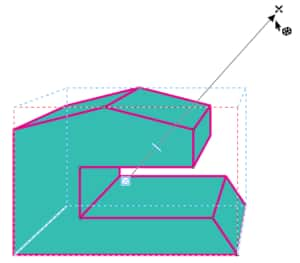
You can also pre-select the object in advance with the Pick tool, activate the Extrude tool, and click and drag to create the extrusion.
You can adjust the location of the vanishing point by dragging the perspective handle, which is the black X, or by entering values in the Vanishing point coordinate fields on the property bar. The extrusion depth can be changed by dragging the slider, or by entering a value in the Depth field on the property bar.
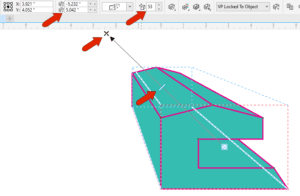
To start over, or remove the extrusion, click the Clear Extrude button on the property bar.
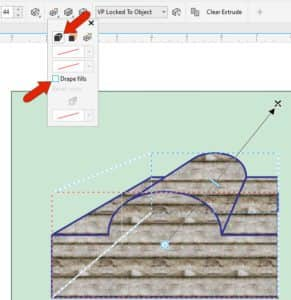
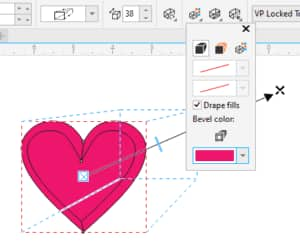
By default, the extrusion fill and outline colors, as well as the outline width, match those of the object being extruded. The Extrusion color icon on the property bar has options to Use Object Fill or Use Solid Color for the extrusion, or Use Color Shading in which you can set a start and end color.
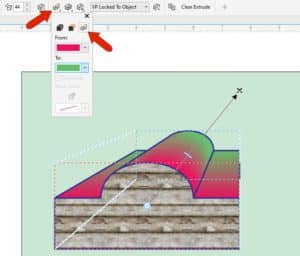
When you select the Use Object Fill option, you can also un-drape the fill, which aligns the fill in different spots in each section.
Changing the original object will also change the extrusion. For example, you can use the Shape tool to adjust or add nodes, and the extrusion updates as you make drag the nodes to reshape the object.
Another way to create a 3D effect is to click the Extrusion Bevels icon on the property bar and check Use bevel. Adjusting the bevel height and angle changes the 3D effect to the front of the object.
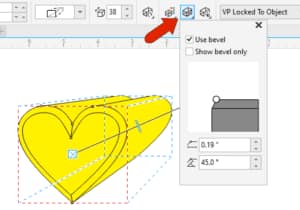
You can also turn off the extrusion and leave just the bevel. For any of the extrusion color options, you can set the color of just the bevel.
Extrusion Types
There are six types of extrusions, which can be seen in the Extrusion Type dropdown window on the property bar. The default type has the original object in front and the extrusion going toward the back and growing smaller toward the vanishing point. The other two types with the object in front have the extrusion growing larger, or staying the same size.
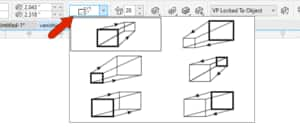
There are also three types with the object in the back, so that only the extrusion itself is visible. With these types, you can choose to have the extrusion grow smaller, grow larger, or stay the same.
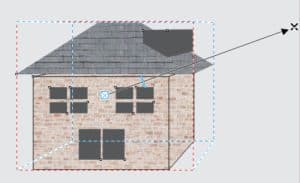
Editing an Extrusion and Changing Vanishing Points
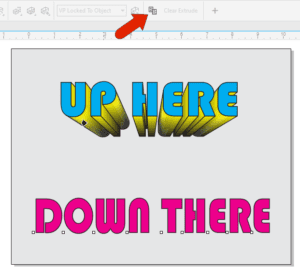
To edit an existing extrusion, you can activate the Extrude tool and click the extrusion. By default, an extrusion’s vanishing point is locked to its object.
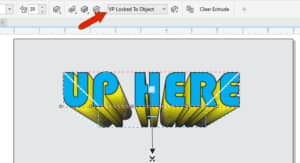
This means that if you move the object with the Pick tool, the extrusion remains the same depth and direction from the object.
TIP: press the Spacebar to switch to the Pick tool, then press the Spacebar again to switch back to the Extrude tool (or whatever previous tool you were using).
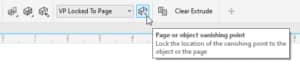
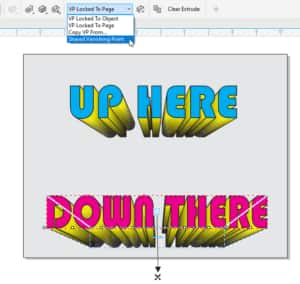
There are other options available from the Vanishing Point Properties dropdown list on the property bar. If you select VP Locked to Page, the extrusion will always go toward the location of the X, even when you move the object.
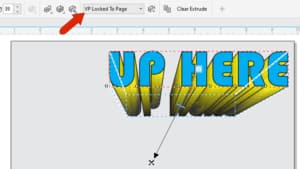
TIP: the Page or Object Vanishing Point icon on the property bar can be used as a quick toggle between locking the vanishing point to the page or object.
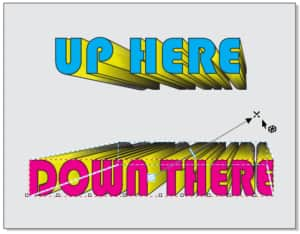
To match a new extrusion to an existing extrusion, first click on the object you want to copy the extrusion to. Click the Copy Extrusion Properties icon on the property bar, then click the object you want to copy the extrusion from.
This new extrusion will share the same locking properties as those of the copied object but doesn’t use the same vanishing point. To match vanishing points, choose the Shared Vanishing Point option from the Vanishing Point Properties dropdown list on the property bar and click the first extrusion again.
Now if you move the shared vanishing point, both extrusions update.
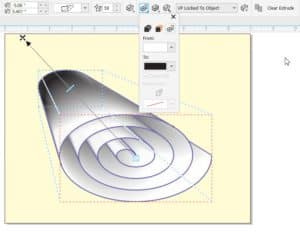
Adding Extrusions to Open Curves
In addition to closed shapes, open curves can be extruded as well. For example, applying an extrusion to an open spiral extrudes just the outlines.
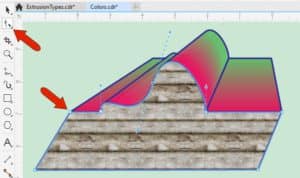
You can get a nice 3D effect by adding a solid or shaded extrusion color in the Extrusion color dropdown on the property bar.
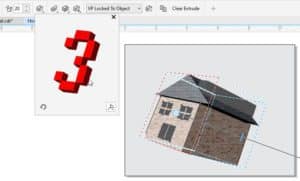
Adding Extrusions to Multiple Objects
Only one object can be extruded at a time, but an entire group can also be extruded. In this example, if we want to extrude this entire house, first we need to select all its shapes with the Pick tool and then click the Group Objects icon on the property bar.
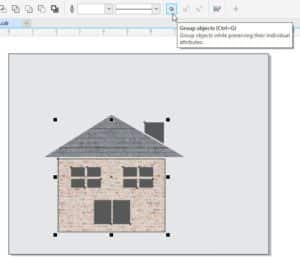
Now we can extrude the whole house.
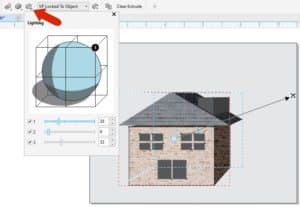
Adding Lighting to Extrusions
Lighting effects can enhance the 3D look of your extrusions. You can turn on lights in one, two, or all directions, and experiment with their values to get the look you want.
Rotating an Extrusion
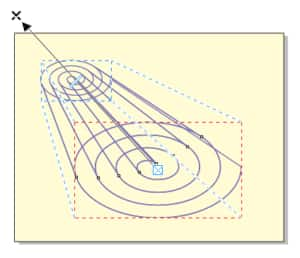
Finally, there are several ways to rotate an extrusion, as long as the vanishing point is locked to the object, and not to the page.
Clicking the Extrude Rotation icon shows a preview for a non-rotated object.
Clicking and dragging this preview object rotates the extrusion.
Clicking the Reset icon in the bottom left corner of the Extrude Rotation window brings back the original orientation.
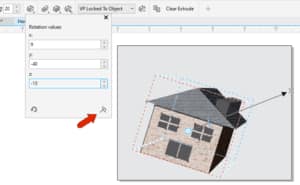
Clicking the Axes icon in the bottom right corner of the Extrude Rotation window opens another window where you can enter rotations angles. Z axis angles spin the object around in 2D, without affecting the vanishing point. Angles in the other two directions do move the vanishing point.
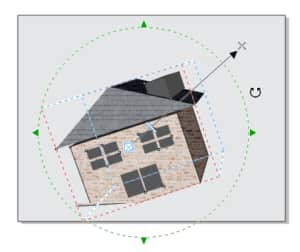
You can also double-click an active extrusion to bring up the green rotation circle. Clicking and dragging outside the circle, while the cursor is a curved arrow, changes the Z axis rotation. Clicking and dragging while the cursor is inside the circle, and is a 3D arrow, moves the vanishing point as well.
Start your FREE 15-day trial and embark on a design journey with powerful tools for vector illustration, layout, photo editing, typography, and collaboration.
