
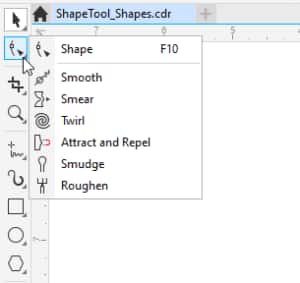
In this tutorial, we’ll review the 7 tools in the Edit Shape tool group: Shape, Smooth, Smear, Twirl, Attract and Repel, Smudge brush, and Roughen brush. These tools can be used to shape different parts of an object or text by manipulating nodes and control handles. We encourage you to download the practice files on the Download Resources tab so you can experiment with these tools yourself to see how they work.
Thanks for watching! We hope you found this tutorial helpful and we would love to hear your feedback in the Comments section at the bottom of the page. You will find a written version of this tutorial below, and a printable PDF copy to download on the Download Resources tab above.
Start your FREE 15-day trial and embark on a design journey with powerful tools for vector illustration, layout, photo editing, typography, and collaboration.
Download these free resources:
Written tutorial (PDF, 630 KB)
Practice files (Zip file, 2.8 MB)
CorelDRAW Graphics Suite resources
Quick Start Guide (PDF, 2 MB)
Keyboard Shortcuts (PDF, 3.5 MB)
CorelDRAW and Corel PHOTO-PAINT user guides
For CorelDRAW Graphics Suite subscription and perpetual licenses (2018 to 2024), languages include English, Português do brasil, 简体中文, 繁體中文, Čeština, Deutsch, Español, Français, Italiano, 日本語, Polski, Русский
CorelDRAW Community
CorelDRAW learning center
Facebook
X (formerly Twitter)
YouTube
What’s New in CorelDRAW Graphics Suite
CorelDRAW Tools
 CorelDRAW Graphics Suite
 Ultimate Vector Bundle Vol. 1
 CorelDRAW Standard 2021
 Ultimate Vector Bundle Vol. 2
 Corel Vector
How to Use the Edit Shape Tools in CorelDRAW
In this tutorial, we’ll review the 7 tools in the Edit Shape tool group: Shape, Smooth, Smear, Twirl, Attract and Repel, Smudge brush, and Roughen brush. These tools can be used to shape different parts of an object or text by manipulating nodes and control handles. We encourage you to download the practice files on the Download Resources tab above so you can experiment with these tools yourself to see how they work.
Click on any of the images below to view full-size.
Edit Shape Tools Basics
The Edit Shape tool group can be found just below the Pick tool in the Toolbox.
Using the Shape Tool on Standard Shapes
We’ll start with the Shape tool, which can also be activated with the F10 key on the PC, and the A key on the Mac.
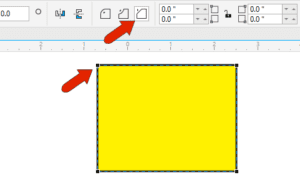
To start changing the shape of an object, click it with the Shape tool to display its nodes and control handles. You can adjust the shape of the object by moving one or more of the nodes.
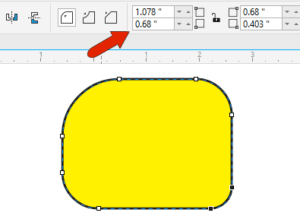
Each type of object provides a specialized set of shaping methods. For example, when you click on a rectangle with the Shape tool, nodes appear at each corner and there are options on the property bar for corner editing.
Dragging any corner node changes all corners, either as rounded, scalloped, or chamfered.

Clicking a corner node before dragging affects just that corner. All corner sizes can be set, whether locked together or unlocked, on the property bar as well.
To learn more about drawing and shaping rectangles, watch the full tutorial How to Use the Rectangle Tools.
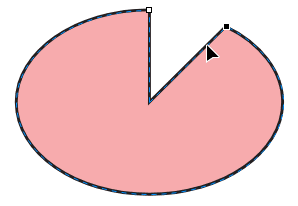
Clicking an ellipse with the Shape tool displays just one node. Dragging this node while the cursor is inside the shape changes the ellipse to a pie.
If the cursor is outside the ellipse, an open arc is created when you drag the node with the Shape tool. Ellipse type and angles can be set on the property bar.

To learn more about drawing and shaping ellipses, watch the full tutorial How to Use the Ellipse Tools.
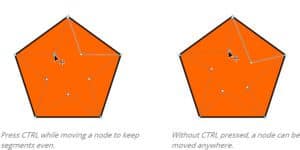
For a polygon, dragging a node creates the same change at all sides or points. For example, if you drag one of the middle side nodes on a 5-sided polygon inward, you can create a star. Holding the Ctrl key while dragging a node keeps all segments even, otherwise the nodes can be dragged anywhere.
To learn more about drawing and shaping polygons, watch our full tutorial How to Use the Polygon Tool.
Using the Shape Tool on Text
For text objects, the Shape tool places nodes on each character, allowing you to edit each character independently. You can use the node to drag a character to a different spot in the document, or click on a color swatch on the Color palette to change the fill. You can also use the settings on the property bar to change the font, size and rotation of each character.
If you want to edit 2 or more characters together, first use the Shape tool to marquee-select all the nodes you want to edit. Then you can proceed to make any changes.
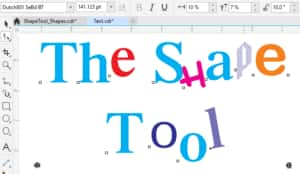
Dragging the icon at the lower right corner changes character spacing, holding Shift while dragging this icon changes word spacing, and dragging the icon at the lower left corner changes line spacing.

Node Editing with the Shape Tool
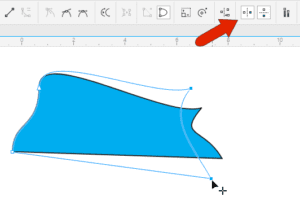
The Shape tool is also used for node editing on any curve, which provides enormous flexibility in creating the exact curve you want. Node editing allows you to add or remove nodes, change the node type, reverse the starting and ending node, and stretch, scale, rotate and skew nodes.
Converting Objects to Curves
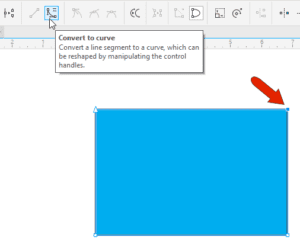
A standard object such as a rectangle or text must be converted to a curve before its nodes can be edited. To do this, select the object with the Pick tool and click the Convert to curves icon on the property bar.
NOTE: Some objects such as spirals, freehand lines and Bézier lines are created as curves so they are already ready for node editing.
If a curve is already selected, then activating the Shape tool displays the nodes for that curve, and you can drag nodes to different spots.
Multiple nodes can be selected at once by dragging a marquee window around them.
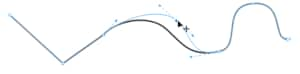
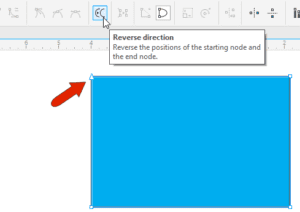
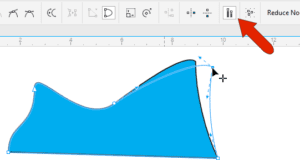
Each curve has one arrow node that helps determine the start and end nodes of each segment, though direction can be changed with the Reverse direction icon.
To change a line segment to a curve, select its end node, and click the Convert to Curve icon.
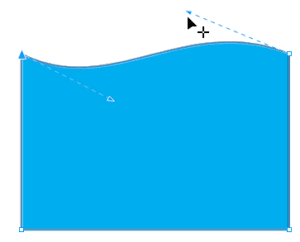
Now you can use the arrows at both segment end nodes to adjust the curve tangency.
Types of Nodes
Nodes of at the end of curves can be changed into three different types of nodes:
A Smooth node makes a smooth transition between segments, and you can adjust the tangency arrows on either side with different distances from the node, while the transition always remains smooth.
A Symmetrical node also remains smooth, and the tangency remains the same on either side.
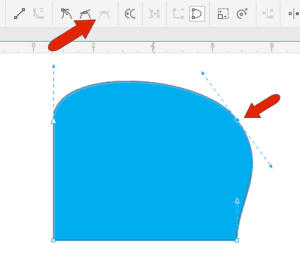
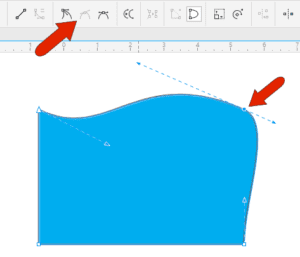
With a Cusp node, tangency can be different on either side, resulting in a sharp corner.

While one or more nodes are selected, clicking Stretch or Scale nodes icon on the property bar produces handles you can use to move the nodes by dragging a corner or middle handle. With the Rotate or skew nodes icon, you can use corner handles to rotate the selected nodes, and middle handles to skew them.
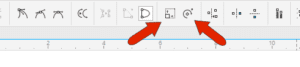
When multiple modes are selected, and the Reflect nodes horizontally and/or vertically icons are enabled, a mirrored move occurs on the opposite side when moving nodes.
By default, moving a node doesn’t affect tangency of neighboring nodes. But in Elastic mode, the segments act as rubber bands when stretched.
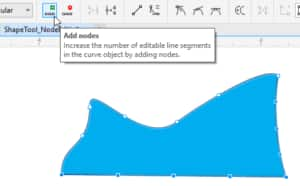
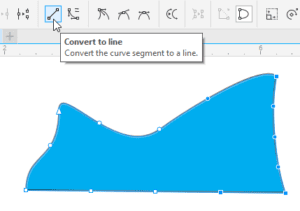
Double-clicking along a segment adds a node, double-clicking a node removes it, and if you marquee-select multiple nodes and click Add nodes, you can create intermediate nodes.
And if you want linear segments instead of curves, you can select nodes and convert curve segments to lines.
The Smooth Tool
The Smooth tool is used to remove jagged edges or sharp corners, by “brushing away” or removing nodes.
For this tool and the others, the Nib Size can be set on the property bar, or changed by dragging the mouse left or right while holding the Shift key. You can also adjust the Rate of applying the effect, either on the property bar, or by holding the Alt key while dragging left or right. These tools also have a Pen pressure icon which can be enabled by tablet users.
Clicking the shape that you want to smooth displays its nodes, and you can drag over the edges and repeat as needed to get a more smooth, organic-looking shape.
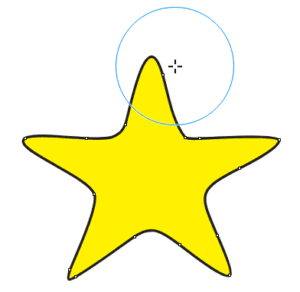
Increasing the nib size and dragging repeatedly increases the smoothing effect.
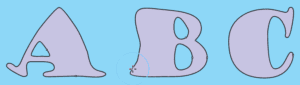
In this example of text that was converted to curves, the Smooth tool can be used to gradually remove the serifs, to give the curves a hand-drawn look.
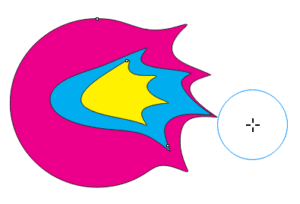
The Smear Tool
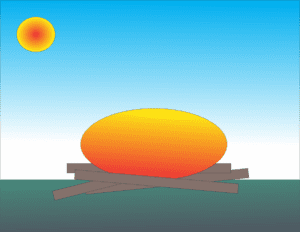
We’ll be using this simple drawing to show how the Smear, Twirl, Attract and Repel, Smudge brush, and Roughen brush tools can be used.
With the Smear tool, you can shape an object by pulling out extensions or making indents along its outline, and these extensions narrow toward their ends.
We’ll start with the ellipse in the center. Once you activate the Smear tool, there are options on the property bar to change the Nib size and use a Smooth smear or Pointy smear.
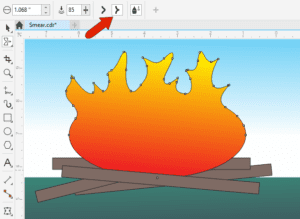
Dragging from inside the shape pulls out extensions, dragging from outside creates indentations.
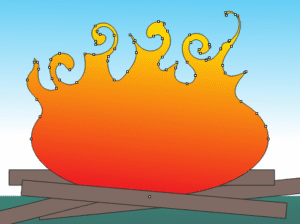
The Twirl Tool
The Twirl tool adds a swirl effect to outlines. If you click and hold without moving your mouse, the Twirl tool will create a static twirl – the longer you hold down your mouse button, the more rotations your twirl will have.
You can also click and drag to pull the swirl outward. On the property bar you can choose Counterclockwise Twirl or Clockwise Twirl.
The Attract and Repel, Smudge Brush, and Roughen Brush Tools
The Attract and Repel tool lets you shape objects by attracting nodes or pushing nodes away. To control the shaping effect, there are settings on the property bar to adjust the Nib size, the Rate (which sets the speed at which the effect is applied), and switch between the Attract tool and the Repel tool.
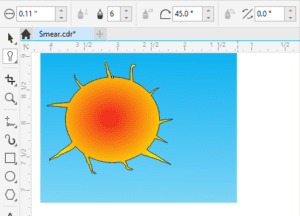
The Smudge brush tool is similar to the Smear tool, but the extensions and indents it creates have a uniform thickness depending on the Dryout value that you set on the property bar. A positive dryout (1 to 10) narrows the effect towards the end of the stroke, and a negative dryout (-1 to -10) widens the effect towards the end of the stroke. Setting the Dryout value to 0 maintains an even stroke width.
In this example, we used the Smudge brush tool to add “rays” to the sun.
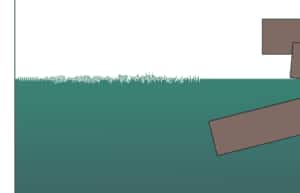
The Roughen brush tool can be used to add a jagged or spiked edge to objects. On the property bar you can adjust the Nib size and the Frequency of spikes. In this example, we dragged along the edge of the green rectangle several times to create random spikes for grass, varying the tools settings each time.
Shape Editing for Multiple Curves
Finally, a shape editing tool can only be used on one curve at a time, but you can get around this by grouping curves together.
With the Pick tool, hold the Shift key while selecting each of the objects that you want to group, then click the Group objects icon on the property bar (or use keyboard shortcut Ctrl + G).
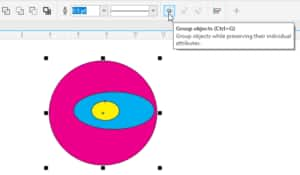
Now when you use one of the editing tools such as the Smear tool, it will affect all the curve objects in the group.
Start your FREE 15-day trial and embark on a design journey with powerful tools for vector illustration, layout, photo editing, typography, and collaboration.
