
The Outline Pen tool in CorelDRAW is used to change the appearance of lines and outlines. In this tutorial, you’ll learn the various ways to access and adjust the settings for outlines, such as color, width and style. We’ll also review other settings to control the look of corners, adjust outline position, and creating a calligraphic effect.
Thanks for watching! You will find a written version of this tutorial below, and a printable PDF copy to download on the Download resources tab above.
Start your FREE 15-day trial and embark on a design journey with powerful tools for vector illustration, layout, photo editing, typography, and collaboration.
Download these free resources:
Written tutorial (PDF, 460 KB)
CorelDRAW Graphics Suite resources
Quick Start Guide (PDF, 2 MB)
Keyboard Shortcuts (PDF, 3.5 MB)
CorelDRAW and Corel PHOTO-PAINT user guides
For CorelDRAW Graphics Suite subscription and perpetual licenses (2018 to 2024), languages include English, Português do brasil, 简体中文, 繁體中文, Čeština, Deutsch, Español, Français, Italiano, 日本語, Polski, Русский
CorelDRAW Community
CorelDRAW learning center
Facebook
X (formerly Twitter)
YouTube
What’s new in CorelDRAW Graphics Suite
CorelDRAW tools
Lines, shapes and outlines
 CorelDRAW Graphics Suite
 Ultimate Vector Bundle Vol. 1
 CorelDRAW Standard 2021
 Ultimate Vector Bundle Vol. 2
 Corel Vector
How to use the Outline Pen tool in CorelDRAW
Learn how to access and adjust the settings for the Outline Pen tool in CorelDRAW, which is used to change the appearance of lines and outlines.
Click on any of the images below to view full-size.
Accessing the Outline Pen settings
There are several ways to access the settings for the Outline Pen tool, including:
- Outline Tools tool group in the Toolbox (Windows only)
- Keyboard shortcuts: F12 for Windows and CMD + SHIFT + P for Mac
- Outline tab on the Properties docker (Properties inspector for Mac)
- Outline swatch on the status bar
- Property bar
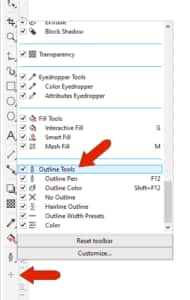
The Outline Pen tool is part of the Outline Tools tool group. These tools are not displayed by default in the toolbox that runs along the left side of the CorelDRAW interface. Windows users can add them to the toolbox, by clicking the plus icon at the bottom of the toolbox, scrolling down to the end of the list, and adding a checkmark beside Outline Tools.
For Mac users, the Outline tools can’t be added to the toolbox, but you can access the same settings on the Outline tab of the Properties inspector.
NOTE: if you activate the Outline Pen tool without having an object selected in the drawing window, the properties you set here will become the default for graphic objects you create later.
Basic settings
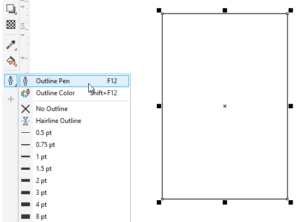
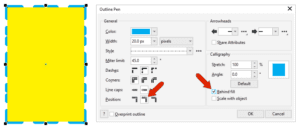
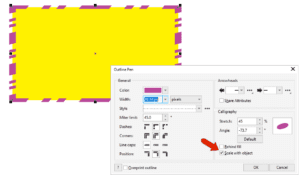
To demonstrate the Outline tools, we’ll start with a simple rectangle. From the Outline Tools tool group, choose the Outline Pen tool.
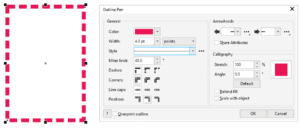
The Outline Pen dialog box will open. Here you can set the outline color, width, and line style.
There are other places in the CorelDRAW interface where you can also change outline properties.
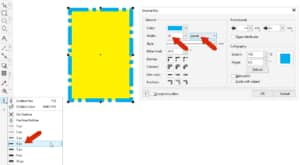
Right-clicking a color swatch in the Color palette along the right of the interface changes the outline color, and left-clicking adds a solid fill. You can also change line width and style on the property bar, as well as the Properties docker/inspector, on the Outline tab. The options here are the same ones that are available in the Outline Pen window.

There are also several pre-set line widths in the Outline Pen flyout, and you can use the Outline Pen window or the Properties docker to specify different units and a custom width.
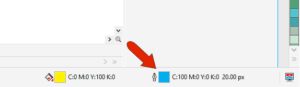
Double-clicking the Outline swatch on the status bar is another way to open the Outline Pen window. For Mac users, if the status bar is not displayed, go to View > Show Status Bar to turn on the status bar and access the Outline swatch.
Custom line styles
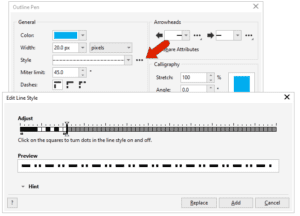
With a dotted or dashed line style, you can use the style settings to create a custom style. The slider sets the repeat distance, and filling in squares to the left of the slider establishes the repeating pattern. Clicking Add creates a new pattern which is then available in the styles drop down, or you can click Replace to replace the style you originally selected with the new version.
Corners, caps and outline position
When an outline is comprised of dashes and dots, it will probably not be symmetric in either direction. Choosing Align dashes aligns the style at corners, and Fixed Dashes make dashes identical at corners while adjusting pattern scale along edges.
Default line caps have squared edges, and you can switch to round caps or extended square caps that extend line length.
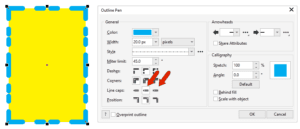
By default, the outline is centered with respect to the fill, but you can set it inside or outside the object. An outline can also be placed behind fill.
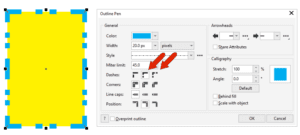
Also by default, corners are mitered, or sharp. But they can be round or beveled instead. For mitered corners, angles less than the miter limit are considered sharp. For a rectangle, if this angle is greater than 90, the corners will be beveled instead.

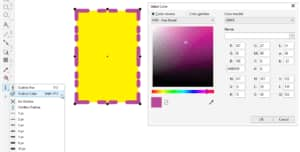
Outline color
For finer control over outline color, open the Outline Color tool on the toolbox. Here you can choose from color palettes, or a variety of color viewers in which you can fine tune color values.
Other outline settings
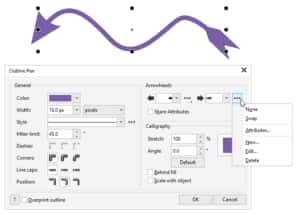
Outline settings apply to open curves as well, such as this curve drawn with the Pen tool, to which you can add arrowheads or other shapes at each end. Each arrowhead has a three-dot icon with an option to Swap start and end points, and an Edit option, which you can use to adjust properties such as Size or Rotation angle.
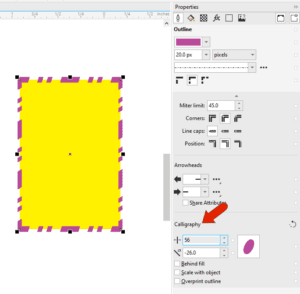
Calligraphy settings are best demonstrated with a wide solid curve. Reducing the Stretch value produces a hand-drawn pen nib look, and adjusting the Angle is equivalent to turning the nib.
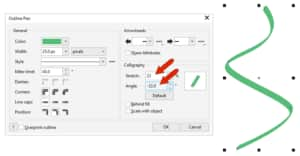
Changing calligraphy values can also produce interesting angles and varying thicknesses in non-solid line types.
And finally, when Scale with Object is checked, line widths increase as an object is enlarged.
Without this option checked, the line widths remain the same when you resize the object.
Start your FREE 15-day trial and embark on a design journey with powerful tools for vector illustration, layout, photo editing, typography, and collaboration.

Comments (3)
Reader Interactions
Comments
I would like very much to be able to apply other effects on outlines too, such as gradient, pattern-fill aso, just like you can on fillings.
The free Inkscape program has this, and with thicker outlines, you can get amazing effects on your project this way.
Hi HJ,
To do this, select the object that has an outline and under the Object menu choose “Convert Outline to Object”. Now the outline will be a separate object that you can fill with any type of fill.
Best regards,
The Discovery Center team
Unfortunately: There ist still now way to create an outline with just simple round dots!