
In this tutorial, you’ll learn how to use CorelDRAW’s Crop and Eraser tools. Cropping lets you quickly remove unwanted areas in objects and imported photos, eliminating the need to ungroup objects, break linked groups apart, or convert objects to curves. You can crop vector objects and bitmaps. The Eraser tool works just like a pencil eraser, removing any part of the image over which you click and drag.
Thanks for watching! We hope you found this tutorial helpful and we would love to hear your feedback in the Comments section at the bottom of the page. You will find a written version of this tutorial below, and a printable PDF copy to download on the Download Resources tab above.
Start your FREE 15-day trial and embark on a design journey with powerful tools for vector illustration, layout, photo editing, typography, and collaboration.
Download these free resources:
Written tutorial (PDF, 769 KB)
CorelDRAW Graphics Suite resources
Quick Start Guide (PDF, 2 MB)
Keyboard Shortcuts (PDF, 3.5 MB)
CorelDRAW and Corel PHOTO-PAINT user guides
For CorelDRAW Graphics Suite subscription and perpetual licenses (2018 to 2024), languages include English, Português do brasil, 简体中文, 繁體中文, Čeština, Deutsch, Español, Français, Italiano, 日本語, Polski, Русский
CorelDRAW Community
CorelDRAW learning center
Facebook
X (formerly Twitter)
YouTube
What’s New in CorelDRAW Graphics Suite
CorelDRAW Tools
 CorelDRAW Graphics Suite
 Ultimate Vector Bundle Vol. 1
 CorelDRAW Standard 2021
 Ultimate Vector Bundle Vol. 2
 Corel Vector
The Crop and Eraser Tools in CorelDRAW
In this tutorial, you’ll learn how to use CorelDRAW’s Crop and Eraser tools. Cropping lets you quickly remove unwanted areas in objects and imported photos, eliminating the need to ungroup objects, break linked groups apart, or convert objects to curves. You can crop vector objects and bitmaps. The Eraser tool works just like a pencil eraser, removing any part of the image over which you click and drag.
Click on any of the images below to view full-size.
The Crop Tool
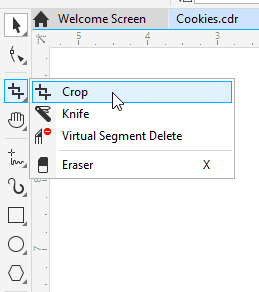
The Crop tool can be found in the tool group that is located, by default, in the third icon from the top of the Toolbox.
The simplest use for the Crop tool is for trimming images. To do this, activate the Crop tool and drag the cursor to define the area to keep – this is called the cropping area.

The position and size of the cropping area are listed on the property bar, and you can drag in the workspace to move the cropping area, or drag side or corner nodes to resize the cropping area.
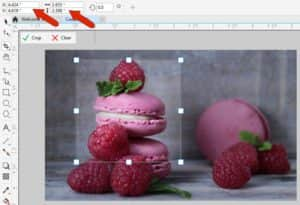
To complete the crop, click the Crop button with the green checkmark, or double-click inside the cropping area. Anything outside this area will be removed.
Or to start over or cancel, click the Clear button with the red X, or press the Esc key.
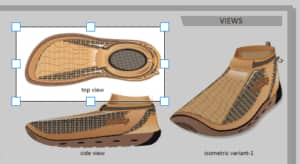
If you need a specific cropping area size, first define an cropping area of any size, then specify the crop dimensions on the property bar. Drag the cropping area to the part you want to keep and click the Crop checkmark to apply.
In this example, let’s say we need only the top view of the shoe, and nothing else. But the cropping area includes bit of the side view as well.
Clicking once inside the cropping area changes the square handles into corner handles that can be used for rotation.
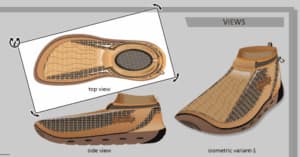
Clicking again brings back the original handles.
If you want to crop just one object in a drawing, such as the bitmap image in this example, you’ll need to use the Pick tool to select that object before cropping.

Then use the Crop tool to trim the selected object(s).

After completing the crop, all unselected objects remain intact.

If the image hadn’t been selected in advance, then everything in the drawing except for what was inside the cropping area would have been removed.
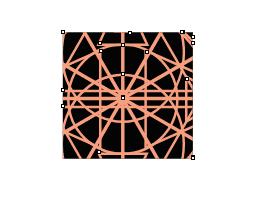
The Crop tool isn’t just for images. In this example there are ellipses, curves, and lines.

After cropping out all but the center, the objects that remain are trimmed accordingly,
The Eraser Tool
The main reason to use the Eraser tool instead of the Crop tool is when you want to remove an area that doesn’t have a rectangular shape.
The Eraser tool can be found in the Crop tool group flyout, and has the X shortcut.
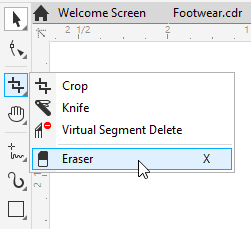
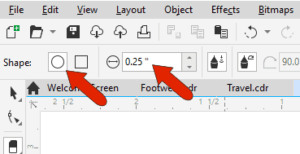
This tool works just like a pencil eraser, with either a round or square nib. You can change the nib size by entering a new diameter on the property bar, or by holding the Shift key while dragging the cursor up or down.
When you drag the cursor around the image, everything in the cursor’s path is erased.

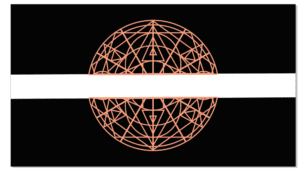
Another way to use the Eraser tool is to click two endpoints of a straight line, without dragging, to erase the path of entire line. After clicking the first point, you can hold the Ctrl key (Option key on Mac) to constrain the line to specific angles . . .
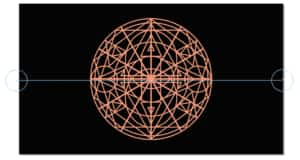
. . . then click the second point to complete the erasure. The curves in this example are now trimmed where the Eraser tool passed through, and all paths are now closed. This means that each curve starts and ends at another curve – no curves are left open-ended.
As with the Crop tool, if you want to erase only specific objects, you need to select the objects in advance. In this example, the group of curves is selected with the Pick tool.
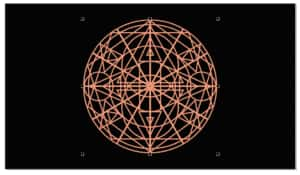
After activating the Eraser tool and clicking the start and end of the erasure line, only the curves are erased and trimmed – the black background rectangle remains intact.

For stylus users, the pressure, tilt, and bearing options on the property bar can be adjusted to control size, flatness, and rotation of the Eraser nib. All users can also enable Reduce nodes, which results in erasure curves with fewer nodes.

Start your FREE 15-day trial and embark on a design journey with powerful tools for vector illustration, layout, photo editing, typography, and collaboration.

Comments (2)
Reader Interactions
Comments
Thanks for sharing.
I was actually looking for how to crop around the edges of the image of an object. Not how to use the erase tool.
If you have a tutorial on that, please share.
Hi Mr. Henry,
If you are looking to crop exactly around the edges of an object, in essence extracting that object from the background, this written tutorial covers several methods for CorelDRAW and PHOTO-PAINT:
https://learn.corel.com/tutorials/removing-backgrounds-from-images-in-coreldraw-and-photo-paint/
There is also this video tutorial that deals specifically with masking and the Cutout Lab in PHOTO-PAINT.
https://learn.corel.com/tutorials/photo-background-removal-in-photo-paint/
Hope this helps!
The Discovery Center team