
This tutorial covers all features of CorelDRAW’s Blend tool. This tool is used for transitioning from one object to another, including transitions between colors, shape, and other properties.
Thanks for watching! We hope you found this tutorial helpful and we would love to hear your feedback in the Comments section at the bottom of the page. You will find a written version of this tutorial below, and a printable PDF copy to download on the Download Resources tab above.
Start your FREE 15-day trial and embark on a design journey with powerful tools for vector illustration, layout, photo editing, typography, and collaboration.
Download these free resources:
Written tutorial (PDF, 927 KB)
CorelDRAW Graphics Suite resources
Quick Start Guide (PDF, 2 MB)
Keyboard Shortcuts (PDF, 3.5 MB)
CorelDRAW and Corel PHOTO-PAINT user guides
For CorelDRAW Graphics Suite subscription and perpetual licenses (2018 to 2024), languages include English, Português do brasil, 简体中文, 繁體中文, Čeština, Deutsch, Español, Français, Italiano, 日本語, Polski, Русский
CorelDRAW Community
CorelDRAW learning center
Facebook
X (formerly Twitter)
YouTube
What’s New in CorelDRAW Graphics Suite
CorelDRAW Tools
 CorelDRAW Graphics Suite
 Ultimate Vector Bundle Vol. 1
 CorelDRAW Standard 2021
 Ultimate Vector Bundle Vol. 2
 Corel Vector
Using the Blend Tool in CorelDRAW
Learn how to use the Blend tool in CorelDRAW to add transitions from one object to another, including transitions between colors, shapes, and other properties.
Click on any of the images below to view full-size.
In CorelDRAW, blends are used to transition from one object to another, including transitions between colors, shape, and other properties. The Blend tool is part of the Effects tool group.
The Blend tool is part of the Effects tool group.
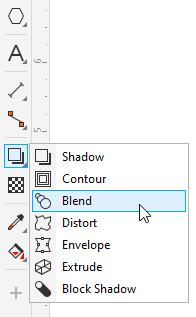
There is also a Blend docker, or Blend inspector on the Mac, which can be opened by choosing Window > Dockers > Effects > Blend. The options here are the same ones that appear on the Property Bar when creating or editing a blend.
Blend Tool Basics
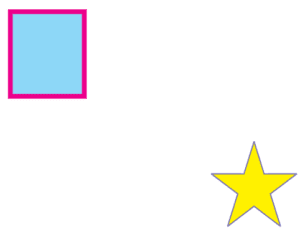
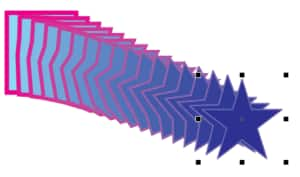
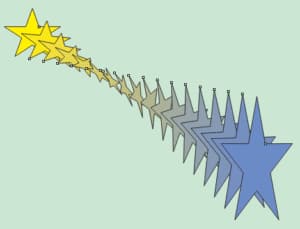
This example includes a rectangle and a star, with different fill colors, outline colors, and outline widths.
When the Blend tool is active, and the cursor is over an object that can be blended, it has a blend symbol. Drag between the two objects, and the blend preview is indicated by blue outlines.
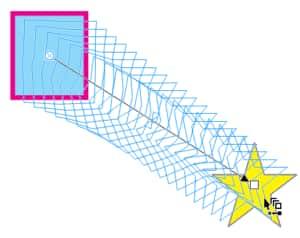
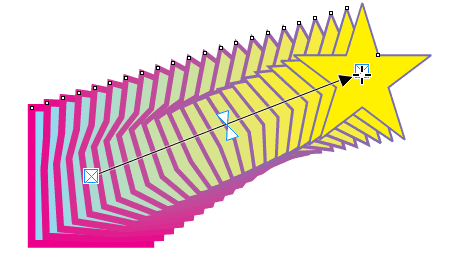
When you release the mouse button, the blend is created. This blend consists of 20 evenly-spaced shapes that transition from rectangle to star, and whose fill colors, outline colors, and outline widths also transition.
Note that color blends can be created for objects with uniform or fountain fills, but not for bitmap, texture, or vector fills.
Start and end objects are marked with white squares and are referred to as control objects. The arrow points to the end control object. Either control object can be dragged to a new spot, which updates the blend.
Editing a Blend
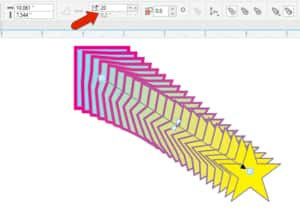
On the Property Bar, or on the docker, you can change the number of blend objects, add a twisting angle and make the path a loop to match the angle, and change the color blend from direct to clockwise along the color wheel or counterclockwise.

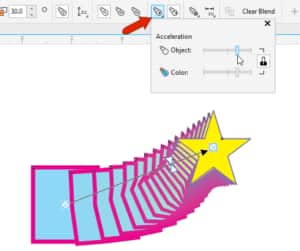
You can click the Object and Color Acceleration icon to adjust the rates of change for object shape and color, either together or separately when you turn off the lock icon.
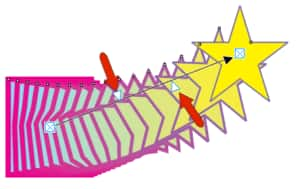
You can also adjust change rates on the blend itself. Each triangle control handle can be dragged separately to adjust color change or shape change rates, and double-clicking either triangle brings the two triangles back together. Double-clicking on either locked triangle unlocks them again.
To see which object is the start and which is the end, click the Starting and Ending Objects icon, and choose Show Start or Show End.
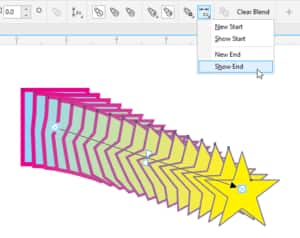
This option switches temporarily to the Pick tool, with the start or end object selected. If you make a change to the selected control object, such as to its outline width, or to its fill color by clicking a color swatch, the blend adjusts accordingly.
To reverse the blend start and end order, you can choose Object > Order > Reverse Order.
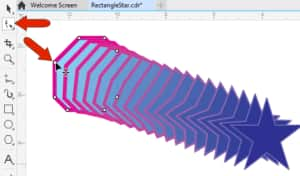
Any changes to the shape of either start or end object will also affect the blend. For example, if you use the Shape tool to adjust or add nodes, the transitional shapes will update as well.
Blend Paths and Spacing
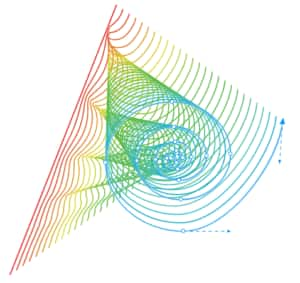
By default, a blend proceeds in a linear path. But if you hold the Alt key while dragging between shapes, you can draw a freehand curve for the transition.
To set an even spacing by distance, click Blend Spacing, and specify the spacing distance.

To blend along a different path, you can either click the Path Properties icon and choose New Path, or right-click anywhere in the blend and choose New Path.
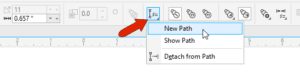
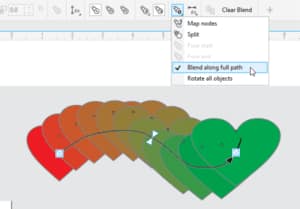
Clicking the new path curve brings the objects to that path. To make the objects fit the entire curve, click the More Blend Options icon, and choose Blend Along Full Path. The Rotate all objects option in the same drop-down keeps each transition shape perpendicular to the path.
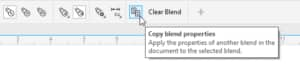
If you want to match the blend properties between objects to another blend between other objects, click Copy Blend Properties, then click inside the blend you want to copy.
Creating 3D Effects using Blends
The Blend tool is commonly used for adding 3D effects to objects. In this example, a blend created a tunneling effect between two rectangles with no fill, a gleaming or reflective effect from an ellipse with a fountain fill, and a 3D text effect.

Blending Open Curves
Blends work nicely with open curves as well, such as this blend between a line and spiral.

With the Shape tool, you can move endpoints of the line, or nodes of the spiral, to change the result.
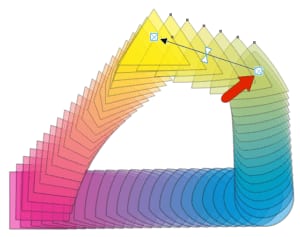
Node Mapping
Node mapping can be used to twist transition objects. Click More Blend Options and choose Map Nodes.
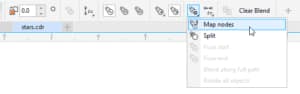
Click the node on the end shape, then click the node on the start shape to match the first node.

The result is twisted transition shapes.
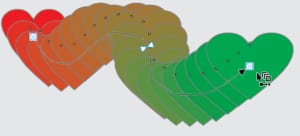
Compound Blends
A compound blend is a joined set of two or more blends. This example consists of blends between each shape.

To add another blend section, click the blend to split, then click More blend options and choose Split.
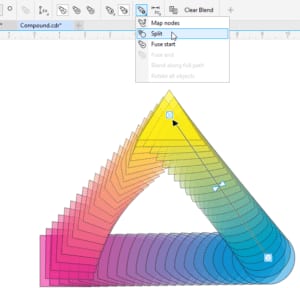
Where you click becomes a new control object.
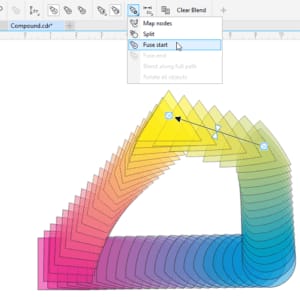
Removing blend sections can be done by fusing. Select the section to remove, click More Blend Options, and choose to fuse the start or end.
Blending Multiple Objects
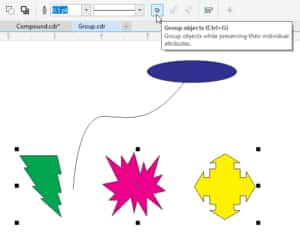
By default, only one object can be used for either end of a blend, but you can get around this by using a group. With the Pick tool, select the shapes to combine, and click the Group objects icon.
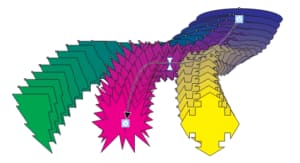
Now you can create a single blend which has the appearance of a compound blend.
What kind of projects have you created with the Blend tool? Share your work in our Graphic Design gallery!
Start your FREE 15-day trial and embark on a design journey with powerful tools for vector illustration, layout, photo editing, typography, and collaboration.
