
This first tutorial in our series Working with Masks in PaintShop Pro provides an overview of what masks are and how they can be used. If you aren’t familiar with masking, it can seem like a complicated photo editing technique, but once you understand how to use masks you will be amazed with the creative possibilities they offer. In this tutorial we will demonstrate several different masking applications to help you understand how masks can be used to create a variety of effects, including photo framing, transitions, textures, collages, and more.
Thanks for watching! You will find a written version of this tutorial below, and a printable PDF copy to download on the Download resources tab above.
Download your FREE 30-day trial and make every shot your best shot with PaintShop Pro, your all-in-one photo editing and design software.
Download these free resources:
Written tutorial (PDF, 2 MB)
Sample images (Zip, 2 MB)
PaintShop Pro resources
Keyboard shortcuts (PDF, 173 KB)
PaintShop Pro User Guides
Partner and User websites
PaintShop Pro User Forum
Scrapbook Campus (Tips and tricks, workshops, master classes, and more)
Creation Cassel (Scripts, picture tubes, and other PaintShop Pro tools, plus weekly freebies)
PaintShop Pro Maniacs (Facebook group)
PaintShop Pro (Facebook group)
What’s new in PaintShop Pro
Working with masks
PaintShop Pro tools
Featured products
 PaintShop Pro 2023 Ultimate
 AI HDR Studio 3.0
 PaintShop Pro 2023
 Vision FX 2.0
Introduction to PaintShop Pro masks
Welcome to this introduction to masking in PaintShop Pro. Masks can seem like a confusing or overwhelming topic, but once you go through a few examples, you’ll see that they’re quite easy to understand and use.
One way to think of a mask is with the analogy of painter’s tape on a blank wall. The photo is the paint, and the tape applied on the wall prevents those areas from being painted with the photo.
Or you can also think of masks like windows. The areas not being masked are the parts of the photo that show through, like a window lets light show through a wall. The bits that are masked are like the wall – whatever is behind the window can’t be seen through the wall.
PaintShop Pro comes with several masks installed. And you can download more free masks from the Welcome Book. To get more masks, open the Welcome Book, select Get More in the left menu and then click on the Creative Content tab. Scroll down to find the Creative Content Pack and download.

Let’s look at a few examples of masks and the different ways they can be used.
How to apply a mask
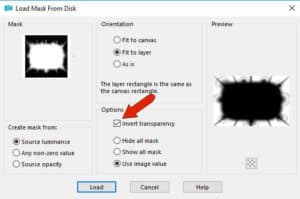
Open an image in the PaintShop Pro Edit workspace. Go to Layers > Load/Save Mask > Load Mask From Disk. Click on the dropdown menu arrow to see the library of available masks. In this example we will choose the flower mask.
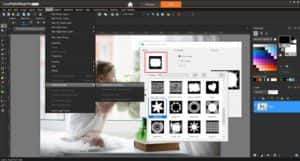
The black areas of the mask will end up covering the image. Remember black = block! The white areas will allow the image to show through, producing the equivalent of a flower-shaped window. Leave the default options as they are and click Load.
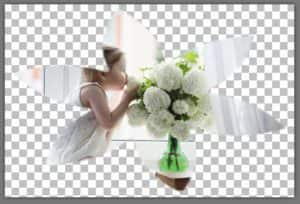
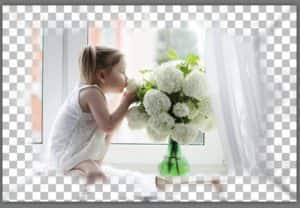
This is the result: the center of the photo is showing, and the background is blocked off, following the flower shape. For a photo that has the subject in the center, this mask is good for blocking parts of the background, highlighting the subject.
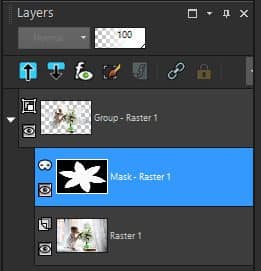
Look at the Layers palette and note the change of layer structure. The mask layer appears above the background layer, and both layers are placed inside a layer group. Masks are always grouped with the layer that was active when the mask was created. And because there’s no practical reason for a mask to be under the photo, the mask layer can’t be moved below the background.
Masks can also have shades of gray, enabling some of the image to show through. Let’s look at one of those. We’ll click Undo to remove the first mask. Again, go to Layers > Load/Save Mask > Load Mask From Disk and select the mask called Edge Burst. This mask is white in the center, with black and shades of gray along the edges.
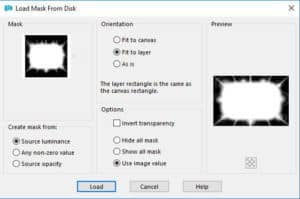
The result: the entire image appears in the center, and there’s both full and partial transparency along the edges.
We’ll click Undo again to remove this mask and demonstrate a creative way to enhance this masked image.
Start by adding a new raster layer above the photo. Use the Flood Fill tool to paint the entire raster layer green. Since the green layer is active, the mask will be applied to the green layer, not the photo layer.
Load the Edge Burst mask again. This time, the center of the green layer is to be blocked, not the parts along the edges. This means that black should be in the center, white along the edges. Click Invert Transparency to reverse the black and white pixels.
The green layer remains atop the image as a frame, with some translucent areas, and the center of the image shows through.

How to apply a mask from an image
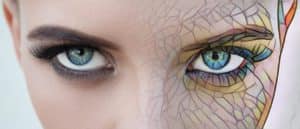
In addition to the masks available in PaintShop Pro, you can also use an image that you create or find yourself. In this example we have our original image open and a black and white spiral image.
Note: you can use a color image as mask as well, though PaintShop Pro will reduce it to grayscale when used for masking.
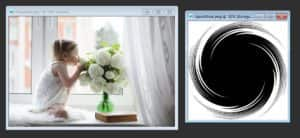
With the photo selected, go to Layer > New Mask Layer > From Image. In the Source window, select the spiral image. In this example, the mask data is inverted so that the edges of the photo will be blocked, not the center.

After applying, the square mask image was stretched horizontally to fit the rectangular photo, which is one of the default mask settings.
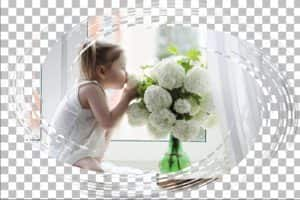
We can apply the same green frame effect as the previous image. Add a new raster layer and flood fill it with green. Then drag the green layer below the mask group. The green fills in all the black and gray parts of the inverted mask.

Creating masks from the Layers palette
In the Layers palette, click the New Mask Layer icon for another way to access mask options. In addition to the From Image option, there are also Hide All and Show All options. These will be demonstrated in-depth in other tutorials in this series.
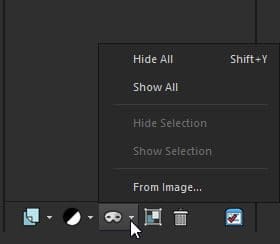
But in a nutshell, a Hide All mask blocks the entire image, and white paint can be used to bring back the parts you want to show. With the Show All option, black paint can be used to define the areas to block.
Creating gradient masks
Masks can also be used to create transitions between 2 or more images. In this example, two identical photos are open: an original photo and a copy that has the stained-glass effect from the Pic To Painting plugin.

With the painted image selected, add a new Hide All mask layer. Then on the mask layer, select a black-to-white gradient to apply. Activate the Flood Fill tool to fill the mask layer.

To merge the images, select the original photo and copy it (Ctrl + C). Then return to the masked image and make the entire mask group active by clicking on the Group – Raster 1 layer in the Layers palette. Now paste the original photo (Ctrl + V) and you will see it becomes the top layer in the Layers palette.

Drag the photo layer to the bottom. The original photo now appears below the part of the masked image that was blocked, and the gradient enables a smooth transition.
Using masks to create textures
Another use for masks is to make textures. In this example, two images are open. The mask image is a grayscale wood grain. The other image consists of two solid-filled blue layers.
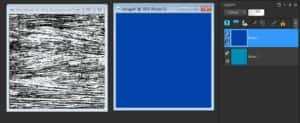
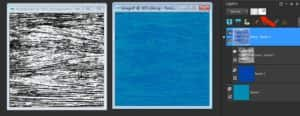
With the darker blue layer active, apply the wood grain image as mask as we did earlier with the spiral image (go to Layer > New Mask Layer > From Image). In the Source window, select the wood grain image). This produces an image that looks like distressed wood painted blue, allowing the light blue to show through below the dark blue.
You can adjust the layer opacity to see how the mask effect can be modified. Keep this image open in PaintShop Pro, as we will use it again later.
The last example will demonstrate how masks are used in photo collages.
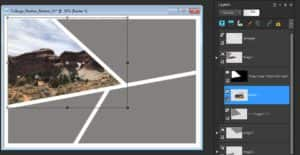
Go to File > New from Template and select the Collage category. Scroll through and choose one of the free templates such as Shatter01.

The layer structure of this template has 4 groups, one for each photo opening, each group containing a mask above a dark gray placeholder shape. Each group’s mask is all black with a white shape that indicates where the corresponding photo opening is for that layer.
Open the photos that you want to place in the collage. Select the first image and copy it, then go to the collage and click on the layer above which the photo will go. Paste in the first image, then activate the Pick tool to move or resize your photo so that it is placed in the photo opening.
Note: you will see that the mask layer is named “Drag image 1 below this mask” to help you identify where to place your photos in the layer structure.
What’s great about this is that no matter what the size of the photos, no photo will ever appear in any spot but its own masked rectangle. Without masks it would be really tough to fit these photos to such irregular shapes, and they would overlap each other.
Repeat for the remaining photos until your collage is complete.

For an extra creative touch, let’s use the wood texture image from earlier. If you don’t like the blue colors, you can flood fill both layers with other colors, such as 2 shades of brown. The masked wood grain pattern will remain.
Merge all layers of the wood texture image to a single layer by right-clicking on one of the layers in the Layers palette and selecting Merge > Merge All (Flatten). Copy the image and go back to your collage.
Click on the Template layer (top layer) in the Layers palette to make this layer active, paste in your wood texture image, then drag the wood layer to the very bottom of the Layers palette. You may need to use the Pick tool to resize and reposition the wood texture image so that it fits the collage size.
In order to have the wood texture image show through as the border for the collage, you can do one of the following:
- click the Visibility toggle (eye icon) beside the Template layer to turn off the visibility. This gives you the option to bring back the white border if you wish
- delete the white border in the Template layer entirely, by using the Delete key or Eraser tool.

These are just a few examples of what you can do with masks in PaintShop Pro. Once you have learned how to work with masks, a whole new world of creative possibilities will be open to you!
Download your FREE 30-day trial and make every shot your best shot with PaintShop Pro, your all-in-one photo editing and design software.
