
In this tutorial, we will show you how to rotate photos to fix any images that have been photographed on an angle or end up sideways on your smartphone. You will also learn how to flip and mirror photos to improve the composition of your social media images and create unique images.
Download your FREE 30-day trial and make every shot your best shot with PaintShop Pro, your all-in-one photo editing and design software.
Download these free resources:
Written tutorial (PDF, 1 MB)
Sample files (Zip file, 6 MB)
PaintShop Pro resources
Keyboard shortcuts (PDF, 173 KB)
PaintShop Pro User Guides
Partner and User websites
PaintShop Pro User Forum
Scrapbook Campus (Tips and tricks, workshops, master classes, and more)
Creation Cassel (Scripts, picture tubes, and other PaintShop Pro tools, plus weekly freebies)
PaintShop Pro Maniacs (Facebook group)
PaintShop Pro (Facebook group)
What’s new in PaintShop Pro
Getting started with PaintShop Pro
PaintShop Pro tools
Featured products
 PaintShop Pro 2023 Ultimate
 AI HDR Studio 3.0
 PaintShop Pro 2023
 Vision FX 2.0
How to flip, mirror and rotate photos
In this tutorial you will learn:
- How to flip and mirror a photo
- How to flip and mirror a selected object or area in your photo
- Three ways to rotate photos
Click on any of the images below to view full size.
How to flip and mirror a photo
First of all, let’s look at the difference between the Flip and Mirror commands. When you use Flip, the photo, active layer or selected object/area is flipped in position. When you use Mirror, the photo, active layer or selected object/area is flipped along the horizontal (left to right) or vertical (top to bottom) axis.
When you flip or mirror a photo you won’t see a difference between these two commands. But you can also flip or mirror objects (like a shape or text) or a selection, and then you will see the difference.
- Open your image in the Edit
- Click on Image in the top menu, then select Mirror > Mirror Horizontal to flip the image along its horizontal axis.
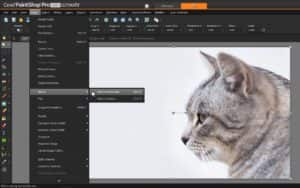
And this is the result. If you had used the Flip Horizontal command on this photo, the result would be exactly the same.

How to flip and mirror a selection
When you flip or mirror a selection, the object or area you have selected will be placed on a new layer as a floating selection, leaving the original layer unchanged.
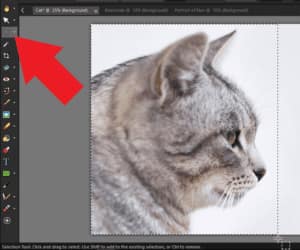
- Use the Selection tool and draw a selection around the cat.
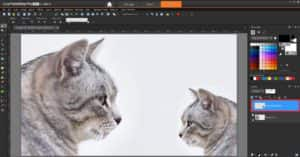
Click on Image > Flip > Flip Horizontal and this will be the result.

Or, click on Image > Mirror > Mirror Horizontal and this will be the result. When working with a selection you can clearly see the difference between the Flip and Mirror commands.

The flipped or mirrored cat selection is now on a new Floating Selection layer. If you want to preserve this new layer, right-click on the layer in the Layers palette and select Promote Selection to Layer. This layer will remain independent, which means you can use a variety of photo editing tools and techniques to modify it without affecting the layer below. For example, you can use the Pick tool to resize and reposition the promoted selection to create something like this:
Rotating and mirroring images for better composition
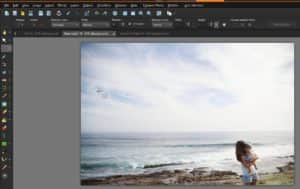
Another practical use for rotating and mirroring images is for when you want to create an image to use on social media, for example, a cover photo on Facebook.
You can mirror or flip the image so that the key part of an image won’t be blocked by your profile picture.
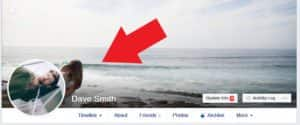
Click Image, then select Mirror > Mirror Horizontal. Now when you upload this photo, the woman and child won’t be blocked by the profile picture.
How to rotate images
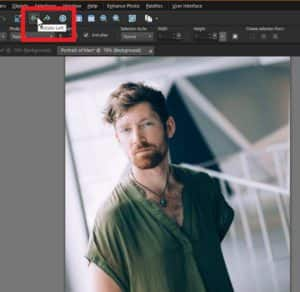
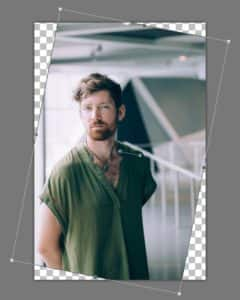
I have this portrait of a man that I need to rotate before adding it as his profile picture.

There are three different options to choose from when rotating images.
- To rotate the image 90 degrees clockwise or counter-clockwise, use the Rotate Right or Rotate Left commands under the Image menu or simply click on the Rotate Right or Rotate Left buttons.
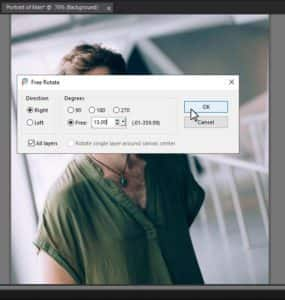
- To rotate an image to a specific angle, select Free Rotate under the Image menu.
- You can choose either the Right or Left option to set the direction of the rotation.
- Under Degrees, you can choose the Free option and set a specific value for the rotation.
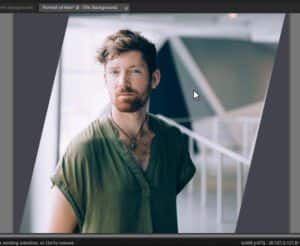
After this, you’d need to crop the image accordingly to remove the added background.
Again, you will need to use the Crop tool to remove the added background.
Now we can clearly see our subjects in our cover photo on Facebook and we no longer have a crooked photo as our profile picture.

Download your FREE 30-day trial and make every shot your best shot with PaintShop Pro, your all-in-one photo editing and design software.

Comments (1)
Reader Interactions
Comments
Well explained and with a common example.