
In this tutorial we will show you how to use the PowerClip tool in CorelDRAW for clipping objects, such as photos, bitmaps and vector objects, and placing them inside other objects, text or frames. Using PowerClip is an easy way to trim your artwork to a specific shape or size or add creative effects such as clipping a photo inside your text.
Thanks for watching! We hope you found this tutorial helpful and we would love to hear your feedback in the Comments section at the bottom of the page. You will find a written version of this tutorial below, and a printable PDF copy and exercise file to download on the Download Resources tab above.
Start your FREE 15-day trial and embark on a design journey with powerful tools for vector illustration, layout, photo editing, typography, and collaboration.
Download these free resources:
Written tutorial (PDF, 1 MB)
Exercise files (Zip file, 6.4 MB)
CorelDRAW Graphics Suite resources
Quick Start Guide (PDF, 2 MB)
Keyboard Shortcuts (PDF, 3.5 MB)
CorelDRAW and Corel PHOTO-PAINT user guides
For CorelDRAW Graphics Suite subscription and perpetual licenses (2018 to 2024), languages include English, Português do brasil, 简体中文, 繁體中文, Čeština, Deutsch, Español, Français, Italiano, 日本語, Polski, Русский
CorelDRAW Community
CorelDRAW learning center
Facebook
X (formerly Twitter)
YouTube
What’s New in CorelDRAW Graphics Suite
CorelDRAW Tools
 CorelDRAW Graphics Suite
 Ultimate Vector Bundle Vol. 1
 CorelDRAW Standard 2021
 Ultimate Vector Bundle Vol. 2
 Corel Vector
Clipping Objects into Other Objects Using PowerClip
The PowerClip tool in CorelDRAW allows you to place vector objects and bitmaps, such as photos, inside other objects, or frames. A frame can be any object, for example artistic text or a rectangle. Using PowerClip is an easy way to trim your artwork to a specific shape or size or add creative effects such as clipping a photo inside your text.
Click on any of the images below to view full-size.
How to Create a PowerClip Object
Our first exercise is creating a plaid stocking. We have a red stocking and a red plaid pattern. Think of the stocking as the container that you want to fill with the plaid pattern. There are a few ways of clipping objects, such as the plaid pattern into other object, such as the stocking image.
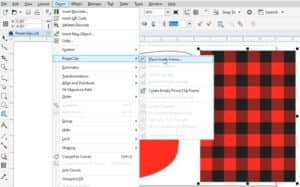
1. Select the plaid pattern and go to Object > PowerClip > Place Inside Frame, or
2. Right-click on the plaid pattern and choose PowerClip Inside
Whichever method you choose, you will see that your cursor becomes an arrow. Click with the arrow on the stocking and the plaid pattern will be clipped inside the stocking shape. Then press Ctrl + Z to undo if you would like to try the third method.
3. Select the plaid pattern, click and hold your right mouse button and drag the pattern about halfway into the stocking shape. Your cursor will become a small target icon. Release your right mouse button and choose PowerClip Inside from the menu that pops up. The pattern will land in the stocking right where you let it go.

With the first 2 methods, the plaid pattern was automatically centered inside the stocking. But with this 3rd method the pattern is not centered in the stocking. We can make adjustments by editing the PowerClip object.
How to Edit a PowerClip Object
When you select a PowerClip object a small toolbar will appear, usually above or below the object.

This toolbar has options for:
- Edit PowerClip
- Select PowerClip Contents
- Extract Contents
- Lock Contents to PowerClip
- Fit Contents
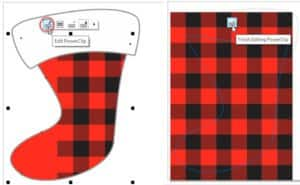
Click on the Edit PowerClip icon and move the plaid pattern to cover the whole area of the stocking.
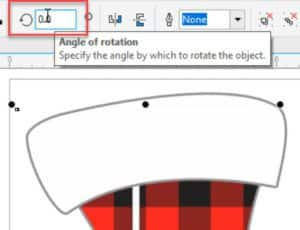
Once you are in Edit PowerClip mode, you can resize or reposition the plaid pattern as you would with any object, by dragging the nodes inward or outward. If you click on the plaid pattern a second time the nodes will change to arrows, allowing you to rotate the pattern.
Then click on the Finish Editing PowerClip icon that appears, to exit the PowerClip.
There are a few other ways to edit a PowerClip object:
- Select the PowerClip object and go to Object > PowerClip > Edit PowerClip. Edit as needed. To exit, go to Object > PowerClip > Finish Editing PowerClip.
- Hold down the Ctrl key and click inside the PowerClip object. Edit as needed. To exit, hold down the Ctrl key and click outside the PowerClip object.
- Right-click on the PowerClip object and select Edit PowerClip. Edit as needed. To exit, right-click again and choose Finish Editing PowerClip.
How to Remove or Extract a PowerClip Object
Now that we reviewed how to add and edit PowerClip, let’s look at how to extract or remove the contents of a PowerClip container. As with editing a PowerClip object, there are several methods you can choose from.
Select the PowerClip object then:
- click on the Extract Contents icon on the PowerClip toolbar, or
- go to Object > PowerClip > Extract Contents, or
- right-click and choose Extract Contents.
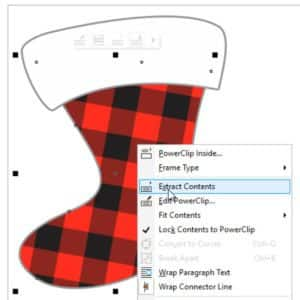
Now drag the plaid pattern off to the right. You will see there is an X inside our previous PowerClip container (stocking). This just indicates that this shape is a PowerClip container.
Note: if you don’t want the stocking (or any other object) to be a PowerClip container anymore, right-click on it and choose Frame Type > None. But to continue with this tutorial, keep it as a PowerClip container.
Additional PowerClip Exercises
Now that you are familiar with the basics of creating and editing PowerClip objects, here are some additional exercises that will introduce you to advanced PowerClip features.
Exercise 1: Using the Alt Key
You can use the Alt key to edit and move the contents without going inside the PowerClip object. To demonstrate, we will add some white accents to our plaid pattern.
- Select the Rectangle tool on the Tools toolbar and draw tall thin rectangle about as tall as the stocking.
- Switch to the Pick tool and click on the white swatch in the Color palette. This will make the rectangle white.
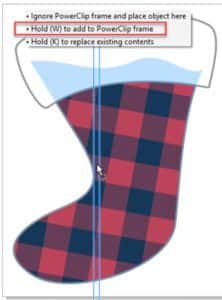
- Drag the rectangle over the plaid pattern in the stocking but don’t release your mouse button. You will see a menu that pops up with some instructions, one of which is Hold (W) to add to PowerClip frame.
- Press the W key and then release your mouse button, and the rectangle is added to the PowerClip container.
Note: If you have assigned the W key as a shortcut key for another function, the rectangle will still be added to the PowerClip frame but whatever else you have assigned to the W key will happen as well.
- Hold down the ALT key and click on the plaid pattern. See that the nodes (handles) become circles instead of squares. This indicates that you are editing inside the PowerClip frame.
- If you changed the angle of the plaid pattern when experimenting with editing PowerClip objects earlier in the tutorial, set the Angle of Rotation (in the Property bar) back to 0. This will make it easier to line up the white accents.
- Hold down the Alt key and select the white rectangle. Make sure the nodes are circular to ensure that you have it selected.
- Drag the white rectangle to the middle of one of the plaid rows. You can also use the nodes to make it thinner if you want.
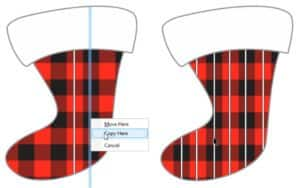
- Hold down your right mouse button and drag the white rectangle left or right to the center of another plaid row.
- Release your right mouse button and select Copy Here. Repeat this process to add as many white rectangle accents as you want.
Exercise 2: Using a Photo for a Kitchen Tile Backsplash
Did you know that with a process called sublimation you can print a photo, graphic design or artwork on ceramic tiles to create a custom backsplash for your kitchen? Here is how to use the PowerClip tool to set up the artwork for this project.
In this exercise we will use a backsplash area of 48” wide by 18” tall, and a tile size of 6”x6”.
- On page 2 of the exercise file, set the Page dimensions to 48” wide x 18” tall in the Property bar.
- Under the View menu, select Snap to > Page.
- On the Tools toolbar, select the Graph Paper tool in the Polygon tool group flyout. In the Property bar, set the grid size to 8 x 3.
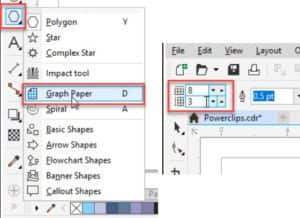
Drag your mouse from the top left corner to bottom right corner to draw out the graph paper. The result will be a grid of 24 squares.

- Go to File > Import and browse to the location where you saved the Meadow.jpg photo from the tutorial downloads zip file (or use any photo you wish). Click Import.
- Again, drag from the top left corner to bottom right corner to add the photo. Make sure some of the grid is still showing.
- Right-click on the meadow photo and choose PowerClip Inside. With the arrow, click on one of the grid lines.

The meadow photo is now clipped inside the tile grid. Click on the Edit PowerClip icon in the PowerClip toolbar if you need to scale or move the photo to make it cover the entire grid. Then click on the Finish Editing PowerClip icon.
When you are ready to print the tiles, click on the Ungroup Objects icon in the Property bar. Now each of your tiles is a separate image that can be printed.

Exercise 3: Clipping a Photo Inside Text
You can also use the PowerClip tool for clipping objects inside text. Go to page 3 in the exercise file.
- Right-click on the fire photo and select PowerClip Inside.
- With the arrow cursor, click on one of the letters in “Fire Department”.
- Click on the Edit PowerClip icon in the PowerClip toolbar, select the fire photo and use the nodes to resize and reposition the image to fill the text.
- Click on the Finish Editing PowerClip icon and you’re done!

Start your FREE 15-day trial and embark on a design journey with powerful tools for vector illustration, layout, photo editing, typography, and collaboration.

Comments (1)
Reader Interactions
Comments
That’s awesome