Learn how to use Vector FX, a generative AI program that uses text prompts to create vector images in SVG format. With Vector FX you can produce all kinds of editable, scalable vector graphics that can be brought into CorelDRAW to create custom designs for use in branding, marketing and other professional design projects.
Learn more and purchase Vector FX here.
Thanks for watching! You will find a written version of this tutorial below, and a printable PDF copy to download on the Download Resources tab above.
Start your FREE 15-day trial and embark on a design journey with powerful tools for vector illustration, layout, photo editing, typography, and collaboration.
Download these free resources:
Written tutorial (PDF, 821 KB)
CorelDRAW Graphics Suite resources
Quick Start Guide (PDF, 2 MB)
Keyboard Shortcuts (PDF, 3.5 MB)
CorelDRAW and Corel PHOTO-PAINT user guides
For CorelDRAW Graphics Suite subscription and perpetual licenses (2018 to 2024), languages include English, Português do brasil, 简体中文, 繁體中文, Čeština, Deutsch, Español, Français, Italiano, 日本語, Polski, Русский
CorelDRAW Community
CorelDRAW learning center
Facebook
X (formerly Twitter)
YouTube
What’s new in CorelDRAW Graphics Suite
CorelDRAW tools
Adding effects in CorelDRAW
 CorelDRAW Graphics Suite
 Ultimate Vector Bundle Vol. 1
 CorelDRAW Standard 2021
 Ultimate Vector Bundle Vol. 2
 Corel Vector
How to use Vector FX
In this tutorial, we’ll demonstrate how to use Vector FX, a generative AI program that uses text prompts to create vector images in SVG format. With Vector FX you can create all kinds of customizable, scalable vector graphics, from simple to complex and the resulting SVG files can be brought into CorelDRAW, or other vector editing software, for further editing and refinement.
Because Vector FX is a standalone program that runs directly on your local device, and not in the cloud, your creations are limitless, and your data remains private and secure.
Click on any of the images below to view full-size.
Configure the Vector FX settings
Before you start using Vector FX, it’s crucial to configure the program settings for optimal performance.
When first installed, the default settings are the lowest, and it’s important that the settings be updated to match your system. Be sure to read over the Performance Tips that appear when you first open the program.
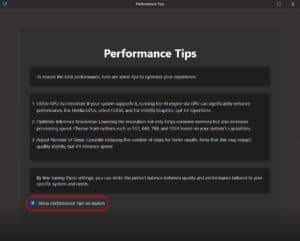
Settings menu
Open the Settings menu and choose AI Engine. This window has two tabs: Model Settings and Prompt Settings.
In Model Settings, the most important setting is Supported Processing Methods. Select the processing method that best matches your system specs.
The Image Resolutions setting determines the level of detail in the vector output, and ranges from 512 to 1024.
- A high resolution will produce cleaner or more detailed vectors but requires more processing time and power.
- A low resolution will speed up the processing time and still produce great results, just not as detailed or refined.

Tip: when experimenting with different prompts and settings, you can work at a low resolution to generate images more quickly. Once you are happy with the style of images being generated, you can increase the image resolution to produce more detailed images.
The Select Model setting is High Quality but future updates to Vector FX will offer additional models.
If you make changes, be sure to click Apply to reinitialize the AI engine.
Now let’s look at Prompt Settings.
The Inference Steps setting adjusts the number of steps taken to create the image. The more steps you take, the more impact it has on the results. Think of it like this: the longer you spend working on a piece of art, the more detail you’ll put into it. This may not always mean better results, but you have more time to refine and add detail. The default setting of 25 will consistently produce good results with faster processing time.
For Text Weight, the default of 7.5 is fine for most users. Increasing this value means that every part of your prompt will be represented very literally, which you may want to do if you plan to use very detailed, intricate prompts to generate very specific results.
Lastly, we have Batch Processing. When enabled, Vector FX will generate five different options using the same prompt and settings. When disabled, you’ll get one image at a time, and each of the five outputs can have its own prompt and settings. This means you can iteratively tweak prompts and settings to compare results and use the side-by-side options to gauge the impact of the prompt vs. settings.
Help menu
Let’s now look at the Help menu:
- FAQ links to the Vector FX website with some frequently asked questions.
- Performance Tips opens the tips popup we saw earlier.
- System Info opens a handy window with your computer specs. This is where you can see your graphics card, so you know which processing method to select in Model Settings.
- Check for Updates is how you can check periodically for enhancements and new models.
- About displays version details for the software and AI engine.
Generate a simple vector image
For our first example we’ll create some cartoon birds. The Batch Processing setting (in the Prompt Settings menu) is off, so we can use a different prompt for each of the five output images. We’ll start by typing the prompt “cute colorful cartoon owl” in the Prompts text box.
We have the High Detail setting toggled off to reduce processing time while we experiment with prompts. And we’ll keep the rest of the slider settings at their default values to begin with.
Seed is a random ten-digit number, somewhat like a unique artistic interpretation. If you want to replicate results, you will need to use the same seed number, along with the same set of slider values and identical text prompts.
When we click the Generate button, Vector FX generates one image of a cartoon owl. The number of objects and nodes appears just below.
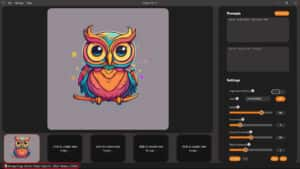
If the results aren’t quite what you are looking for, you can try a new seed number and generate the image again.
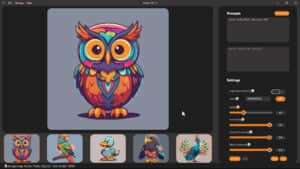
Now we’ll try some different prompts to generate other types of birds. Click the space for second output image to select it, then enter a new prompt such as “cute colorful cartoon parrot.” We’ll keep the default slider settings and click Generate.
Follow the same process for each of the five output images. In our example, we also created a duck, an eagle, and a peacock.
When you click an output image you can see its prompt, slider settings, unique seed number, and the number of objects and nodes.
Adjust the slider settings to refine your image
Choose one of the output images to work with, and we’ll explore the slider settings. Adjusting the sliders doesn’t require a regeneration—the adjustments occur in real time.
- The Detail slider controls the number of objects and nodes in the image. If you lower the Detail setting, it will reduce the object and node count, resulting in a more simplified version of the image.
- The Smoothing slider controls the number of small objects. If you increase the Smoothing setting, it will reduce the number of objects, resulting in a more streamlined image.
- The Corner Smoothing and Path Coarseness sliders control the actual node counts. Increasing either or both of those slides will reduce the number of nodes.
Edit Vector FX images in CorelDRAW
Once you’ve adjusted the settings to produce an image to your liking, you can save it as an SVG file or open it directly in CorelDRAW.
- To save an image as an SVG file, select it and click the Save button or use File > Save. You can then open or import the SVG file in CorelDRAW or other vector editing programs.
- To open an image directly in CorelDRAW, select it and use File > Edit with CorelDRAW.
In CorelDRAW, the objects will be listed in the Objects docker (Objects inspector for Mac users). The number of objects is the same as the number of objects listed in Vector FX.
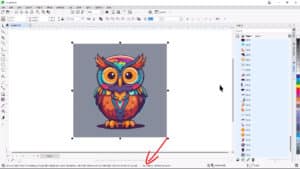
Because this is a vector design, it can be resized or scaled up with no loss of image quality. And it can be edited and refined with numerous tools in CorelDRAW.
- Select an object or group of objects with the Pick tool to move, resize, or delete.
- Click a color swatch to change the color; right-click a color swatch to add an outline color.
- Select an object with the Shape tool and use the nodes to reshape an object.
- Use the Interactive Fill tool and Transparency tool to add gradients, patterns, and transparency effects.
- Use the shape and line drawing tools to create new objects to enhance the design.
- Use the Text tool to add text.
- Choose from a wide variety of effects to enhance your design, such as creative art styles, drop shadows, textures, and much more.
And once you’re finished editing the image, it can be used to create print and online marketing materials like web banners, menus, flyers, social media posts, etc.

Create a detailed illustration
Now let’s create a design with more detail and complexity. We’ll start with the prompt “detailed illustration of a sunset, mountain range, waterfalls, vibrant colors” with terms separated by commas.
Tip: When creating prompts, it’s important to be concise and descriptive, and not use any terms that conflict with one another.
Again, we’ll keep the High Detail setting toggled off to save processing time as we experiment with different prompts and settings.
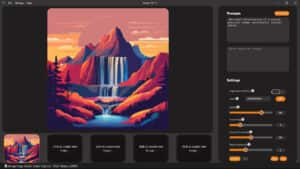
After generating the first image, we can use the second output image to see what that results are when we use the same prompt and settings but add a negative prompt. In the negative prompt field, we entered “primary colors, trees” so that the generated image would avoid saturated colors, and not include trees.

To try a third option, we added a few terms (complex, expressive, peaceful) to the original prompt, and updated the negative prompt to remove the word “trees).
Once you’re happy with the results generated from your prompt, you can use it as is or try toggling on the High Detail setting and regenerate the image to produce a more detailed version of the image.
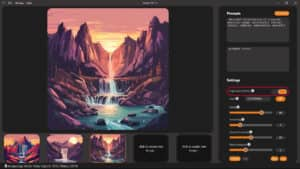
Your image can now be brought into CorelDRAW for further editing and refinement, and used to create marketing materials, t-shirts, merchandise, and more.

Create a logo
Vector FX can also be used to generate much simpler images, such as a logo. We’ll generate this image using the Batch Processing mode so we can compare the different interpretations of our prompt.
To turn on Batch Processing mode, open the Settings menu, choose Prompt Settings, and enable Batch Processing.

The prompt we are using is “silhouette of a bull head, logo” and we’ll disable the High Detail setting to keep the object count down.
As each option is generated, you can click the output image to view it. If you like one of the first output images you can click the Stop button to end the generation process without creating all five images.
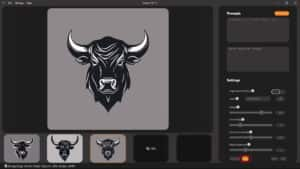
To further simplify the results, you can adjust the settings to minimize object and node count, while keeping enough level of detail.
Here is the bull logo we created in Vector FX and edited in CorelDRAW. To enhance the logo, we used the Ellipse tool to add red ellipse with no outline.
Tip: To place the ellipse behind the bull, right-click on the ellipse and choose Order > To Back of Page.
We also used the Text tool to add the brand name and descriptive text.
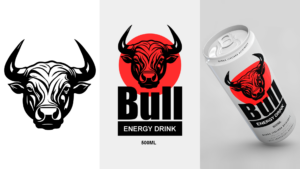
Vector FX is a valuable addition to your graphic design toolkit, allowing you to turn your creative vision into fully editable vector graphics and making it easier than ever to produce custom designs for use in branding, marketing, and other professional design projects.

