
Unleash your creative genius with impeccably realistic pixel-based brushes! Built on world-famous Corel® Painter® brush technology, the Painterly Brush tool combines the best of both worlds—a pixel-based brush tool that is controlled by vector curves.
In this tutorial, we’ll show you how to apply brush effects to existing vector objects and how to draw brushstrokes from scratch. You’ll also learn how to change the appearance of brushstrokes by modifying the size, transparency and color, and how to sculpt and tailor each stroke to perfection by manipulating the vector attributes.
Thanks for watching! You will find a written version of this tutorial below, and a printable PDF copy to download on the Download Resources tab above.
Start your FREE 15-day trial and embark on a design journey with powerful tools for vector illustration, layout, photo editing, typography, and collaboration.
Download these free resources:
Written tutorial (PDF, 821 KB)
CorelDRAW Graphics Suite resources
Quick Start Guide (PDF, 2 MB)
Keyboard Shortcuts (PDF, 3.5 MB)
CorelDRAW and Corel PHOTO-PAINT user guides
For CorelDRAW Graphics Suite subscription and perpetual licenses (2018 to 2024), languages include English, Português do brasil, 简体中文, 繁體中文, Čeština, Deutsch, Español, Français, Italiano, 日本語, Polski, Русский
CorelDRAW Community
CorelDRAW learning center
Facebook
X (formerly Twitter)
YouTube
What’s new in CorelDRAW Graphics Suite
CorelDRAW tools
Adding effects
 CorelDRAW Graphics Suite
 Ultimate Vector Bundle Vol. 1
 CorelDRAW Standard 2021
 Ultimate Vector Bundle Vol. 2
 Corel Vector
How to use the Painterly Brush tool
In this tutorial, we’ll demonstrate how to use the Painterly Brush tool, a graphic design game-changer that was introduced in CorelDRAW® 2024.
Unlike brush tools in other applications that are either vector-only or pixel-based only, the Painterly Brush tool combines the best of both worlds—a pixel-based brush tool that is controlled by vector curves.
Built on world-famous Corel® Painter® brush technology, this tool combines the realistic, organic textures and natural brush effects of pixel-based objects, meaning raster and bitmap images, with the easy editing, manipulation, scaling, and non-destructive quality of vector objects.
Click on any of the images below to view full-size.
Exploring the Painterly Brush tool
The Painterly Brush tool is now the first tool in the Artistic Media tool group and uses the J shortcut key. When activated, the property bar features a Brush picker, which lists dozens of brushstrokes in several categories.

The wide array of curated brushes includes textures of oils and acrylics, the graceful flow of watercolors, intricate detailing of airbrushing, dry mediums of pencils, pastels, chalks, and markers, as well as digital effects and physics-inspired particle brushes.
Each category can be expanded and collapsed by clicking the arrows to the right of the category name. Hovering over each brush displays a stroke preview below the list.
The property bar also has controls for Brush size and Transparency, and a Clear Brushstroke button which removes a brushstroke and returns the curve to a plain vector object.
In addition, you can toggle the Bounding box button on or off to show or hide the bounding box around brushstrokes.

Applying Painterly brushstrokes to objects
The Painterly Brush tool can create curves from scratch, or it can be applied to existing paths, curves, and shapes created with a wide variety of drawing tools.
As an example, we’ll select the white curve with the Pick tool, and then activate the Painterly Brush tool. From the Brush picker, we’ll select the Quirky brush in the Oils category. The effect is applied, at the default size, color, and transparency for that brush.
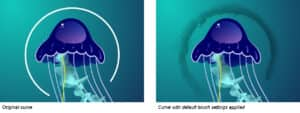
We’ll use the property bar controls to change the Brush size to 1.5” and the Transparency to 50%.
NOTE: Because the Painterly Brush tool produces bitmap images, the document resolution will affect the amount of detail and image quality of the brushstrokes. Consider your intended output (print or digital display) and choose the appropriate document resolution before you begin.
The color of the brushstroke is set according to the curve’s outline color.
- For Windows users, right-click a color swatch in the color palette (we chose Ice Blue).
- For Mac users, right-click on a swatch and choose Set Outline Color.

Next, we want to add a Painterly effect to the yellow curve to create a second jellyfish arm. If we click on the first arm with the Painterly Brush tool, we can see on the property bar which brush was used (the Silk Flower brush in the Particles category) and its Brush size (0.07”) and Transparency (33%) settings.
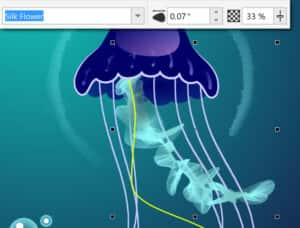
To apply the same effect to the yellow curve, select the curve with the Painterly Brush tool and locate the brush in the Brush picker. Adjust the Brush size and Transparency settings and set the color to match the first arm.

Removing Painterly brushstrokes
Painterly brushstrokes can be removed easily: select a brushstroke with the Painterly Brush tool and then click the Clear Brushstroke button on the property bar.
Clearing a brushstroke removes not only the brush effect, but also the outline properties of the object. Once the outline properties are removed, the original curve will be invisible if it also had no fill properties, but you can still find and select it in the Objects docker/inspector.
To make the curve visible again, select it with the Pick tool and adjust the Outline width setting on the property bar.
Creating new Painterly brushstrokes
You can also draw new brushstrokes from scratch. As an example, we will add another arm to the jellyfish.
We’ll choose the Silk Flower brush again and set the same brush properties as before. Click and drag to draw a brushstroke, releasing your mouse button to finish the stroke.

Changing default brush properties
If you want to draw multiple brushstrokes with size, transparency, and/or color properties that are different than the default brush properties, you can set new brush defaults. This will save you the time and effort of having to change the properties of each new brushstroke you draw.
To change the default Brush size or Transparency, select the brush and change these settings on the property bar before you begin drawing.
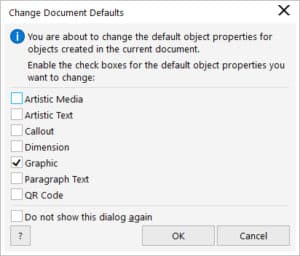
To change the default brush color, click a blank area in the drawing window with the Painterly Brush tool to ensure no objects are selected, then right-click a color swatch on the color palette. In the Change Document Defaults dialog box that pops up, make sure Graphic is checked and click OK.
You can also use the Painterly Brush tool to create texture or background effects. As an example, we’ll use the Sprinkle brush from the Airbrushes category to draw a spray of small bubbles to enhance the larger bubbles. For this effect, we changed the Brush size to 1.5” and the Transparency to 50%.

Modifying brushstrokes with the Shape tool
As with any vector object in CorelDRAW, you can use the Shape tool to modify Painterly brushstrokes that have been drawn from scratch or applied to an existing object. Select the Shape tool in the toolbox and then select a brushstroke, such as one of the jellyfish arms. You’ll see small nodes along the length of the arm. Now you can add or delete nodes, move nodes, and use nodes to adjust the path of the brushstroke. With each change, the brushstroke updates according to the new vector path.

Adding Painterly brush effects to text
The Painterly Brush tool can also be used to add effects to artistic and paragraph text. In this example, we’ll select the artistic text “Ola Bonjour Hello” with the Painterly Brush tool. We’ll chose the Fairy Dust brush from the Digital Effects category and adjust the Brush size (0.1”), Transparency (50%), and color (white).

If you edit the text or change text properties such as font, size, and other formatting options, the brushstroke updates accordingly.
Whether you are adding simple strokes to your projects or bringing complex artistic concepts to life, the versatile collection of Painterly brushes offers a drawing experience that encourages innovation and self-expression in every design pursuit. Give it a try today!
Start your FREE 15-day trial and embark on a design journey with powerful tools for vector illustration, layout, photo editing, typography, and collaboration.
